Creating a New AI Interviewer
If you or an Organization Admin have configured your customer-facing terms and conditions and AI Interviewer global settings, it's time to start creating AI Interviewers. You can create an AI Interviewer from scratch, import a job posting to have an initial draft created for you, or copy from an existing AI interviewer as your starting point.
If you have not yet completed the global setup steps, see AI Interviewer Global Setup.
Follow the steps below to learn how to create an interviewer, design the interview, validate, and add to job interview plans.
Step 1: Create the AI Interviewer
To begin, follow the below steps:
- Navigate to Admin > Interviews & Scheduling > AI Interviewers > Interviewers tab.
- Select + New Interviewer on the top right side.
- Give the interviewer a descriptive name. This is the name your team sees in Ashby and is not visible to candidates.
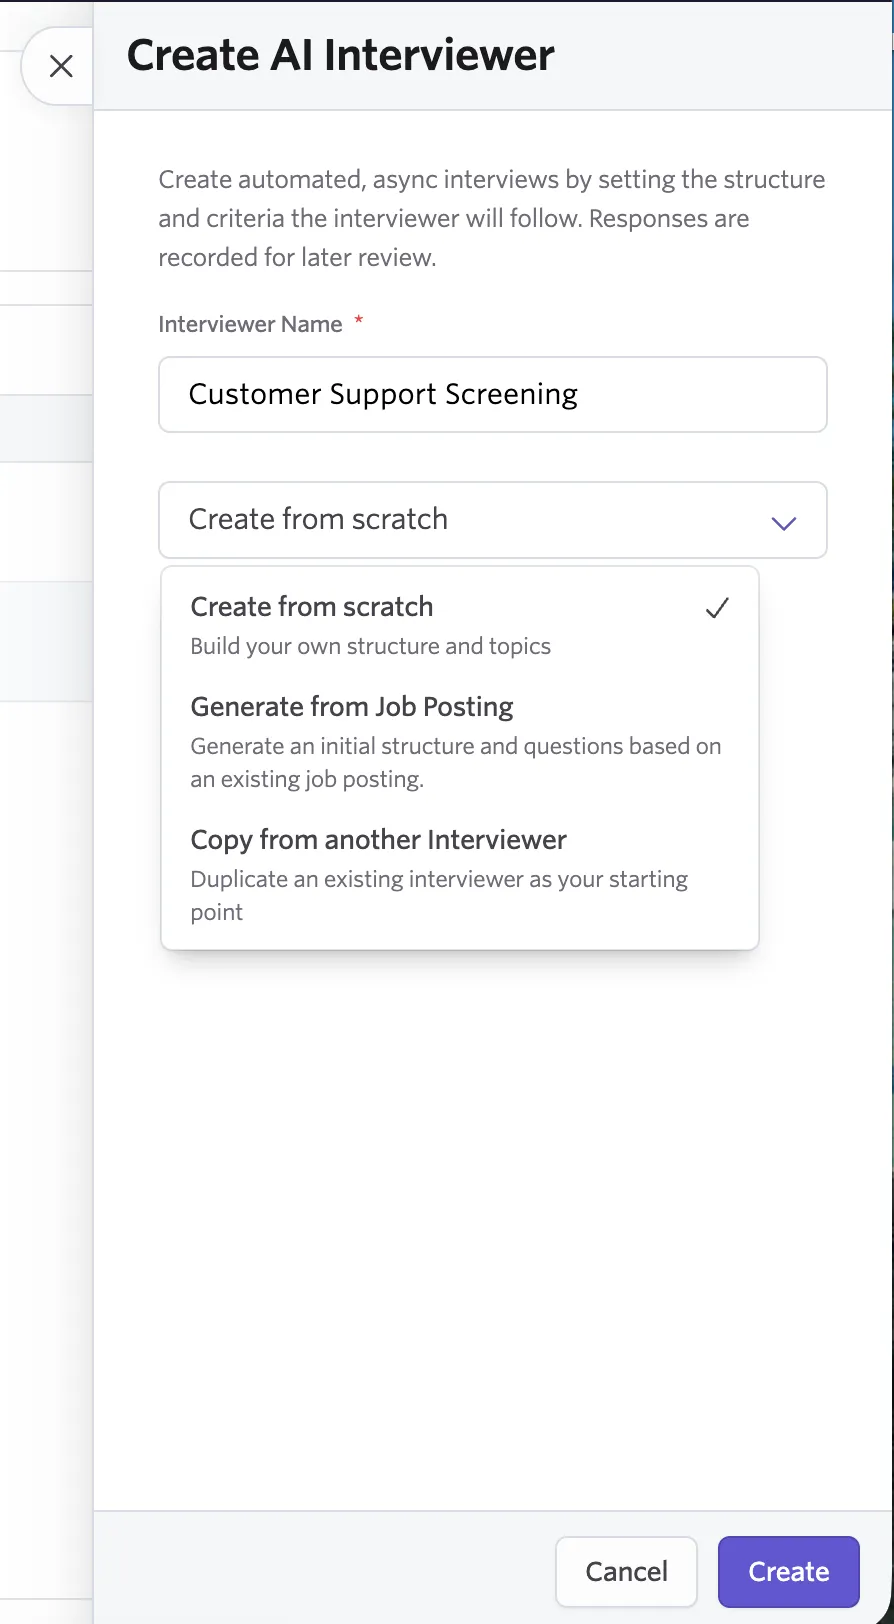
- Next, choose one of the following options to design your interview flow:
Start option | What it does | What else you provide |
|---|---|---|
Create from scratch | Builds your own structure and topics. You get the starter sections described below and fill them in yourself. | Nothing else. |
Generate from Job Posting | Generates an initial structure and questions based on an existing job posting. | Job Posting, and an Interview Duration: Short (around 10 minutes), Medium (around 20 minutes), or Long (around 30 minutes). |
Copy from another Interviewer | Duplicates an existing interviewer as your starting point. Only appears once your organization has at least one AI Interviewer. | Copy from (the source interviewer), and Interview version if the source has more than one — the default version is tagged. |
- Move to the next section to review the generated outline and adjust it for the role.
Step 2: Edit the interview outline & settings
Regardless of the option you choose, every outline follows the same top-to-bottom shape:
Introduction → Minimum Qualifications → Core Interview → Wrap Up
These zones can be populated with sections and topics that you can edit, delete, or reorder. The table below covers the purpose and rules for each zone.
Zone | Purpose | Editing Rules | Topic Types Accepted |
|---|---|---|---|
Introduction | Candidates are greeted and asked to confirm their name. Always runs first. | Pinned. No topics and no settings. | — |
Minimum Qualifications | Screening topics that check whether a candidate meets basic requirements for the role — dealbreakers like certifications, work authorization, or availability. Not meeting a requirement ends the interview and moves to Wrap Up, but doesn't reject the candidate, and a person still reviews the interview. This section is skipped if no topics are added. | Pinned. Exactly one per version, always directly after Introduction. Cannot be moved or deleted; can be renamed. Add and reorder topics. | Criteria and open-ended |
Core Interview | The main body of the interview: competency evaluations, behavioral questions, and role-specific scenarios, grouped into sections by theme. Sections are the only ones you create yourself. | Add, rename, delete, and reorder sections freely — except the last remaining section cannot be deleted. Add and reorder topics within sections. | All three topic types |
Wrap Up | A closing section where candidates can ask their own questions. | Pinned. Created automatically and always last. Cannot be created, renamed, moved, or deleted. Must keep at least one topic. Topics cannot be moved in from other sections. | Open-ended only |
In each zone, topics can be dragged into the order in which the AI interviewer should cover them by clicking Reorder on the right side of the topic, and dragging the section or topic in the list that appears.

The Reorder button only appears when there are two or more sections or topics.
Sections
Sections group related topics together and control the flow of the interview. The only sections you create yourself are the ones inside Core Interview.
To add a section, use + Add Section in the Core Interview header. Rename them to something descriptive, such as “Technical Background” or “Culture & Values.”
Choosing a topic type
These topic types are available to be added to zones and sections:
- Criteria: Use for a requirement the candidate either meets or doesn't meet. Define whether the candidate must answer yes, must answer no, or meet custom criteria.
- Open-ended: Use for a free-form question that Ashby summarizes without assessing against an evaluation band.
- Competency: Use for a skill-based question that Ashby assesses against evaluation bands.
Tips
- We recommend five to eight topics for a screening interview with one idea per topic.
- For competency topics, describe an observable ability and the evidence you want the candidate to demonstrate.
- For criteria topics, make sure the requirement resolves to a clear pass or fail.
- Consider grouping related topics into sections and putting dealbreaker questions first. Use minimum qualifications only for objective, job-related requirements, and avoid questions that local law restricts, such as criminal or salary history.
You must have at least one valid topic in the Minimum Qualifications zone or a Core Interview section plus the Wrap Up topic to publish an AI Interviewer.
Criteria topics
Use criteria topics for minimum qualifications or other requirements with a clear outcome. These will most commonly be used in the Minimum Qualifications zone, where a failed answer results in the end of the interview. Criteria questions can be used in the Core Interview zone as well, but a failed answer will not result in the end of the interview.
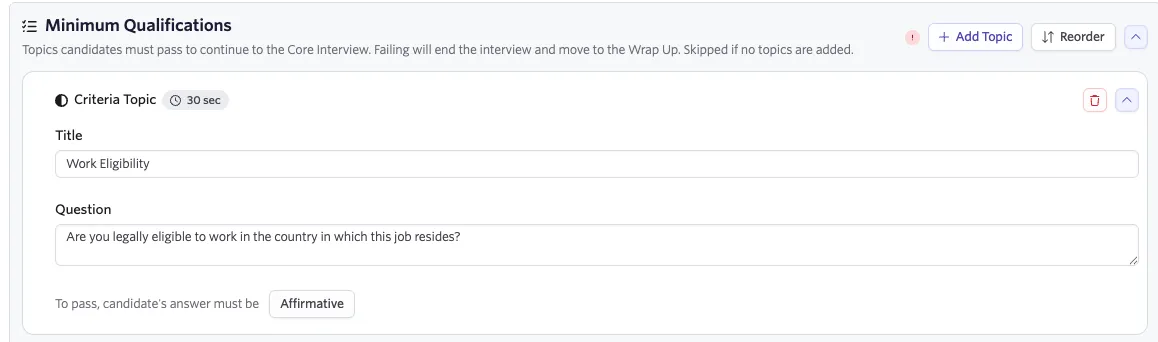
- Title: Add a descriptive topic title. This is an internal label.
- Question: Enter the question you want the AI interviewer to ask.
- Select whether the candidate must answer yes (select Affirmative), must answer no (select Negative), or meet custom criteria (select Custom Prompt).
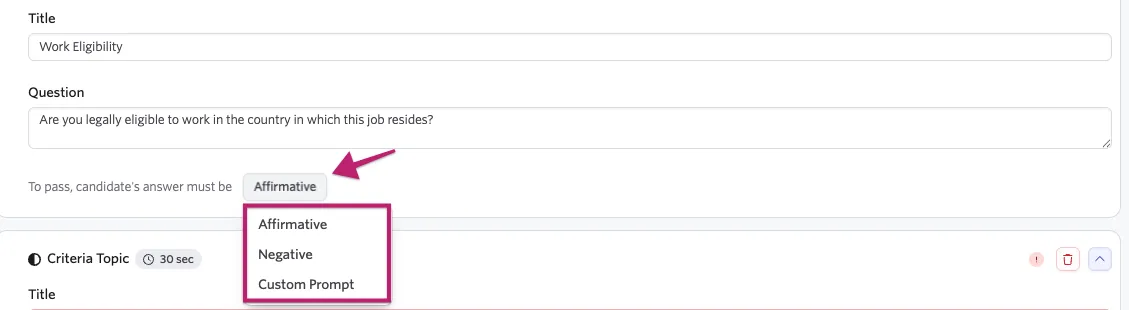
- If you select Custom Prompt, describe the requirements that must appear in the candidate's answer. This can be used to define a specific salary or salary range the candidate must be within.
Keep each criterion focused on one requirement. Clear criteria help the AI interviewer evaluate responses consistently.
Open-ended topics
Use open-ended topics when you want additional context or a summary without followup. The AI asks the question, captures the response, and moves on. This topic type can be added to the Minimum Qualifications, Core Interview, and Wrap Up zones.
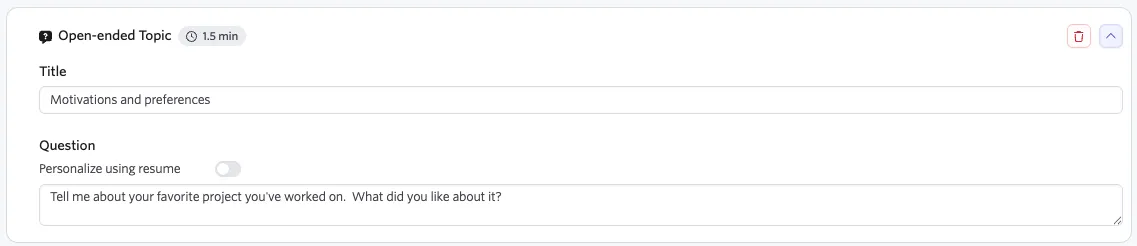
- Title: Add a descriptive topic title. This is an internal label.
- Question: Enter an open-ended question.
- Toggle on Personalize using resume if you want the AI interviewer to use relevant information from the candidate's background when asking the question.
- Review the topic and confirm that it does not require a pass or fail decision.
Open-ended topics work well for motivation, role interest, or other questions where the hiring team wants additional perspective.
Competency topics
Use competency topics to assess a specific skill or capability. This topic type can only be added to the Core Interview zone.
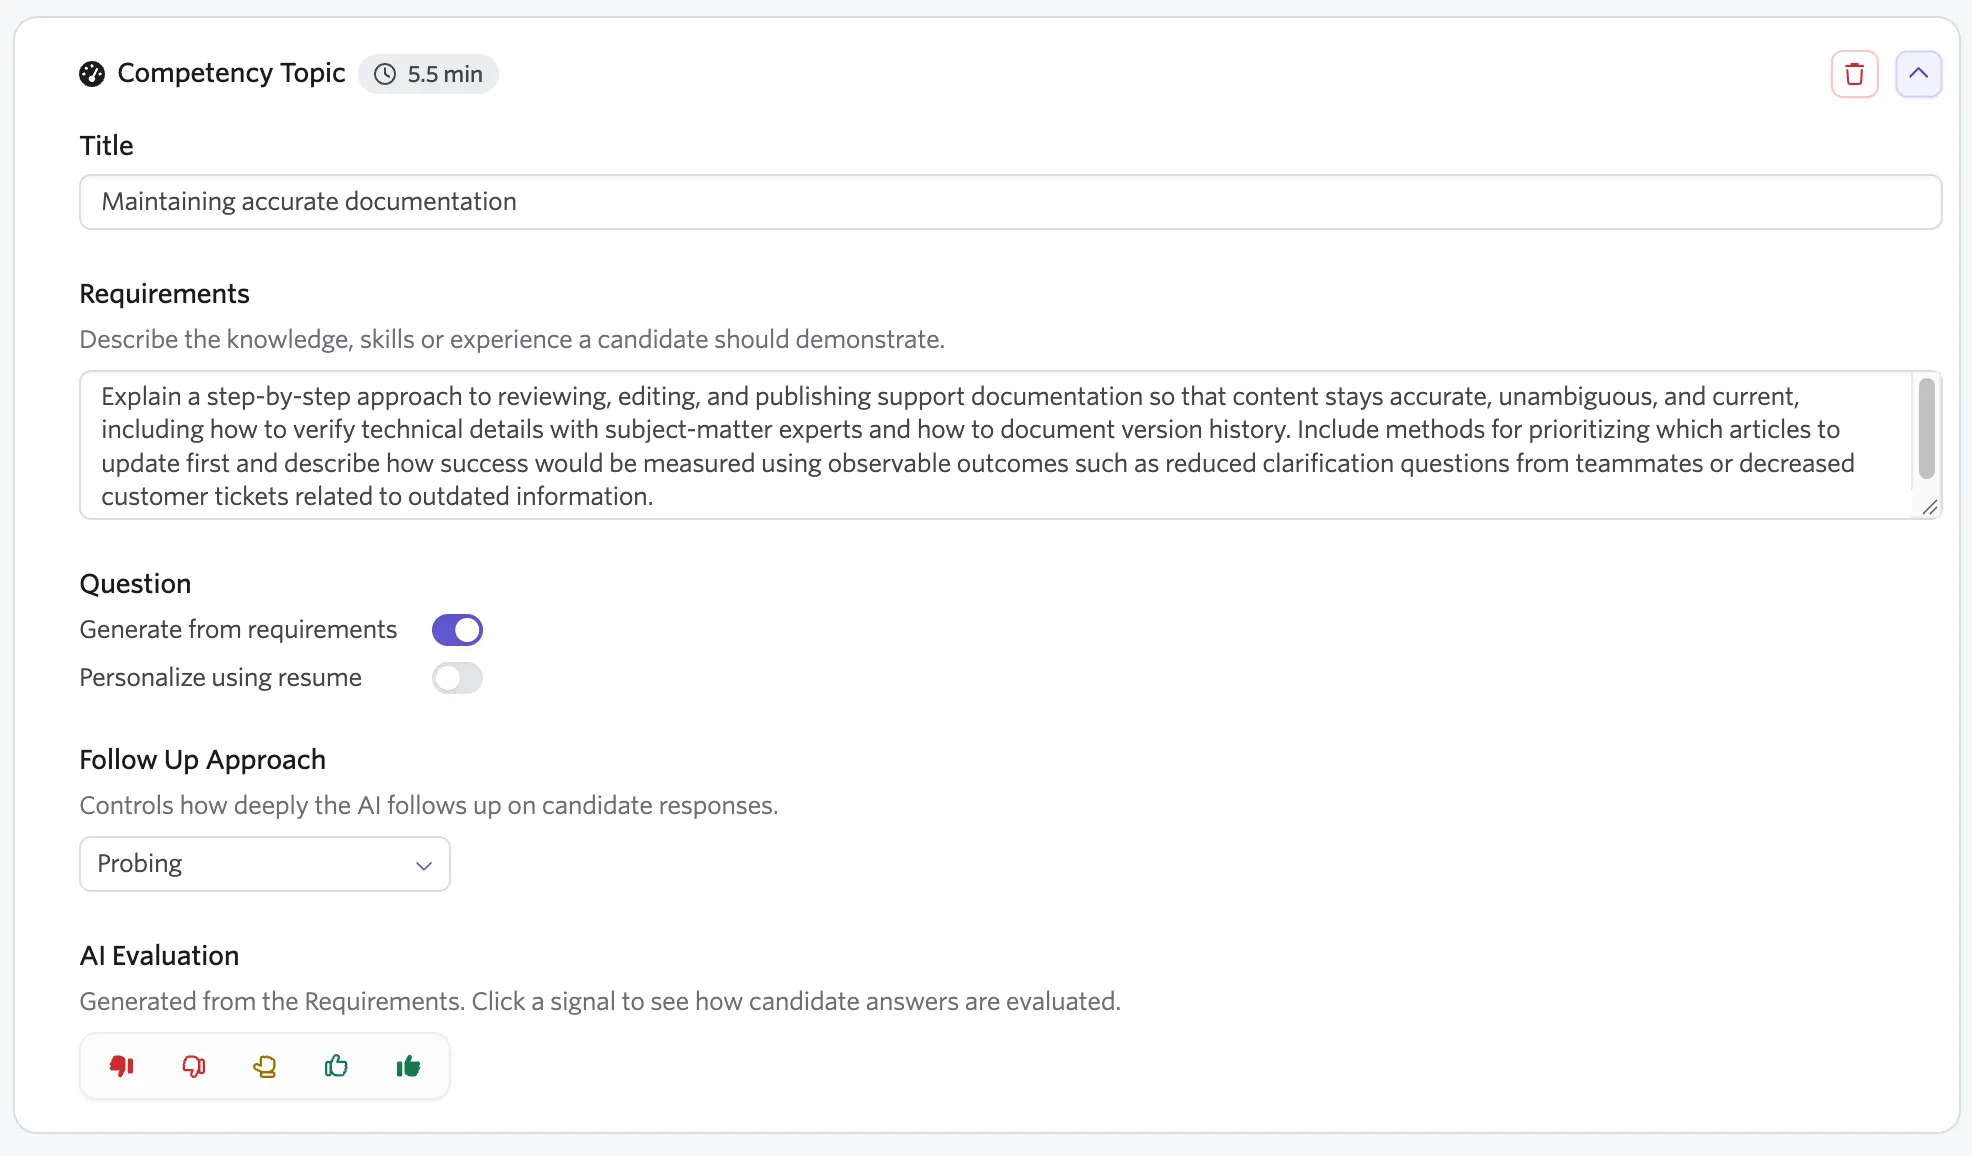
- Title: Add a title that identifies the competency. This is an internal label.
- Requirements: Describe the knowledge, skills or experience a candidate should demonstrate. This field is required; it is what the question and the evaluation rubric are generated from, and what the AI evaluates against.
Use specific, observable requirements. The requirement helps Ashby generate a relevant question and evaluate the candidate's response.
- Toggle on Generate from requirements to have Ashby generate the question based on the requirements. If this if off, you enter the exact question.
- Toggle on Personalize using resume if the question should reference relevant information from the candidate's background.
- Follow Up Approach:
- Minimal: Only ask follow-ups when the initial response is very vague or incomplete.
- Probing: Ask a small number of follow-up questions (typically one or two) before moving to the next topic.
- Deep dive: Ask several follow-up questions to explore the requirement in more depth.
- AI Evaluation: You can click each of the five thumb levels under AI Evaluation to review the generated evaluation bands, indicators, and sample answers. These levels, from left to right, correspond to: Strong concern, Concern, Mixed signal, Positive signal and Strong signal.
The five evaluation bands are generated automatically and cannot be rewritten by hand. The only way to get new evaluation bands is to edit the Requirements field — doing so triggers regeneration, and the strip will show "Evaluation bands are updating…" while that happens.
Step 3: Configure AI Interviewer settings (optional)
Settings can be configured on the Settings tab of the AI Interviewer.
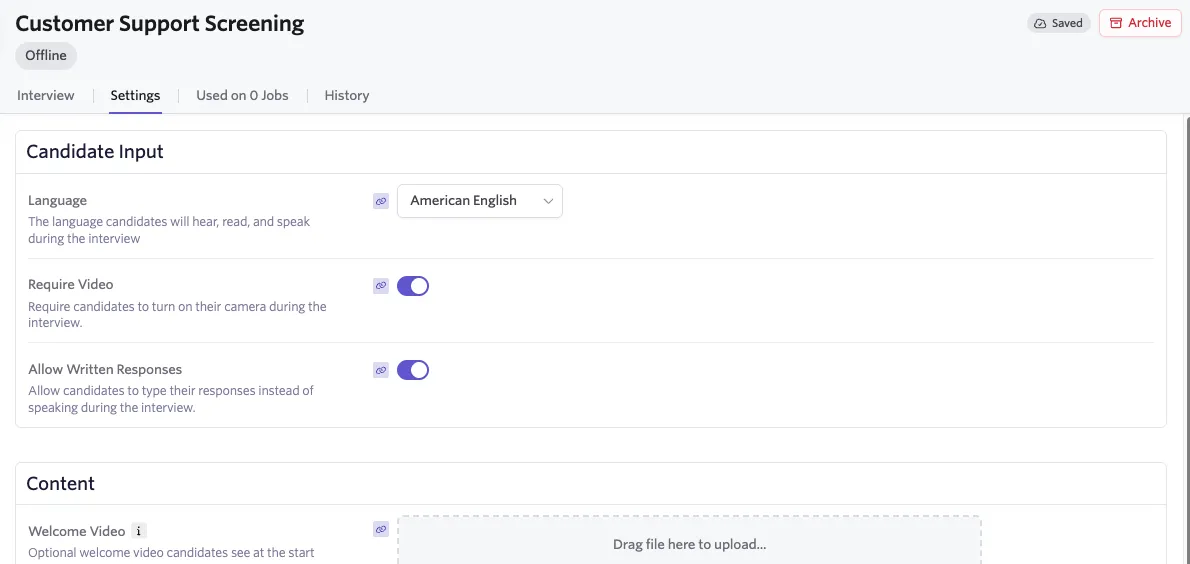
AI Interviewer settings follow a three-level structure:
- Organization defaults
- AI Interviewer settings (you are here)
- Interview-plan activity settings
Settings at a more specific level can override the defaults above them. Therefore, you only need to configure settings on the Settings tab of the AI Interviewer when you want to deviate from your organization defaults, or if organization defaults are not set.
Hovering over the link icon next to a setting indicates where the setting is inherited from.
If you do wish to review or configure settings, see the AI Interviewer Settings Guide for details. Only Candidate Input and Content settings can be configured at the AI Interviewer level. (Invite and reminder settings are configured globally or when you add the AI Interviewer to an interview plan.)
Step 4: Validate the interview outline
How validation works
Validation runs continuously while you edit the interview outline — there is no separate validation step you must run. Shortly after you leave a field, Ashby rechecks that topic: first that its required fields are complete, then an AI review of the wording.
Validation checks for issues such as grammar, spelling, vague or compound questions, criteria that cannot be evaluated, and content that may conflict with Equal Employment Opportunity (EEO) guidelines.
See the table below for an understanding of the validation rules and what might trigger them:
What the review checks | What it flags |
|---|---|
EEO compliance | Content touching protected categories: race, color, religion, sex (including pregnancy, sexual orientation and gender identity), national origin, age 40 or older, disability, and genetic information. Work authorization questions and location requirements tied to legal work constraints are allowed. |
Is it a question | Fragments, placeholders, or statements that will not elicit a response. |
Too many concepts | A single topic bundling several distinct skills or domains — often a comma-separated list. |
Too vague | Unqualified adjectives such as “good” or “strong” that the AI cannot build an evaluation rubric from. |
Relevance | A question that does not match the topic it sits under. |
Binary evaluable | A Custom Prompt criterion that cannot resolve to a clear pass or fail. |
Spelling and grammar | Typos and informal phrasing in otherwise clean fields. |
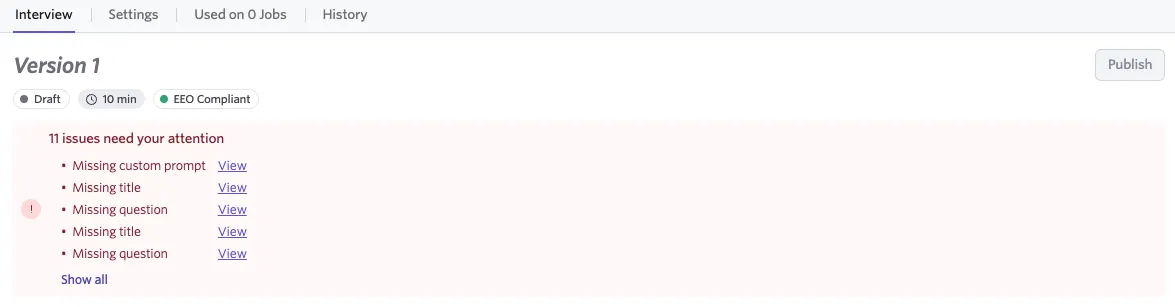
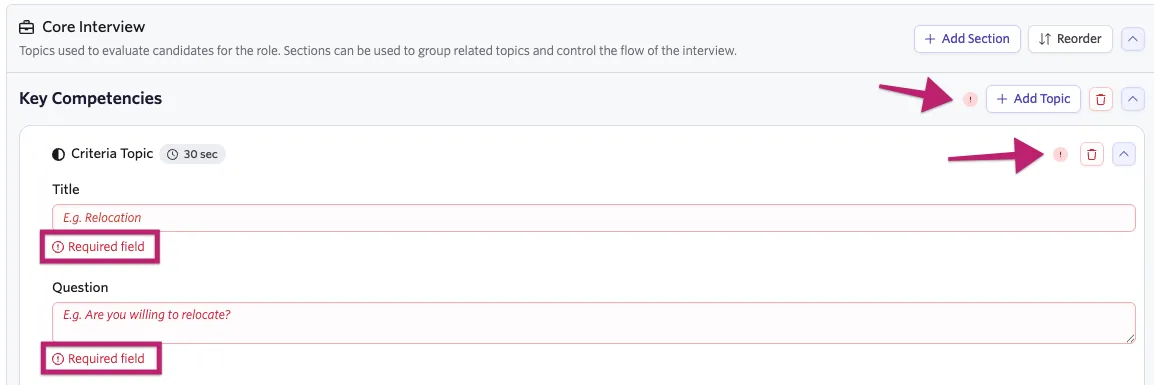
Issues surface in three places:
- A banner at the top of the outline (“N issues need your attention”, with View links that jump straight to the field):
- A red alert badge on the topic card and on the section card containing it, and a red hint beneath the field itself:
Many issues come with a suggested fix you can accept with a single click.
All validation errors must be resolved before publishing is possible. You must either fix it or tick “I understand and accept the risks” on that specific issue. Accepting an EEO issue lets you publish, but the version keeps its EEO Non-Compliant tag so anyone looking at it can see the decision was made deliberately. Accepting an EEO issue is your decision, and we recommend reviewing it with your legal or HR team first.

Error message meanings
The Publish button in the version header stays disabled until the version is ready. Hover over it to see what is outstanding:
Message | What it means |
|---|---|
Fix validation issues to publish | At least one topic still has an unresolved issue. Fix it or accept the risk. |
Wait for validation to finish before publishing | A topic is still being validated. This clears on its own. |
Add at least one valid topic in Minimum Qualifications or Core Interview | The outline has no assessable content yet. |
Step 5: Publish and mark as 'Live'
Publishing a version and making the interviewer Live are two different, but related, things.
- Publishing allows the interviewer to be added to interview plans. This is how AI interviews get assigned to candidates for specific roles. A specific version of the interviewer can be published while other versions are not, but once candidates have been assigned, a version cannot be unpublished.
- Live is a status of the AI Interviewer as a whole, rather than of specific versions. When an AI Interviewer is marked 'Live,' that means candidates are able to take and complete their AI interviews, regardless of which version they have been assigned.
For the purposes of this workflow, we cover how to publish and mark the interviewer Live. For more information on managing interviewer versions, defaults, and publishing, see Managing Versions and Updating Existing AI Interviewers.
To publish your new AI Interviewer and mark it live:
- Ensure all errors have been resolved in the previous step.
- Click Publish in the top right corner.
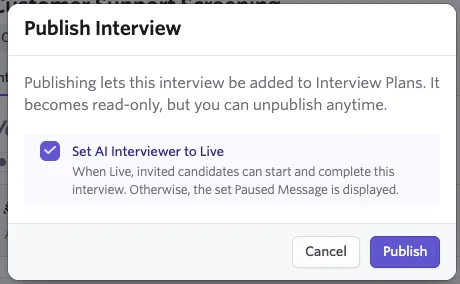
- Check the box to set the interviewer Live and click Publish.
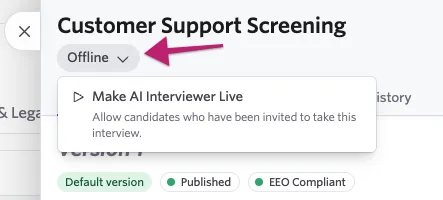
If you opt to make the AI interviewer Live later, you can click the status control in the profile header and choose Make AI Interviewer Live when ready.
Important notes on publishing
- The interview outline is read-only on published AI Interviewer versions. The buttons to add sections, add topics, rename, and delete all disappear, and every field becomes static text rather than a disabled input.
- Making a new AI Interviewer live does not invite candidates by itself. Candidates receive invitations only after you add the interviewer to an interview plan and assign candidates to the relevant stage.
- An AI Interviewer only appears in interview plan pickers once its active version is published. Going Live also requires available AI Interview credits — if your organization runs out, the interviewer pauses itself automatically.
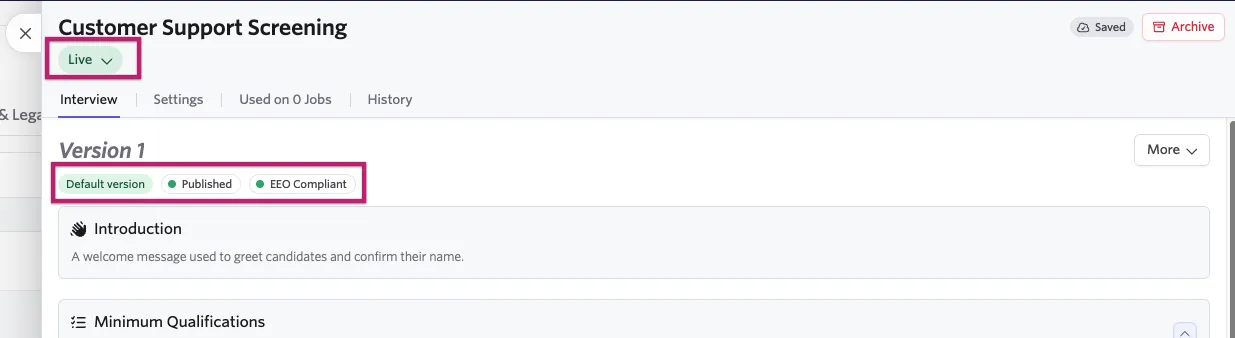
When an AI Interviewer is published and live, status indicators at the top will show it:
Step 6: Add the AI Interviewer to an interview plan
If this is your first time creating an AI interviewer, we recommend testing first to ensure you understand functionality before taking an interviewer live. See Test AI Interviewer Before Launch for these details before proceeding.
The AI Interviewer can be added to the interview plan for a single job, or onto a shared interview plan for multiple jobs, depending on the type of interviewer you configured. Add AI Interviewer as an activity on the stage of the interview plan where candidates should complete the screening interview.
- Open the job's interview plan by navigating to the job and then the Interview Plan tab, or navigate to Admin > Interviews & Scheduling > Interview Plans > Shared Plans tab to update a shared interview plan.
- We recommend creating a new stage for the AI Interviewer under the relevant interview phase. AI interviewers can be added to the Application Review or Active phases.
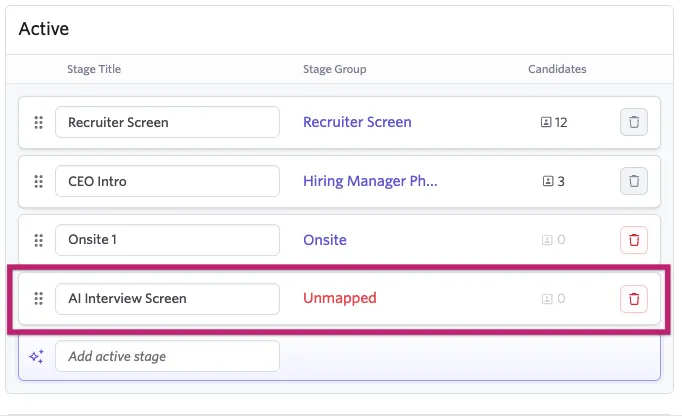
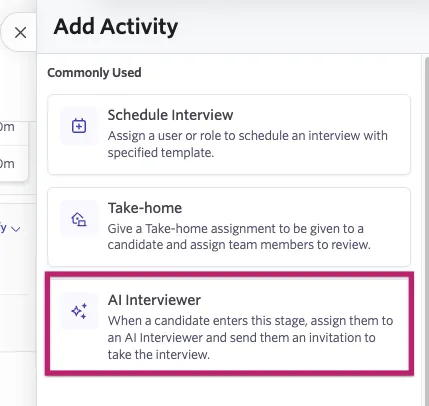
- On the new stage, select Add Activity and then AI Interviewer.
- Select the AI Interviewer and version to use. Since we are adding a brand new AI interviewer, we can leave it set to Default Version. The default version is the version selected by default when a candidate is added to an interview stage with an AI interviewer.
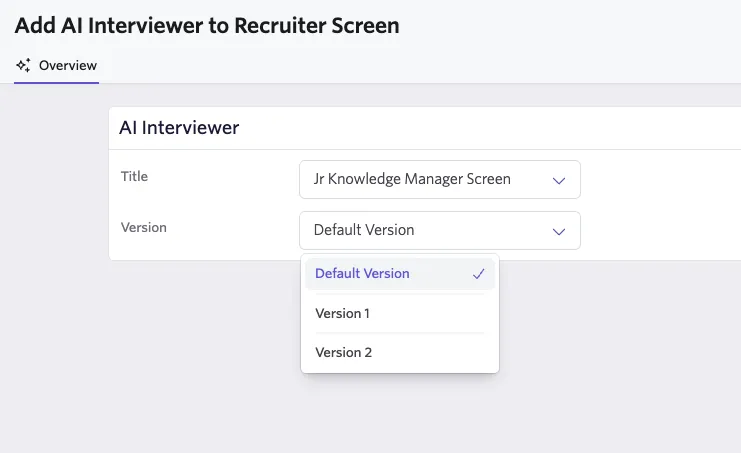
The default version can be changed as needed. See Managing Versions and Updating Existing AI Interviewers for more information.
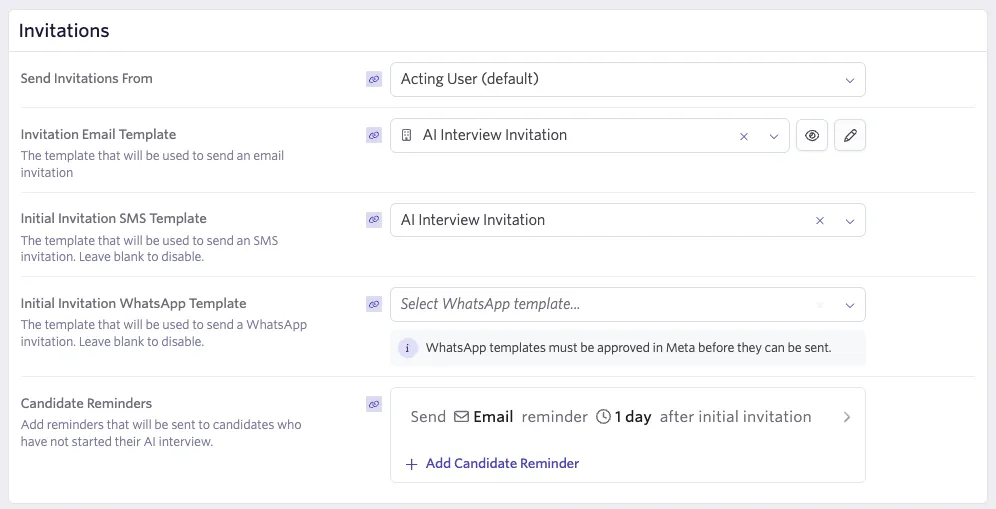
- (Optional) Configure custom invite and reminder settings, or keep the inherited defaults. Hover over the link icon next to each field to see where the setting is inherited from.
- (Optional) On the Settings tab, configure Candidate and Content settings or keep the inherited defaults. Similarly, you can hover over the link icon to see where the setting is inherited from.
See the AI Interviewer Settings Guide for more information on these settings and how to configure.
- On the Assigned Reviewers tab, select an individual assigned reviewer or reviewer group from members of the hiring team.
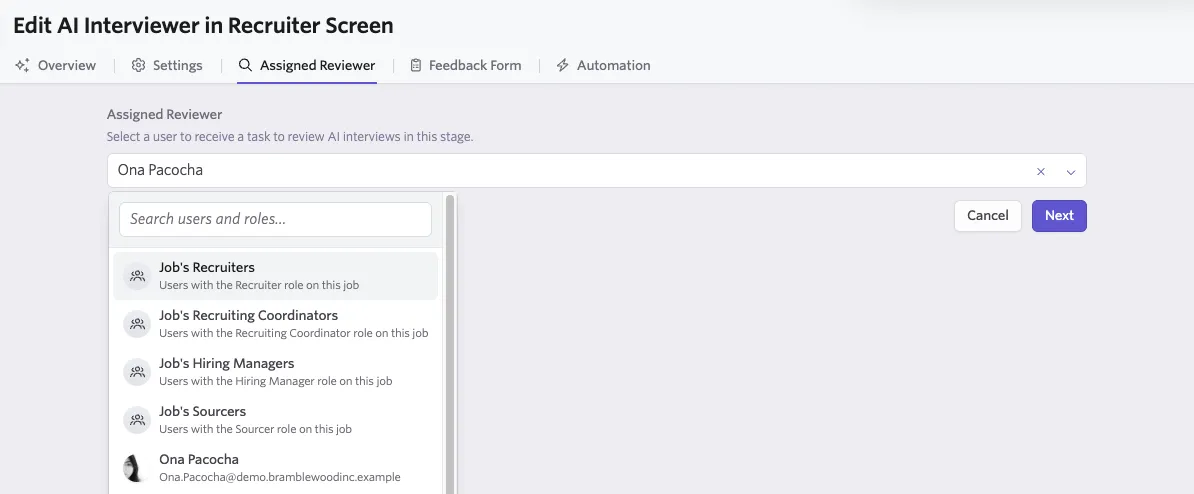
AI Interviewer is meant to support a human hiring decision. A person on your team should review each completed AI interview and decide on next steps. AI Interviewer doesn't make that decision.
- On the Feedback Form tab, select the feedback form for human review.
- On the Automation tab, turn off Invite on stage entry? when creating and testing a new AI interviewer. When automation is on, Ashby sends the invitation when a candidate enters the stage. When automation is off, Ashby assigns the AI Interviewer activity but does not send the invitation automatically. This can be enabled later, when you're ready to send invites or when you want to test the automated invite flow.
If Invite on stage entry is enabled, candidates who are already in the stage will receive invites before you are ready. Best practice for testing includes creating a new stage for the AI interviewer activity to avoid sending mistake invites. Follow our testing steps for more information.
Your AI Interviewer is ready to use when the outline is published, the interviewer is live, and the activity is configured on an interview plan. We recommend following the steps at Test AI Interviewer Before Launch to ensure the AI interviewer flow meets your expectations before launching to candidates.
FAQs
Can I create an AI Interviewer without importing a job posting?
Yes. Create an interviewer from scratch when you already have an interview structure or questions to use.
Does making an AI Interviewer live invite candidates?
No. Making the interviewer live enables it for invitations and interviews. Candidates receive invitations after the interviewer is assigned through an interview-plan activity and a candidate reaches that stage.
Can I change an AI Interviewer after candidates complete it?
Create a new version for changes that could affect an in-flight or completed interview. This preserves the version used for earlier candidates. Learn more in Managing Versions and Updating Existing AI Interviewers .