Bulk Import: CSV Import
The CSV import feature supports creating candidate profiles and openings in bulk by uploading a CSV file containing the details you want to upload. There is no explicit limit to the number of candidates or openings you can upload at once. Ashby uploads large files in batches. Once the upload starts, you can leave the page and return when it is complete. Common use cases for this feature include:
- Migrating candidates from your legacy ATS (if Ashby doesn't support an alternative)
- Uploading your annual headcount plan
- Uploading leads from projects or talent pools in your legacy sourcing tool
When you import very large files (over 100,000 rows of candidates), you may experience a network error. In these cases, we recommend splitting the file into a few smaller files and uploading them as separate CSVs.
Overview
This video is optional viewing. All of the steps are documented below.
Permissions and access
Permissions
- By default, only users with Organization Admin access can complete CSV imports.
- You can grant Elevated Access users the ability to bulk import data if needed. For more information, see Additional User PermissionsAdditional User Permissions.
Step one: Prepare your file
The quality of the data you import into Ashby impacts the quality of data you get out of it. To ensure high quality, we recommend preparing your file before uploading it to Ashby.
Before you start, review the following:
- CSV file requirements
- File uses the .csv file format
- File has headers for every column
- File uses comma delimiters
- File has the same number of columns in every row
- Data quality suggestions
- Data is complete (Are there gaps in your data? If so, consider resolving this before importing)
- Data is accurate (Is this data correct?)
- Data is relevant (Are there data points that don't add to your knowledge about the candidates? If so, consider archiving outside of Ashby)
- Data is timely (Is this historical data that will be frustrating to filter out later? If so, consider archiving outside of Ashby)
- Additional tips
- Use Google Sheets' cleaning tools
- Make sure there isn't any formatting, just data
- Make sure there isn't any unexpected metadata at the top or bottom of the file
- If you are importing information into a custom checkbox field (for more on custom fields, see Custom FieldsCustom Fields), be sure to use a semicolon if you are adding multiple values (for example, Remote; In-Office; Hybrid)
You can use the following templates as a starting point (optional):
Step two: Import a CSV file
Once you're ready to upload your data, you do so in four stages:
- Upload your file
- Mapping
- Starting the Import
- Summary
Import
To import a file:
- Navigate to Admin > Data Management > Bulk Data Import.
- Click Upload CSV in the top right corner of the page.
- Select the import type, then locate and select the file to import.
- Determine the import settings (if applicable), then move on to mapping the data.
Mapping
The mapping step allows you to match any structured field to a corresponding column in your file. If there are columns you don't want to upload, ignore them by clicking the Ignore this column button, and the importer skips them. Check that all fields you'd like to import have been mapped. If a field defaults to being ignored, click Select Field on Candidate to determine the field the value should be mapped to.
Once you've mapped your fields, click Start Import to kick off the import.
Once you've initiated an import, it can take some time to complete. There are no explicit limits on the number of candidates or openings you can upload at once. If your list is large, Ashby uploads your data in batches and it takes longer to complete. You can leave the page and come back later once an upload finishes.
Summary
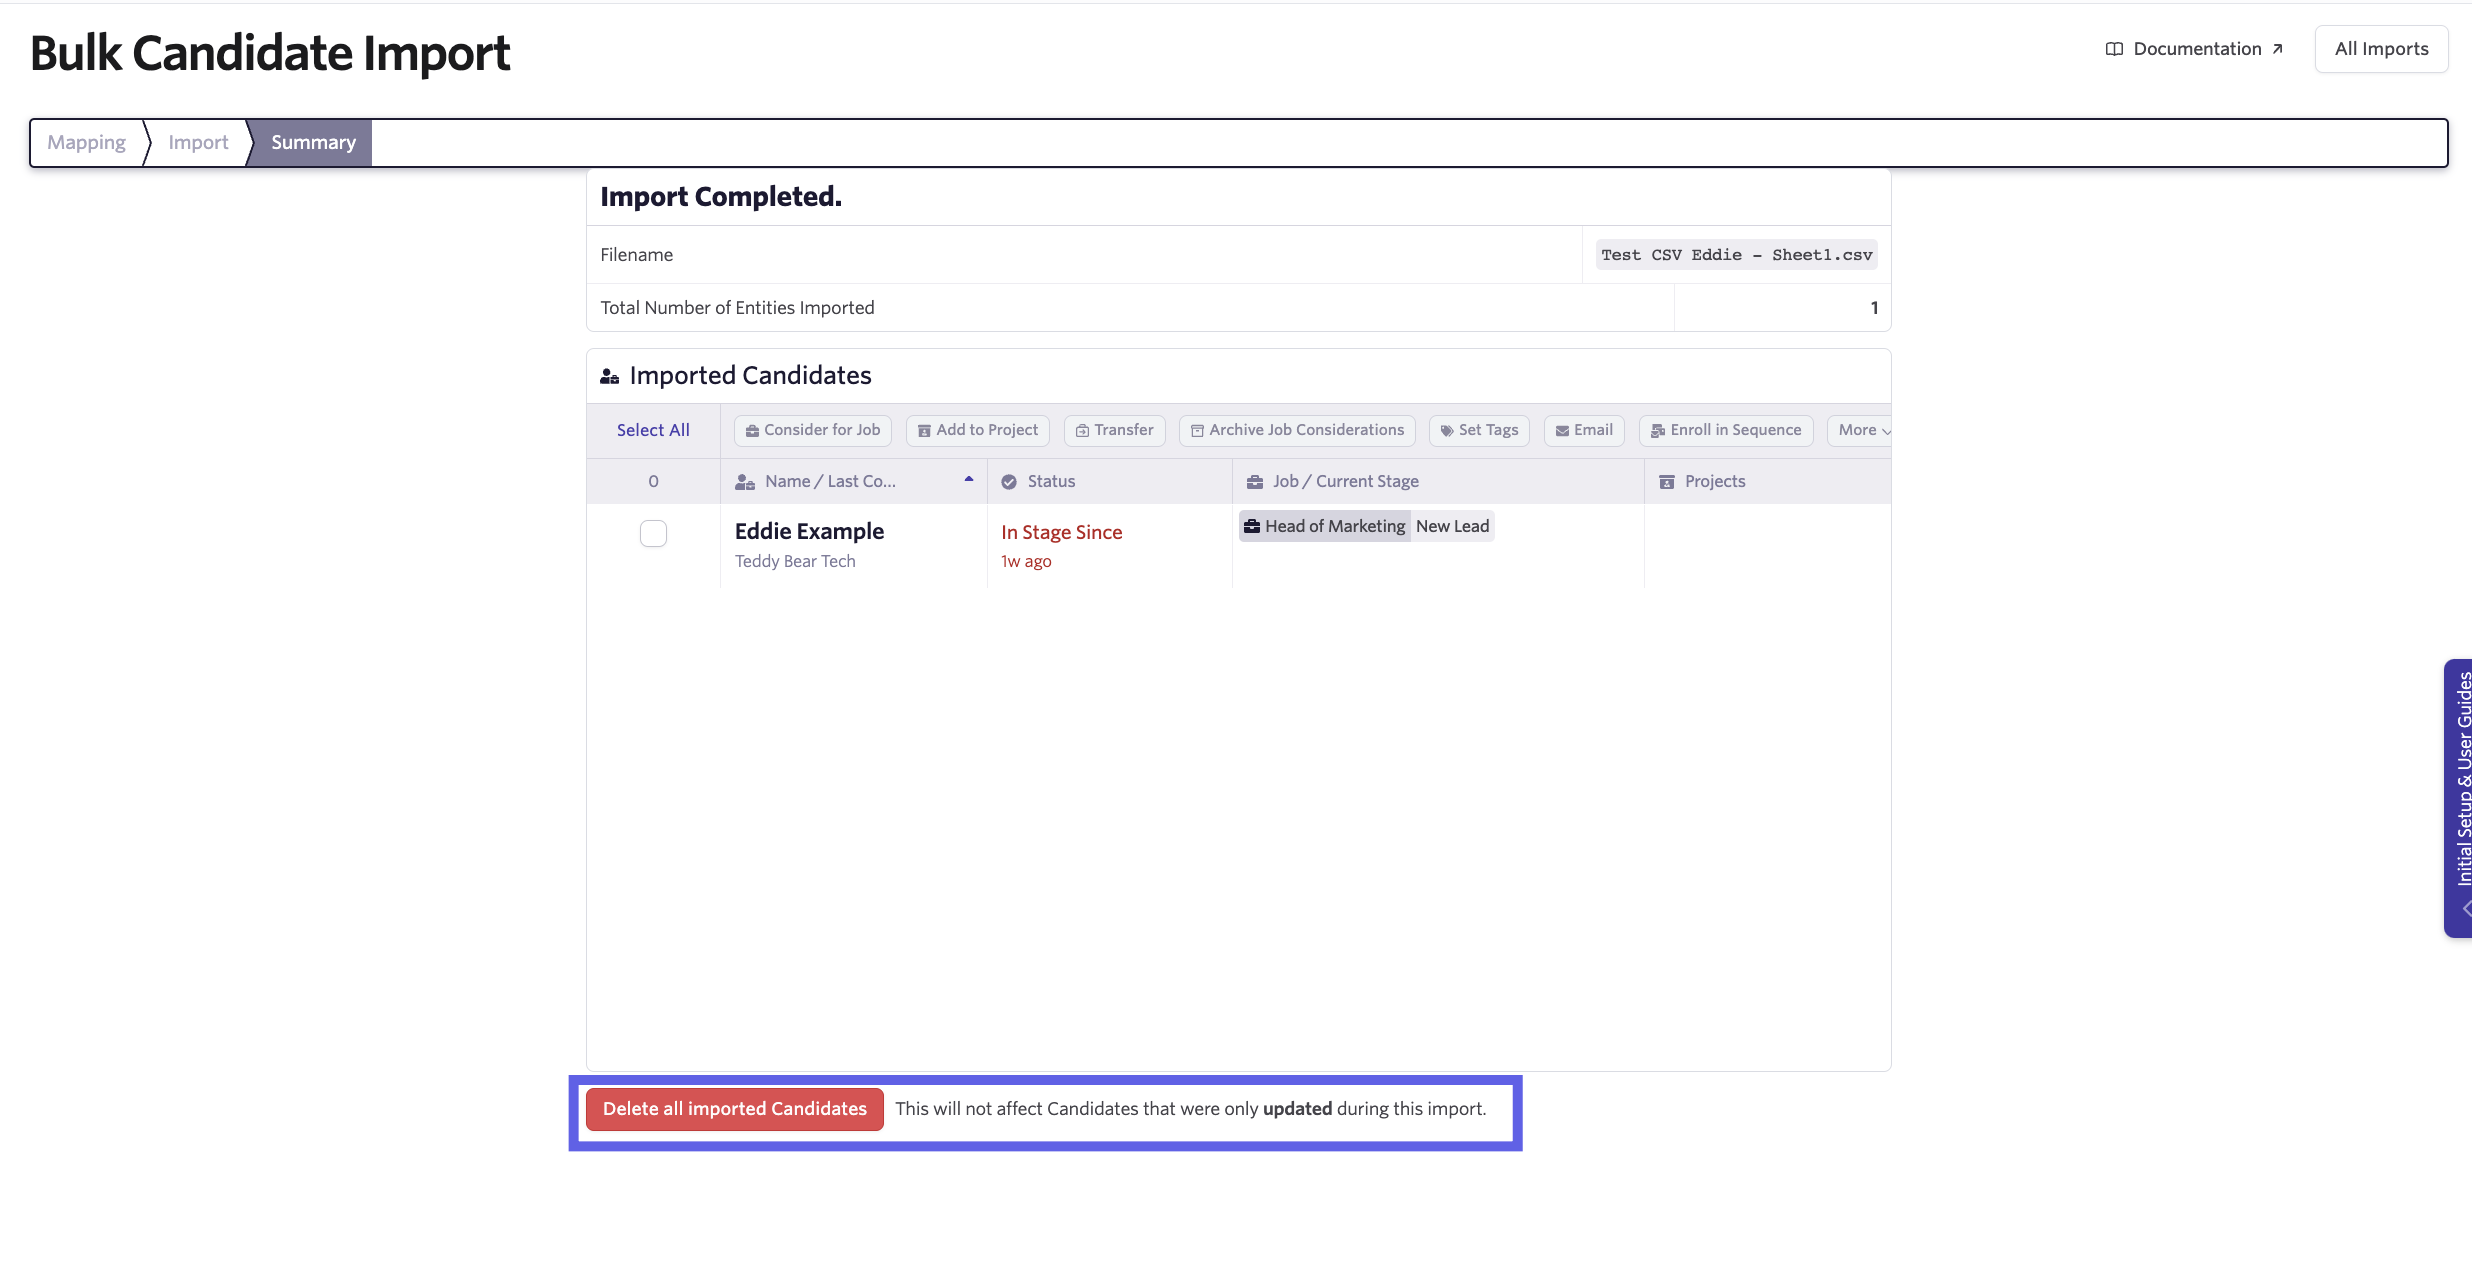
The summary view shows a list of the entries you've uploaded and any skipped due to errors. For candidates, you have a variety of bulk actions you can take on the candidate profiles that are generated.
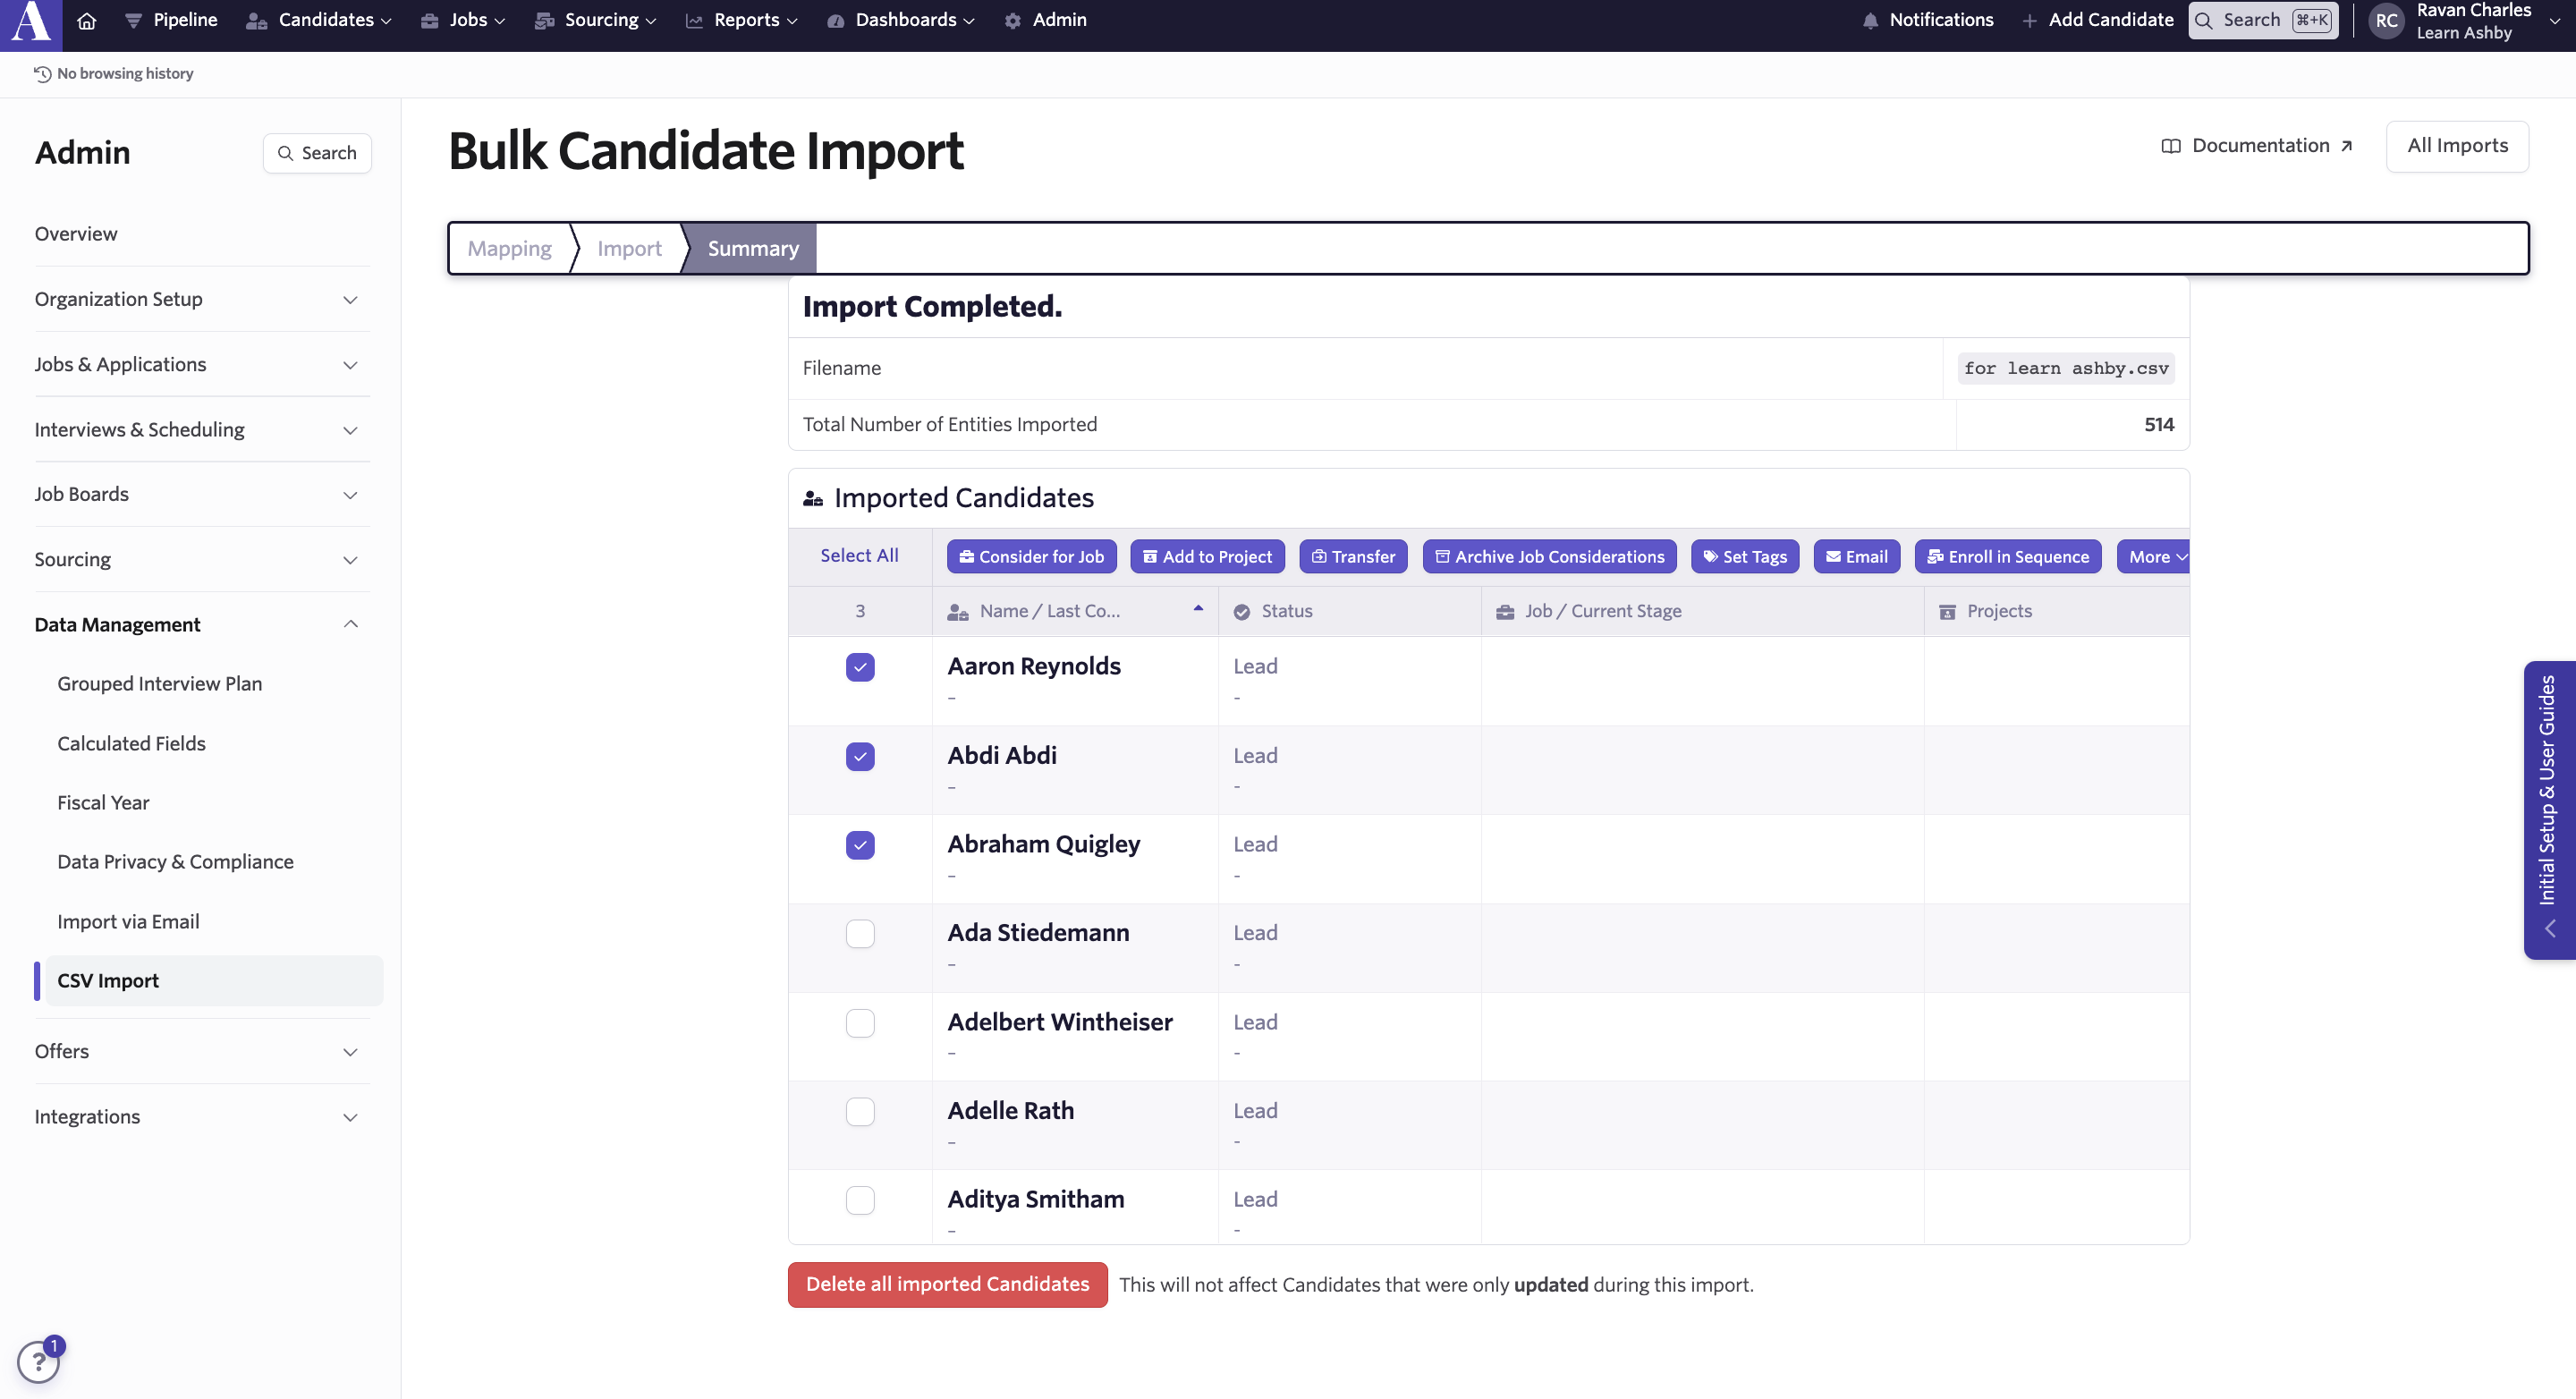
If there's an issue with the upload, you can delete it with the Delete All Imported X button.
What you can import via CSV
Candidates
Using this option creates individual candidate profiles. To upload or update candidates using a CSV file:
- Click Upload CSV in the Bulk Upload section of Admin, then select Candidatess.
- Select your CSV file to start uploading it.
- Determine the Import Settings
- Import Mode: This setting allows you to determine whether the import should only create new entries, only update existing entries, or both create new entries and update existing ones.
- Enable email enrichment? You have the option to enrich profiles with emails in bulk. This option requires the candidate name and LinkedIn URL to be included in the import.
- Only match open jobs: By default, Ashby only maps applications to open jobs, but you can uncheck this checkbox to map applications to all jobs.
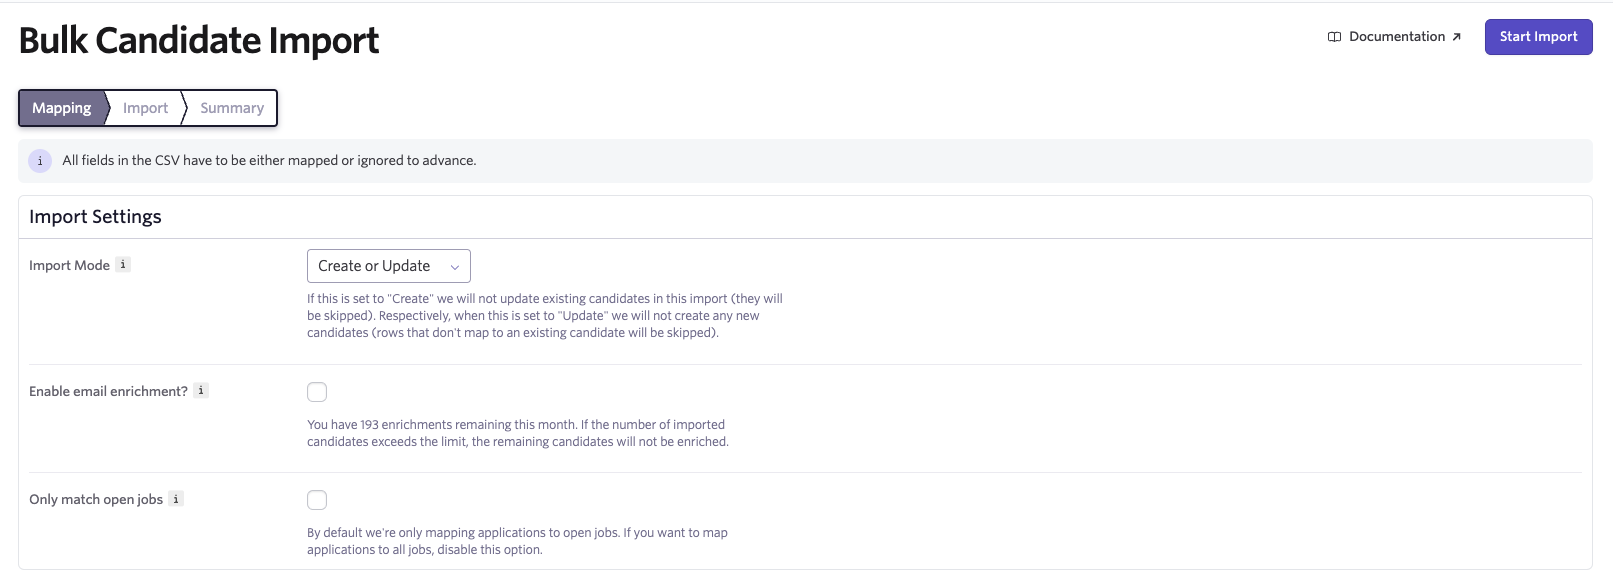
- Click Start Import.
Many structured data fields can be uploaded, so review the upload options in Ashby before completing your upload. If you're unsure, confirm by reaching out to [email protected].
The following fields can be imported:
Fields | Description |
|---|---|
Name | Candidate's Full Name; we also support separate first and last name options. |
Current Employer | The candidate's current employer. |
Current Job (Position) | The candidate's current job title. |
Email Address (Personal, Primary) | The candidate's email address. |
Phone Number (Personal, Primary) | The candidate's phone number. |
Tag(s) | Either apply existing tags you have in Ashby or create new ones and apply them to this candidate. |
Social Profile URLs(s) | URLs for social profiles like LinkedIn, Twitter, Github, and portfolios. |
Source Type | Top-level source, Ashby's default options include Inbound, Internal, Sourced, Referral. Required to apply a source. |
Source | Sub-source, required to apply a source to a job consideration. |
Credited To | Email of the user who sourced this candidate. |
Job | This is the job they are/were considered for. Required to apply a source. |
Current Interview Stage Name | Current stage the candidate is in for the job they are/were considered for. |
Project | Talent pool or list of candidates you're not actively considering. |
Importing candidates: best practices
- To import data like the job and stage a candidate is associated with, or the source of their application, you first need to ensure that information exists in Ashby:
- If you'd like to include your candidate's source, you must include both a Source Type and a Source column in your file. Source Types are top-level values that Sources are nested under to simplify reporting. To add a source, you must also include a source type. These should already be added on the Sources page in Ashby Admin before importing.
- If you'd like to upload candidates to specific jobs, those jobs must be set up in Ashby first. By default, Ashby only maps applications to open jobs, but you can uncheck the Only match open jobs checkbox to map applications to all jobs. The name of the job in Ashby must exactly match the name of the job in the CSV. You can archive any historical jobs once the import is complete.
- When adding or updating existing candidates, ensure that each row contains the candidate's name and an identifying field. An identifying field can be an email address, a phone number, or a social profile URL (LinkedIn or GitHub).
- If two rows contain the same identifying data (for example, two candidate rows having the same email address), you get an error. Ensure that each candidate is listed only once in the CSV file to avoid this issue.
- If importing any dates as part of your candidate data, the date/time should be an ISO 8601-compliant string (e.g., 1982-05-25, 2017-04-22T20:47:05.335-04:00).
- If you have any concerns about your data quality before importing, we suggest starting fresh with Ashby and archiving your historical candidates' data somewhere you can find it.
- If you are importing hired candidates, you cannot import data like the Hired At date or other offer information directly into offer fields in Ashby.
- You cannot upload feed data like emails, feedback forms, applications, resumes, and surveys using the bulk CSV import feature.
Candidate attribution
Credited To and Source are collectively known as the "Attribution" fields. Candidates may have attribution fields. Individual applications may have attribution fields. They may not necessarily be the same. The candidate's attribution fields are intended to be the original source for that candidate's entry into Ashby. Therefore, Ashby attempts to keep the candidate source from updating as you consider candidates for new jobs or make changes to applications. In those cases, Ashby updates the application's attribution fields. The attribution fields in the CSV uploader reflect this behavior:
- If the imported information creates a new candidate, the attribution fields in the import file always apply to the candidate.
- If a candidate already exists in Ashby for the imported information, and you are also importing information about an application, Ashby only updates the application's attribution field.
- If you would like to update a candidate's attribution fields, only include candidate information in your import.
- If you are updating the Credited To field, include the email of the user or employee the candidate should be credited to, not their name. This field only accepts email addresses.
Post-upload actions
Once candidates are imported, you can take bulk actions on the import list. To complete these actions, select individual candidates, or all candidates using the checkboxes, then click the button that corresponds with the action you'd like to take.
Ashby supports the following bulk actions:
- Consider for Job: add candidates to a job consideration (if the file didn't include the job consideration already).
- Add to Project: add candidates to a project. Projects are a simple way to keep track of candidates who are not currently interviewing but whom you want to stay in touch with for the future.
- Set Tags: add tags to candidate profiles.
- Email: send candidates a one-off email using a shared email template or one of your personal email templates.
- Enroll in Sequence: add candidates to an email sequence.
- Request Review
- More:
- Transfer
- Anonymize
- Delete
- Remove from Project
- Mark as Do Not Contact
- Set Tags
- Send Data Consent Request
- Add to Event
If there's an issue with the upload, you can delete it with the Delete All Imported Candidates button. This will not impact candidates that were only updated by the import.
Candidate follow-ups
You can bulk add follow-ups across candidate profiles:
- Click Upload CSV in the Bulk Upload section of Admin, then select Candidate Follow-up.
- Select your CSV file to start uploading it.
- Map your file fields to fields in Ashby, then click Start Import to kick off the import.
When it comes to mapping data after uploading your CSV file, you can map the following data fields.
Field Name | Description | Formatting Notes | Example |
|---|---|---|---|
Candidate Email | The email of the candidate to follow up with | | |
Date | The date when the follow-up is due | The date/time should be an ISO 8601-compliant string (e.g., 1982-05-25, 2017-04-22T20:47:05.335-04:00) | 2025-10-31 |
Note | Notes for the follow-up | | Please reach out to this candidate |
Status | The status of the follow-up | Ashby imports the following as resolved: completed, resolved, done, cancelled, skipped, expired. Ashby imports follow-ups with all other statuses as pending. | Completed |
Assignee Name | The name of the assignee of the follow-up | | Emily Example |
Assignee Email | The email of the assignee of the follow-up | |
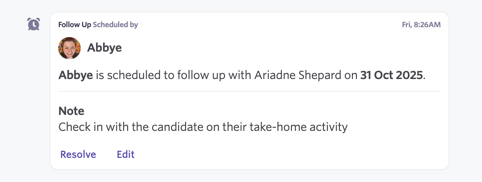
Once the import is complete, the follow-up tasks appear on the candidate's feed. If the follow-up is due, it also shows on the assignee user's home page as a task.
Jobs
If you need to add or update jobs in bulk, you can upload them by doing the following:
- Click Upload CSV in the Bulk Upload section of Admin, then select Jobs.
- Select your CSV file to start uploading it.
- Determine the Import Settings
- Import Mode: This setting allows you to determine whether the import should only create new entries or only update existing entries. Create and Update is not available for importing jobs. If you are both creating and updating jobs, you need to do two separate imports.
- Map your file fields to fields in Ashby, then click Start Import to kick off the import.
If you are looking to update jobs that are already in Ashby, be sure to include either the requisition ID or the Ashby job ID fields in your CSV file.
You can use this template to ensure your data is formatted correctly before uploading, or see the information below on exporting a CSV of existing job data to use as a template for an import to update jobs.
You can map and import the following fields for creating and updating jobs in Ashby:
Field Name | Description | Formatting Notes | Example |
|---|---|---|---|
Title | The title of the job | | Backend Engineer |
Team | The department or team connected to the job | Must exactly match an existing team in your Ashby account. | Product |
Location | The location connected to the job | Must exactly match an existing location in your Ashby account. | New York |
Job Status | The status of the job | Can be Open, Closed, Archived, or Draft | Open |
Requisition ID | The requisition ID linked to the job. | | 123 |
Ashby Job ID | The internal job ID within Ashby. | This field should only be used for updating jobs. | |
Employment Type | The type of employment linked to the job. | | Full-time, Part-time, Contractor |
Closed At | If the job has been closed, the date that the job was closed at. | The date/time should be an ISO 8601-compliant string (e.g., 1982-05-25, 2017-04-22T20:47:05.335-04:00) | 2025-05-25 |
Hiring Manager | The hiring manager linked to the job (must be an active user in Ashby — add the user's email address) | Multiple hiring managers should be added as comma-separated values | |
Recruiter | The recruiter linked to the job (must be an active user in Ashby — add the user's email address) | Multiple recruiters should be added as comma-separated values | |
Recruiting Coordinator | The recruiting coordinator linked to the job (must be an active user in Ashby — add the user's email address) | Multiple recruiting coordinators should be added as comma-separated values | |
Sourcer | The sourcer linked to the job (must be an active user in Ashby — add the user's email address) | Multiple sourcers should be added as comma-separated values | |
Custom Fields | See Custom FieldsCustom Fields for more information on supported field types. | Ensure that the fields are in the appropriate format to match the job-specific custom field (for example, importing yes/no answers into a yes/no custom field) | High Priority (Y/N)? |
Creating jobs
When creating jobs via the bulk import option, the job Title, Team, and Location are required. Ensure that these fields are included in your CSV file.
Updating jobs
When updating jobs via bulk import, either the Ashby Job ID or Requisition ID is required (the job title, location, and team are not required). If you provide both in the import, Ashby uses the Ashby Job ID, and you can then update the Requisition ID via the bulk import.
You can also use the template above to update job details, or you can create a job export using the steps below.
Creating a CSV export of job data for bulk updates
Custom reports are not available on the Foundations plan.
To create a CSV export of job data to use as a base to update your jobs in Ashby:
- Navigate to Reports > Report Builder.
- Select the custom list report option.
- Set the subject to Jobs.
- Use the filters to determine the jobs you'd like to export (for example, filtering by the job department).
- Click Add Field to Show to select the specific job fields you'd like to bulk update.
- Be sure to include the Ashby Job ID and/or Requisition ID fields in your report, as one of these fields must be provided to update your jobs.
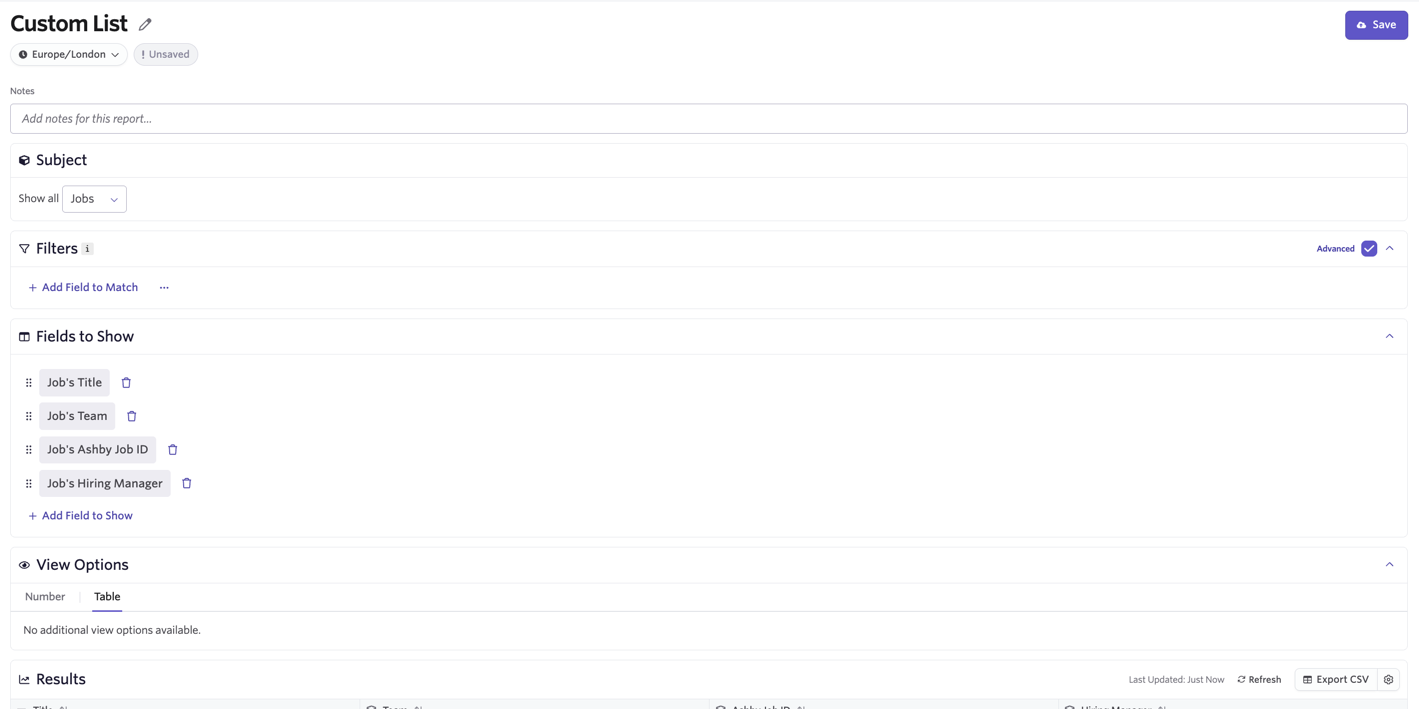
Click Export CSV (listed above your results on the right-hand side) to export the data in the CSV format.
Manually locating the Ashby job ID
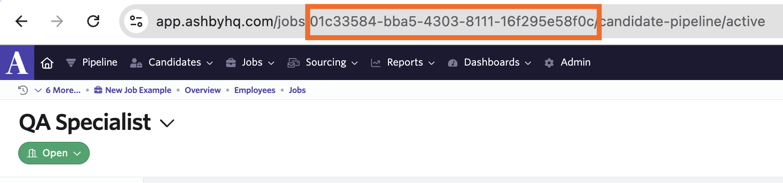
- In addition to using CSV exports, you can locate the job ID by navigating to Jobs > Jobs, clicking into the job in question, and then copying the ID number from the URL.
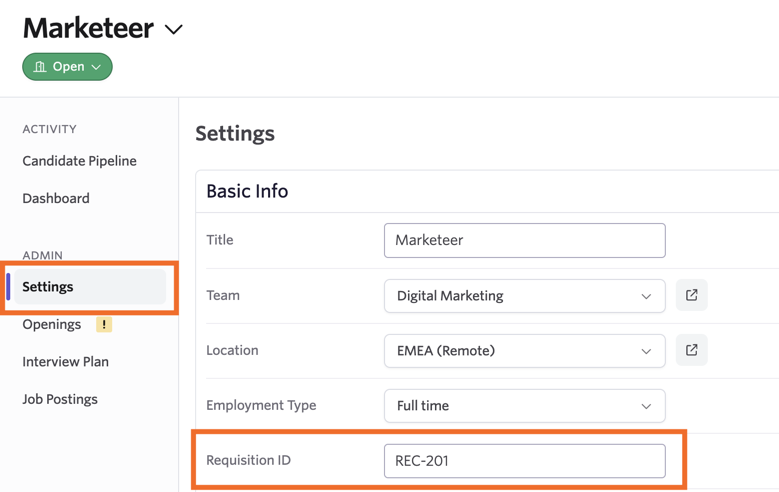
- The requisition ID is listed within the Settings section of the job. If you do not have requisition IDs assigned to your jobs, use the Ashby job ID instead.
Mapping your job fields for updating jobs

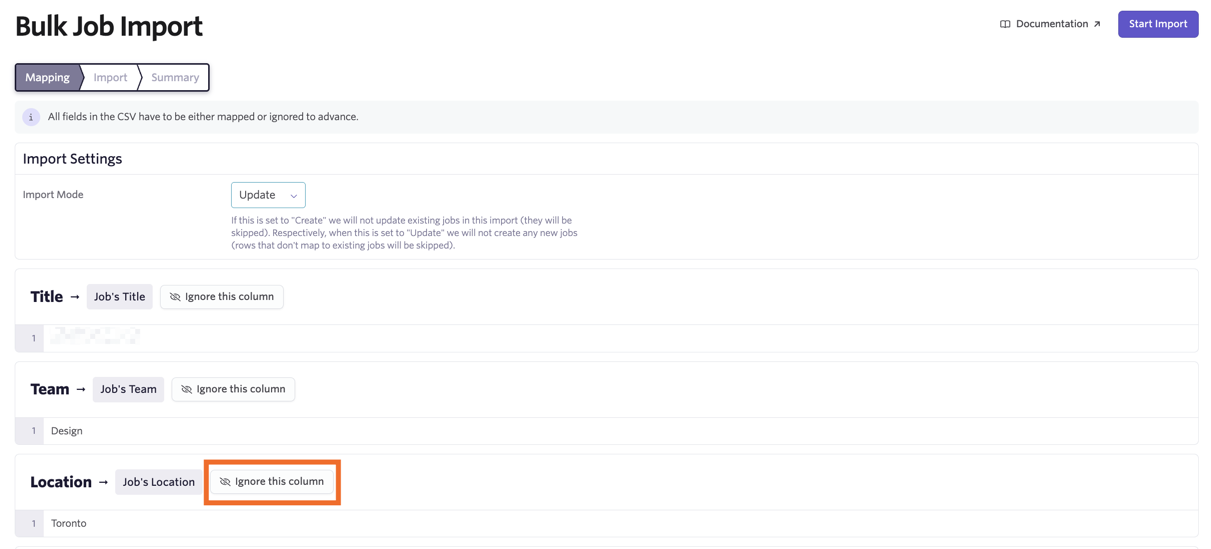
When mapping your job data, map only the field with the job or requisition ID and any fields with updated data to the fields on your jobs. Click Ignore this column beside any fields that you don't want to import or update on your jobs.
When updating existing jobs via CSV import, any mapped hiring team field (Hiring Manager, Recruiter, Recruiting Coordinator, or Sourcer) overwrites the hiring team role on the job.
To avoid removing existing team members by accident, include all hiring team roles you'd like to keep on the job in your CSV and map all hiring team role fields during import.
For example, if you want to update the Recruiter but keep the current Hiring Manager on a job, your CSV must include both fields with the appropriate data.
You must map or ignore all fields in your CSV before you can start your import.
Post-upload actions
We don't currently support taking bulk actions on jobs after they've been uploaded. To manage your jobs in Ashby, navigate to Jobs > Jobs and select the job in question to make amendments.
Openings
See Openings ManagementOpenings Management for more information on how to use the Openings feature. Use this template to ensure your data is formatted correctly before uploading. Bulk imports for Openings are not available on the Foundations plan.
Using this option creates individual openings on the Openings tab within the Jobs section of Ashby. The table below outlines the supported fields and corresponding formatting examples.
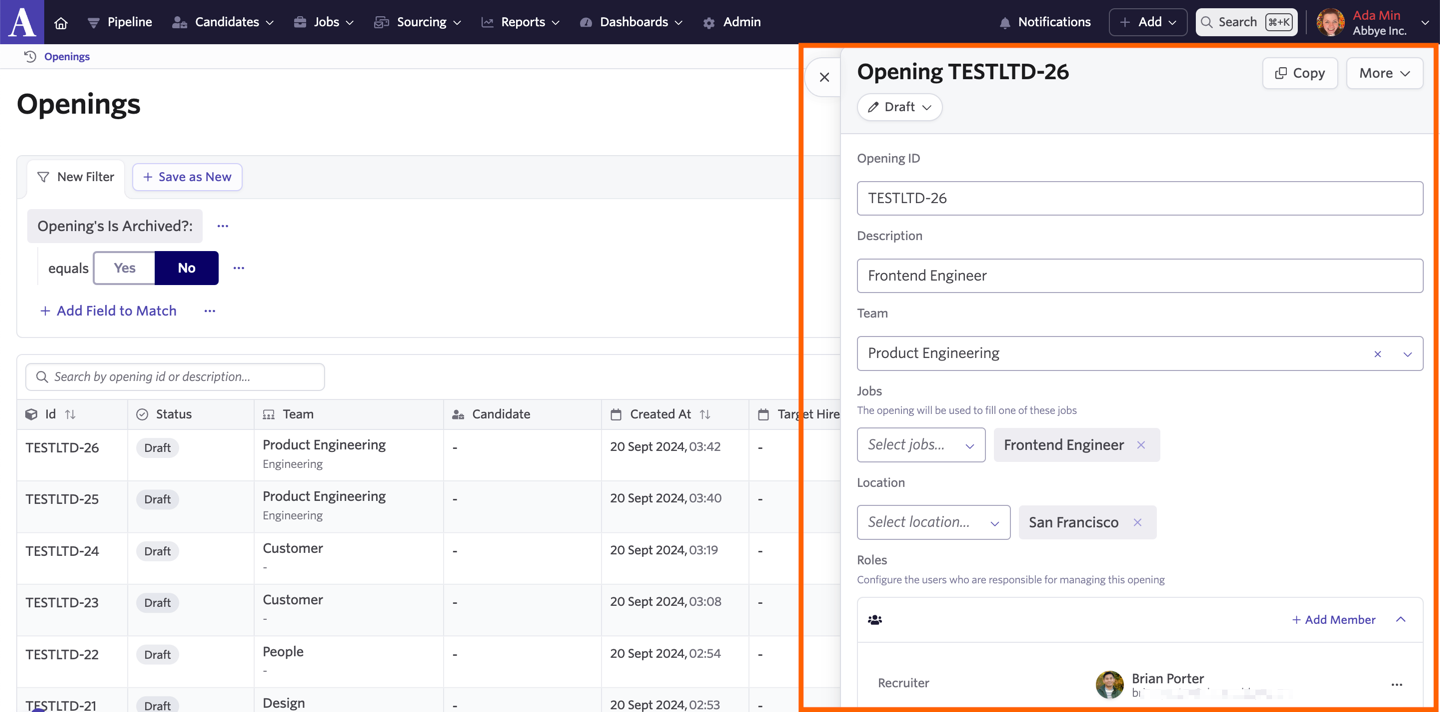
To import openings:
- Click Upload CSV in the Bulk Upload section of Admin, then select Openings.
- Select your CSV file to start uploading it.
- Map your file fields to fields in Ashby, then click Start Import to kick off the import.
The following fields can be imported.
Field Name | Description | Formatting Notes | Formatting Example |
|---|---|---|---|
Opening ID (required) | Numeric or alphanumeric ID associated with a unique opening. | There shouldn't be any duplicate IDs. | ASHBY-1 |
Status | The opening's current status. | Can be one of Draft, Approved, Open, Closed, or Filled. | Draft |
Description | One line text field describing the opening. | Limited to 240 characters. | Senior Backend Engineer |
Team | The name of the existing team in Ashby. | The format is case-sensitive and should exactly match an existing team in Ashby. | Engineering |
Job(s) | Expects one or more jobs. | Multiple jobs should be added as comma-separated values | Senior Backend Engineer (EMEA),Senior Backend Engineer (AMER) |
Ashby Job ID | The internal job ID within Ashby. | This can be used to identify specific Ashby jobs when you have multiple jobs with the same job title. | |
Location(s) | Expects a comma-separated list of names of locations that already exist in Ashby | Multiple locations should be added as comma-separated values | Europe,North and South America |
Recruiter(s) (Role) | Email address(es) of the Recruiter(s) associated with the opening. | Multiple Recruiters should be added as comma-separated values | |
Recruiting Coordinator(s) (Role) | Email address(es) of the Recruiting Coordinator(s) associated with the opening. | Multiple Recruiting Coordinators should be added as comma-separated values | |
Hiring Manager(s) (Role) | Email address(es) of the Hiring Manager(s) associated with the opening. | Multiple Hiring Managers should be added as comma-separated values | |
Sourcer(s) (Role) | Email address(es) of the Sourcer(s) associated with the opening. | Multiple Sourcers should be added as comma-separated values | |
Employment Type | Type of employment associated with the role. | Expects one of the following values: Full time, Part time, Intern, Temporary, Contract | full time |
Is Backfill? | Indicates if this opening is a backfill. | Expects common boolean values: Yes/No, Y/N, 1/0 | Yes |
Target Hire Date | Date an offer is expected to be accepted | The date/time should be an ISO 8601-compliant string (e.g., 1982-05-25, 2017-04-22T20:47:05.335-04:00) | 2023-04-22 |
Target Start Date | Date the hire is expected to start | The date/time should be an ISO 8601-compliant string (e.g., 1982-05-25, 2017-04-22T20:47:05.335-04:00) | 2023-05-29 |
Compensation Range | The compensation range associated with the opening. | Expects a string formatted as min_value/max_value/currency_code/interval. Requires at least one of min or max value (for an exact salary, include just one value). The currency code should be an ISO 4217-compliant alphabetic code (e.g., USD, JPY). Accepted interval values: once, per hour, per day, per week, bi-weekly, per month, per year, per half year, per half month, per quarter. | 70000/80000/USD/per-year 70000//USD/per-year /80000/USD/per-year |
Additional custom fields | Expects values that align with the custom fields your team creates. | See Custom FieldsCustom Fields for more information about the field types supported. | Tier 3 |
Post-upload actions
We don't currently support taking bulk actions on openings after they've been uploaded. To manage your uploaded openings, visit the Openings page in the Jobs section of Ashby.
Bulk updating openings
If you'd like to bulk update openings, you can do so by importing a CSV of updated opening data. When bulk importing updates for openings, be sure to check the following:
- The opening IDs in the CSV match the IDs of the openings you are looking to update.
- The names of teams/departments and locations exactly match those you have set up in Ashby.
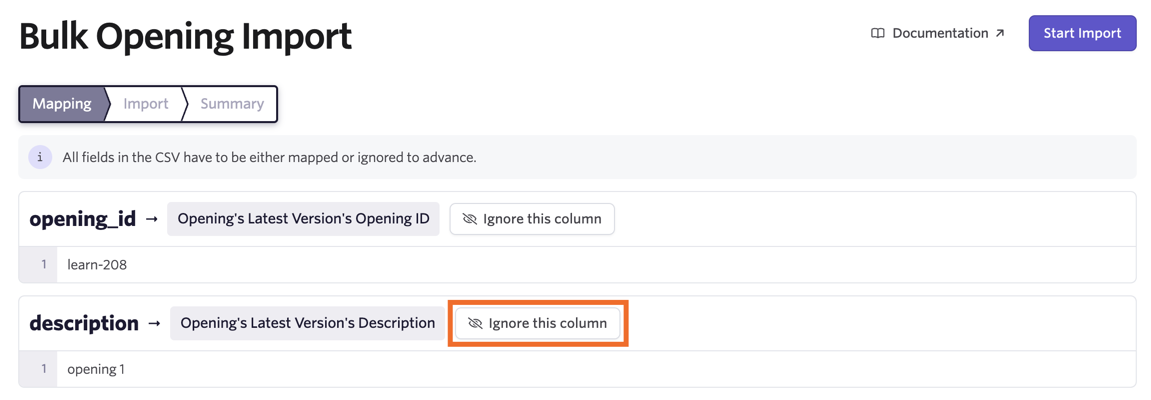
When mapping your opening data, map only the field with the opening ID and any fields with updated data to the fields on your openings. Click Ignore this column beside any fields that you don't want to import. You must map or ignore all fields in your CSV before you can start your import.
Employees
The Employee import is intended for importing key interviewer information into employee profiles at Admin > Organization Setup > Employees.
To import employee data:
- Click Upload CSV in the Bulk Upload section of Admin, then select Employees.
- Select your CSV file to start uploading it.
- Determine the Import Settings
- Import Mode: This setting allows you to determine whether the import should only create new entries, only update existing entries, or both create new entries and update existing ones.
- Map your file fields to fields in Ashby, then click Start Import to kick off the import.
The following data can be imported.
Field Name | Description | Formatting Notes | Formatting Example |
|---|---|---|---|
Name | The name of an employee. | | Rosie Recruiter |
Email (required) | The email address of an existing employee. | Must exactly match the email of an existing user if updating employees. | |
Job Title | The employee's job title. | No character limit. This title may be shown to candidates this person interviews. | Recruiter |
Daily Interview Limit | The greatest number of interviews the employee can be booked for in a day via direct booking. | Must be an integer greater than or equal to zero. | 3 |
Weekly Interview Limit | The greatest number of interviews the employee can be booked for in a week via direct booking. | Must be an integer greater than or equal to the daily interview limit. | 7 |
Interviewer Pools | See Interviewer Training for more information. | Multiple pools should be added as comma-separated values | Business Operations,Managers |
LinkedIn Profile URL | The employee's LinkedIn Profile URL. | | |
Custom Fields | See Custom FieldsCustom Fields for more information on supported field types. | | People Manager (Y/N)? |
You can also import an employee's status (as activated or deactivated) to update their profile status in Ashby.
FAQs
What candidate data can I upload via the bulk CSV import feature?
- Things you can import:
- Candidate demographics
- Current job application
- The current interview plan stage
- Current status
- Things you can't import:
- Resumes*
- Other files
- Notes
- Long text fields
*The Ashby team can upload resume files separately. Reach out to [email protected] to request this.
How does Ashby handle duplicate candidates?
The bulk import feature catches duplicates by checking across candidate information including GitHub and LinkedIn URLs and emails. If Ashby finds matches, it doesn't create a new candidate and instead updates the existing candidate with any new information. If you are using the email import feature and sending over a resume for a candidate profile that already exists, Ashby flags the duplicate and you receive an error.
Something went wrong; how do I undo the upload?
If you'd like to undo your upload, you can delete all uploaded candidates or openings at the bottom of the summary page once an upload is complete. This does not affect candidates or openings that were only updated during the import.
Can I import data into custom fields when importing via the bulk CSV importer?
Yes. You can select custom fields at the mapping stage. For more information, see our Custom FieldsCustom Fields guide.
Can I import a candidate and consider them for multiple jobs as part of the import process?
No. When importing candidates, you can only add them to the pipeline of one job. You need to add further job considerations to the candidate's profile after the import.
I have multiple jobs with the same job title. How do I ensure the candidate is imported to the correct role?
If you have multiple jobs with the same job title in Ashby, you can do the following to map the candidate to the correct job based on requisition ID:
- Add an existing requisition ID or create a new one in the Requisition ID field on the job. To add a requisition ID to a job in Ashby, navigate to Jobs > Jobs, then go to the Settings tab within the job or jobs in question.
- Ensure that the requisition ID is also added to your CSV file (if you didn't have a requisition ID for the role to begin with).
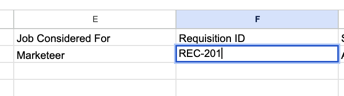
- Import your candidates and opt to map the Requisition ID field in your CSV file to the Job Consideration's Job Title field.

Can I apply a job template to a job I import via a CSV file?
You can't currently apply a job template to jobs imported via a CSV file.
The locations in my import file have commas (for example, New York, New York). How do I import these?
When a location value in the CSV contains a comma, the importer interprets it as a column separator and throws an error. To get around this wrap those values in brackets and quotes: ["New York, New York"] in the original file.