Custom Fields
Custom fields allow you to add additional fields to a candidate's profile, a job, an offer, or an opening that you and other users can fill out, allowing for a further level of customization.
Permissions:
- Only Organization Admins can create custom fields.
Candidate, Job, and Project custom fields can be configured on the Legacy Plus, Plus, and Enterprise plans.
Foundations | Legacy Plus | Plus | Enterprise |
|---|---|---|---|
❌ | ✅ | ✅ | ✅ |
Archive Reason custom fields can be configured on the Plus and Enterprise plans.
Foundations | Legacy Plus | Plus | Enterprise |
|---|---|---|---|
❌ | ❌ | ✅ | ✅ |
Custom fields overview
The video above walks through creating a candidate custom field and viewing it on the candidate profile. You can find a walkthrough for creating and viewing each custom field type below.
Creating custom fields: Object types
Custom fields can be associated with six primary object types in Ashby.
Object Type | Description |
|---|---|
Candidate | These fields are used to capture details specific to individual candidates. They appear on the Summary tab of the candidate profile. |
Job | These fields are used to capture details specific to individual jobs. They appear on the Settings page of a job. |
Offer | These fields are used to capture details about an offer. They appear on the offer activity that appears when a candidate is in the offer stage. |
Opening | These fields are used to capture details specific to individual openings. They appear at the bottom of the opening form. |
Projects | These fields are used to capture details specific to projects. The custom fields show within the Settings section of the project. |
Employee | These fields are used to add additional information to user profiles on the Employees page. Custom fields for employees can be accessed on the Basic Info tab. |
Creating custom fields: Candidate custom fields
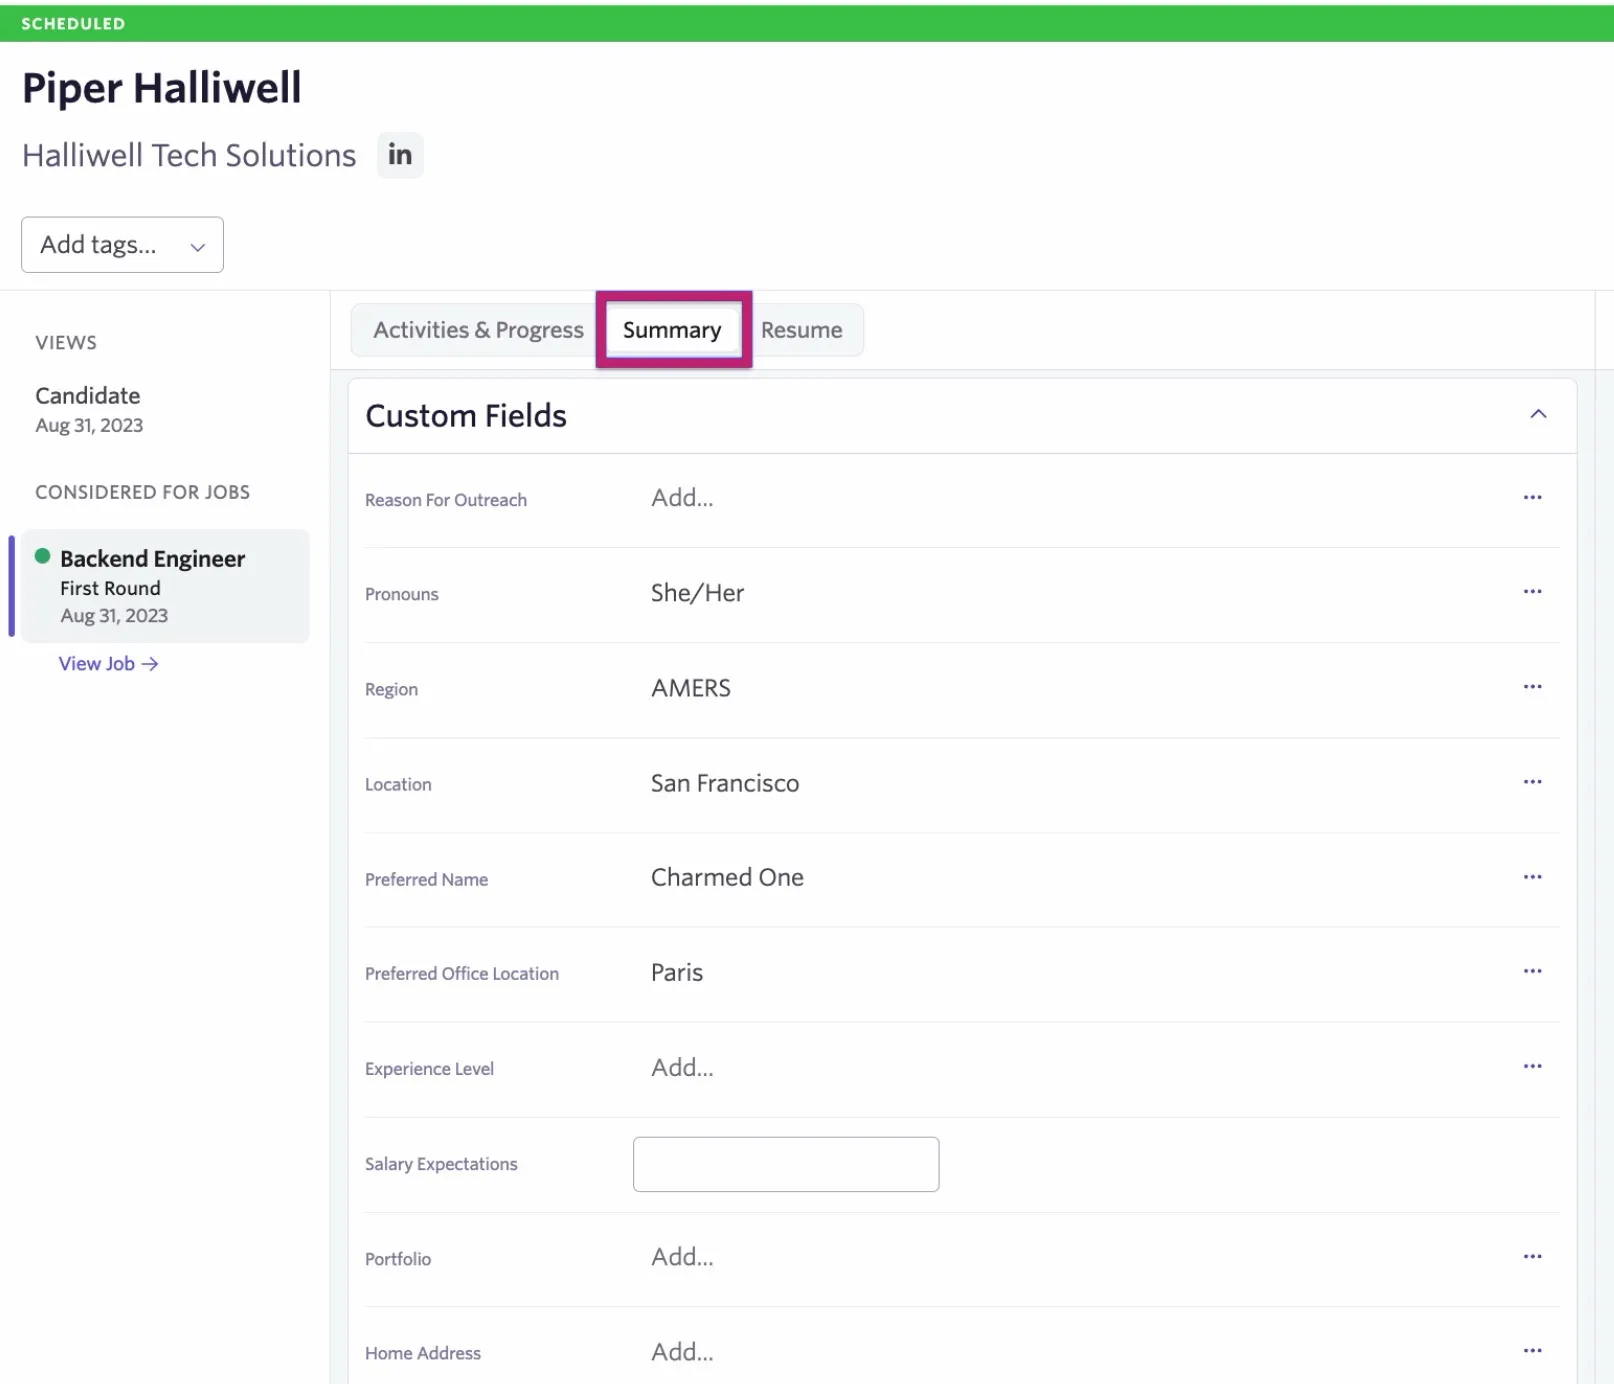
When you add a custom field for candidates, it appears on the Summary tab of their profiles, ready to fill out. New custom fields also apply retroactively to existing candidate profiles, as well as new ones.
Candidate custom fields can be used for adding information like preferred name, full legal name, pronouns, and more!
Field types
Field Type | Description |
|---|---|
Yes/No | Toggle yes or no |
Short Answer | Input a single line of text |
Date | Select a single date |
Multiple Choice | Select a radio button |
Checkboxes | Select one or more checkboxes |
Number | Input a single numeric value |
Currency | Determine a currency or select a default currency |
Long Unformatted Answer | Input multiple lines of text |
URL | Add a URL into this field |
Employee | A single-select dropdown showing all employees in your Ashby instance |
Create a candidate custom field
Navigate to the candidate custom field view, then click + New in the top right corner of the page.
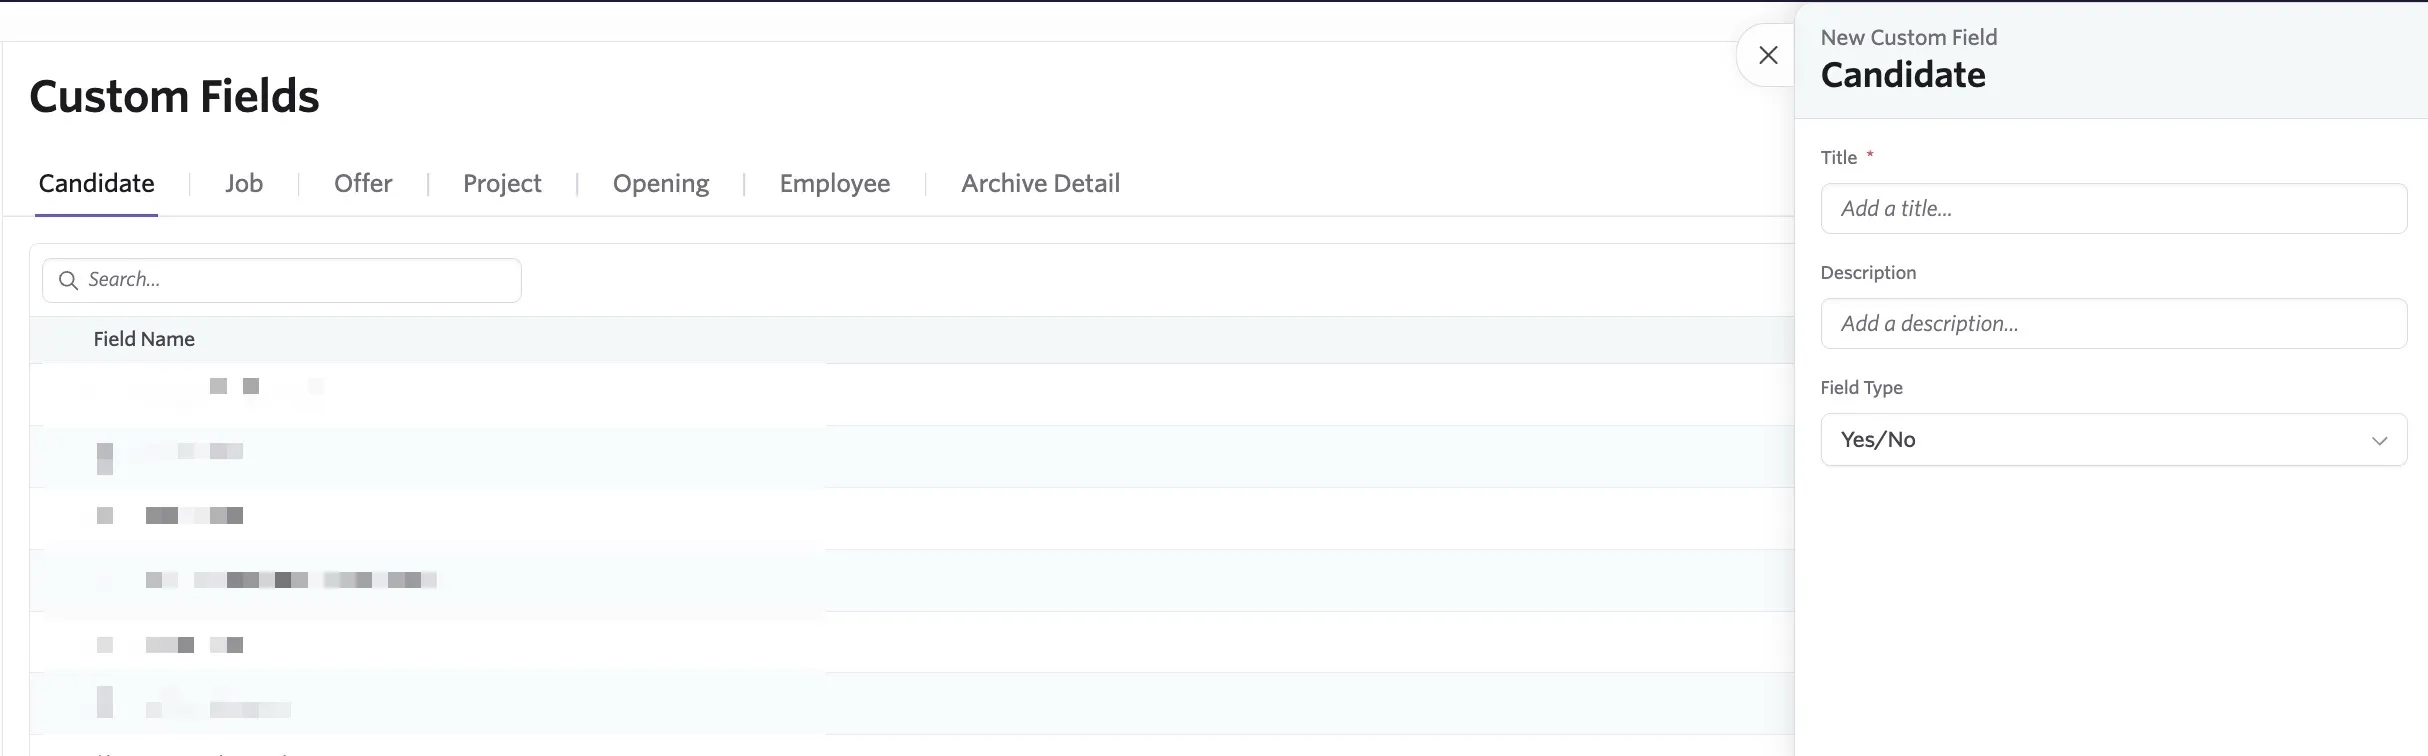
A configuration form appears with the following options:
- Title: Name your field.
- Description: Optionally, add a description that appears below the title.
- Field Type (see options above)
Once you create the custom field, you see additional options when editing it.
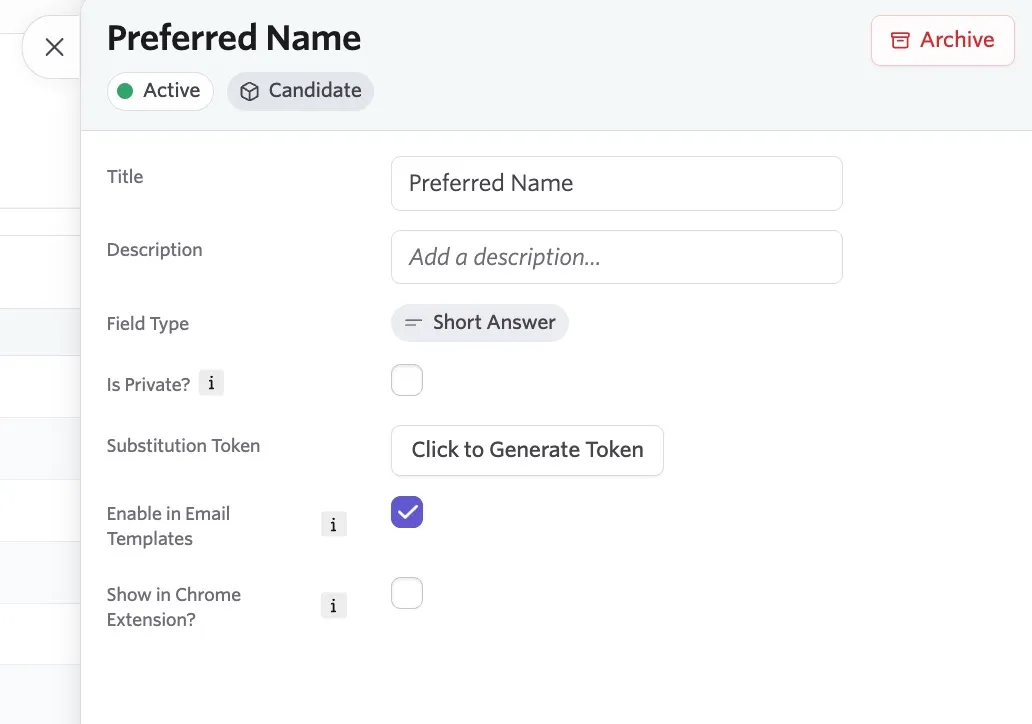
- Is Private?: If checked, only those with Elevated Access or Organization Admin access can view the field. This could be used for fields with sensitive information like candidate salary expectations.
- Substitution Token: Create a token to pull data from this field into an offer letter or e-signature document. If you opt to generate a token for a multiple choice custom field, you get a follow-up option, Customize Substitution Text. More on this in Custom FieldsMultiple choice custom fields: Customize substitution text below.
- Enable in Email Templates?: If checked, the data can be included in emails. Ashby creates a token that you can add to email templates to pull this information over. More on this at Substitution TokensSubstitution Tokens. This option is not supported for checkbox and long unformatted answer custom field types.
- Show in Chrome Extension?: If checked, the field is accessible in the Chrome extension and within Ashby.
The optionShow in Chrome Extension? is only available for candidate custom fields.
Find candidate custom fields on the candidate profile
Once created, candidate custom fields appear on the Summary tab of the candidate profile. These fields can also be used:
- In email templates as custom tokens
- In the interview briefing as custom viewable fields
- In searches and reports
Creating custom fields: Job custom fields
Job custom fields can be created to add additional internal information about a job. Just as with a candidate, you can fill in the field title, add a description, and pick a field type for data input. With a job custom field, you have the additional field type option of a number range.
Field types
Field Type | Description |
|---|---|
Yes/No | Toggle yes or no |
Short Answer | Input a single line of text |
Date | Select a single date |
Multiple Choice | Select a radio button |
Checkboxes | Select one or more checkboxes |
Number | Input a single numeric value |
Currency | Determine a currency or select a default currency |
Number Range | A range of numbers with a lower and upper bound |
Long Unformatted Answer | Input multiple lines of text |
URL | Add a URL into this field |
Employee | A single-select dropdown showing all employees in your Ashby instance |
Create a job custom field
Navigate to the job custom field view, then click + New in the top right corner of the page to open the New Custom field menu.
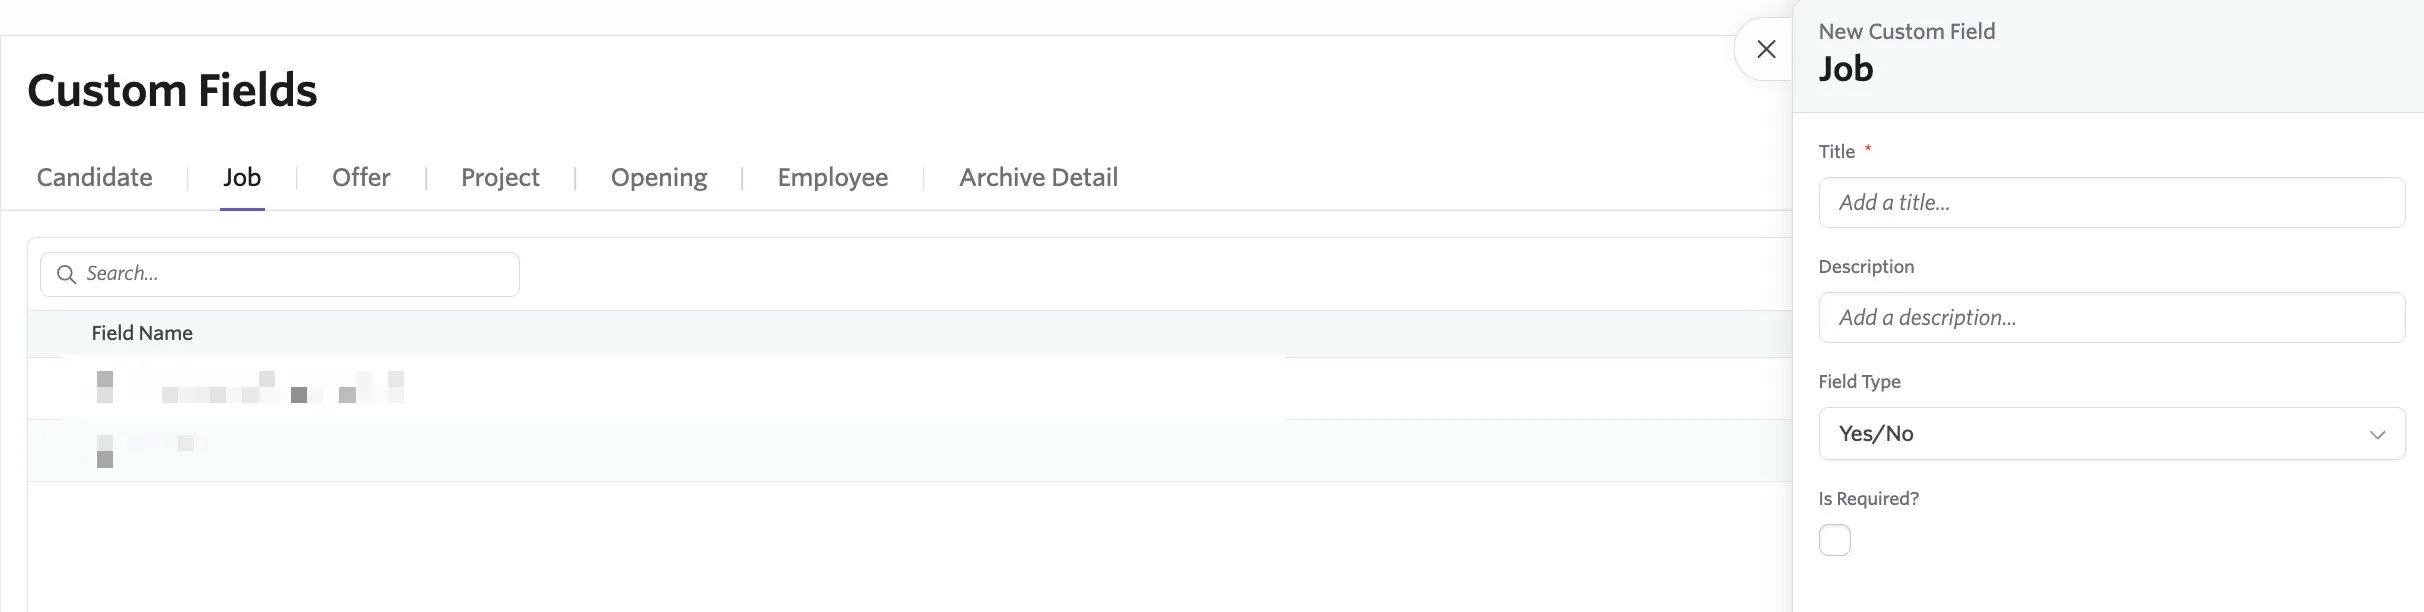
A configuration form appears with the following options:
- Title: Name your field.
- Description: Optionally, add a description that appears below the title.
- Field Type: Determine the type of information that should be added to this field.
- Is Required?: If checked, the job cannot be opened or moved out of its draft state unless this field is completed.
When editing the custom field, you see additional options.
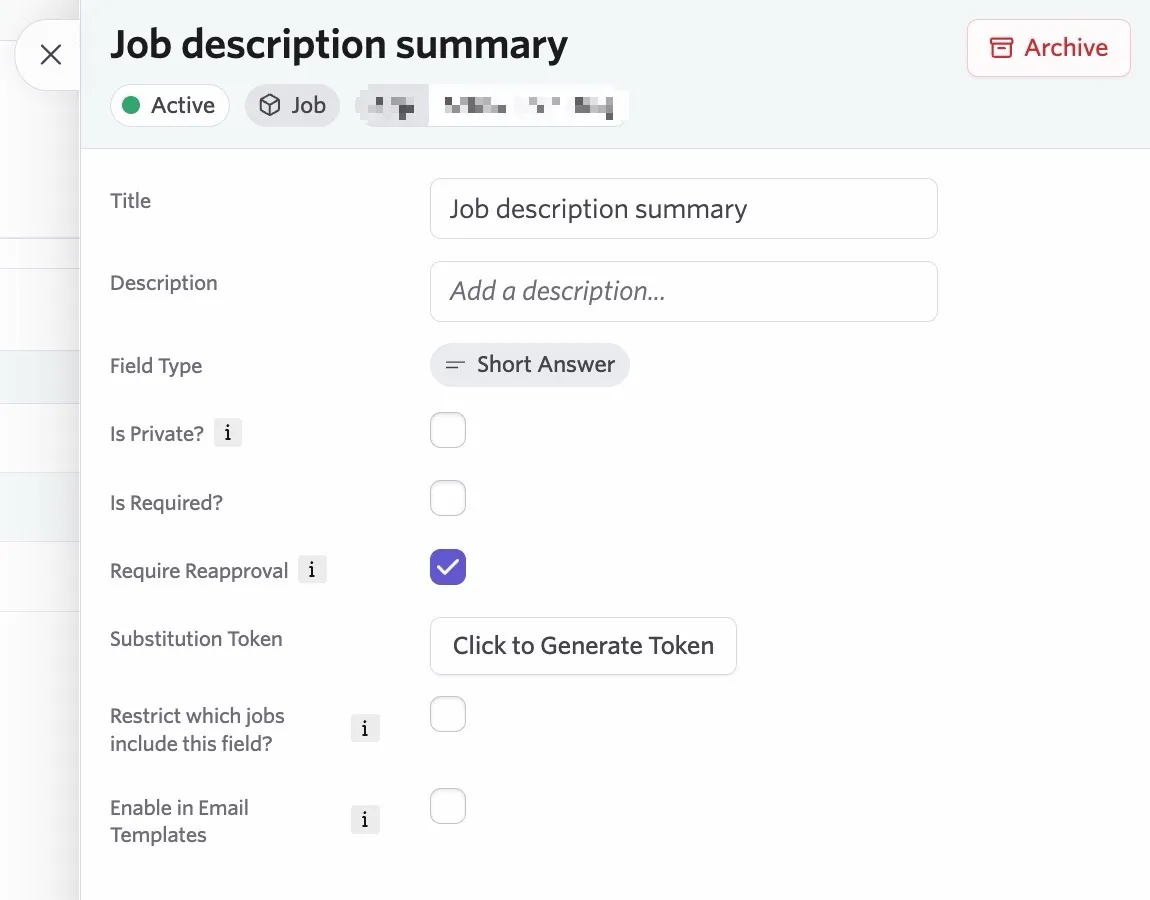
- Is Private?: If checked, only those with Elevated Access or Organization Admin access can view the field.
- Require Reapproval?: If the value in this field is changed and you have an approval process in place for the job, reapproval is required.
- Substitution Token: Create a token to pull data from this field into an offer letter or e-signature document. If you opt to generate a token for a multiple choice custom field, you get a follow-up option, Customize Substitution Text. More on this in Custom FieldsMultiple choice custom fields: Customize substitution text below.
- Restrict which jobs include this field?: Here you can set criteria using filters. Only the jobs meeting your set criteria have this custom field.
- Enable in Email Templates: When enabled, you can pull the content in this custom field into an email generated from an email template. This option is not supported for checkbox and long unformatted answer custom field types. More at Substitution TokensSubstitution Tokens.
Find job custom fields on the jobs' settings
Once created, the custom field shows in the Settings tab within a job. Newly added custom fields show for all jobs, regardless of when you created the job. These fields can be used:
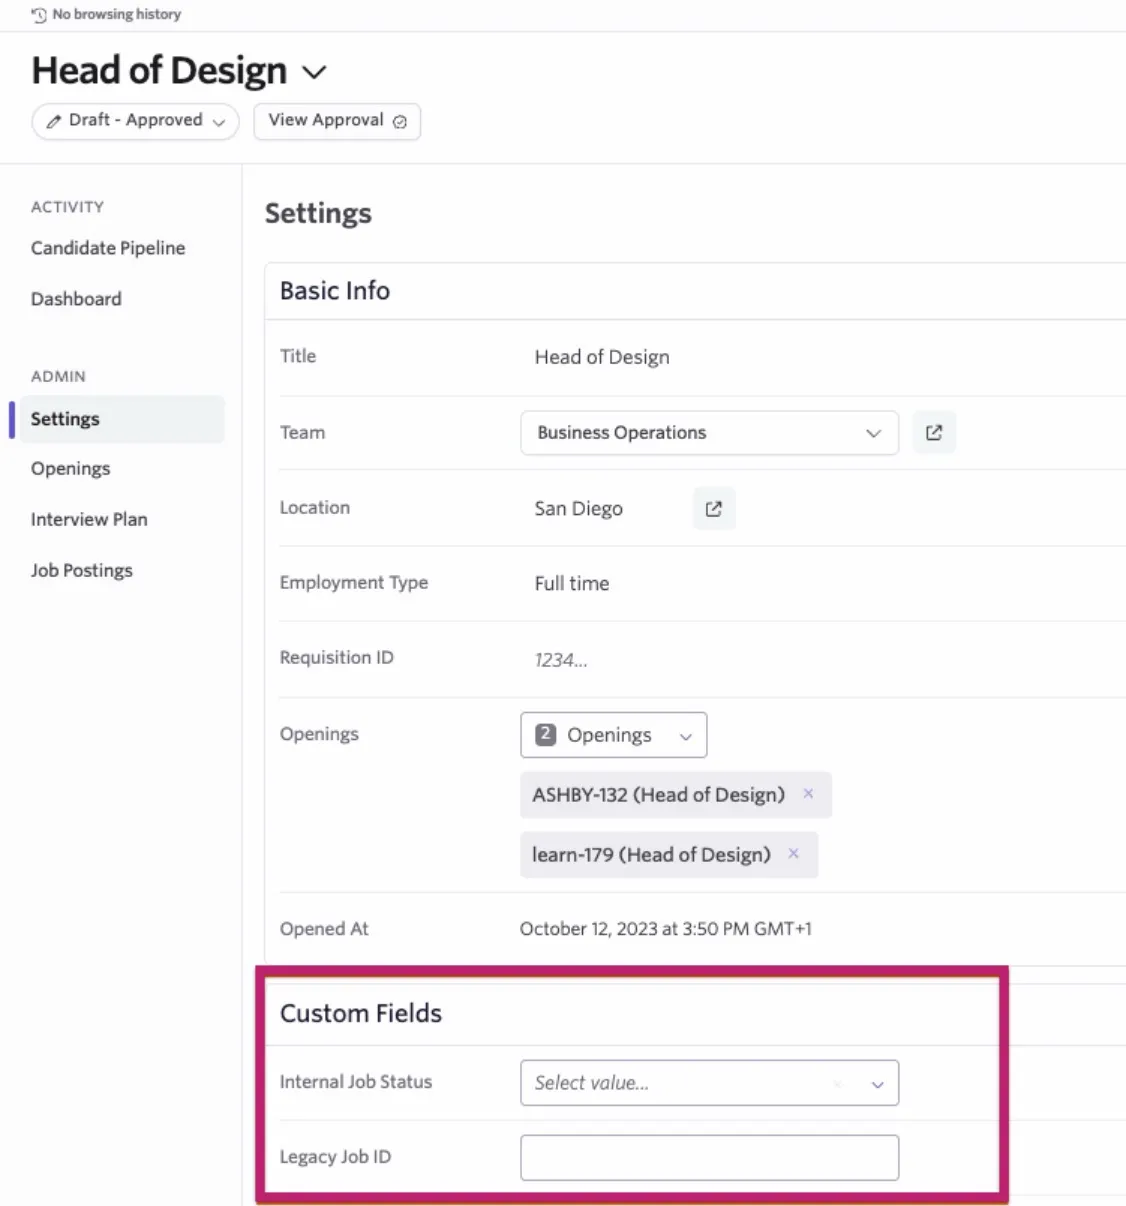
- In searches and reports
- To record job-specific requirements or preferences
If you try to open a job without completing required job custom fields, you see a Missing Value message when amending the job status.
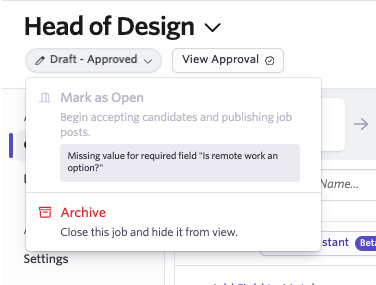
You can create and amend a draft job without completing the required fields.
Creating custom fields: Offer custom fields
Navigate to the offer custom field view, then click + New in the top right corner of the page to open the New Custom field menu.
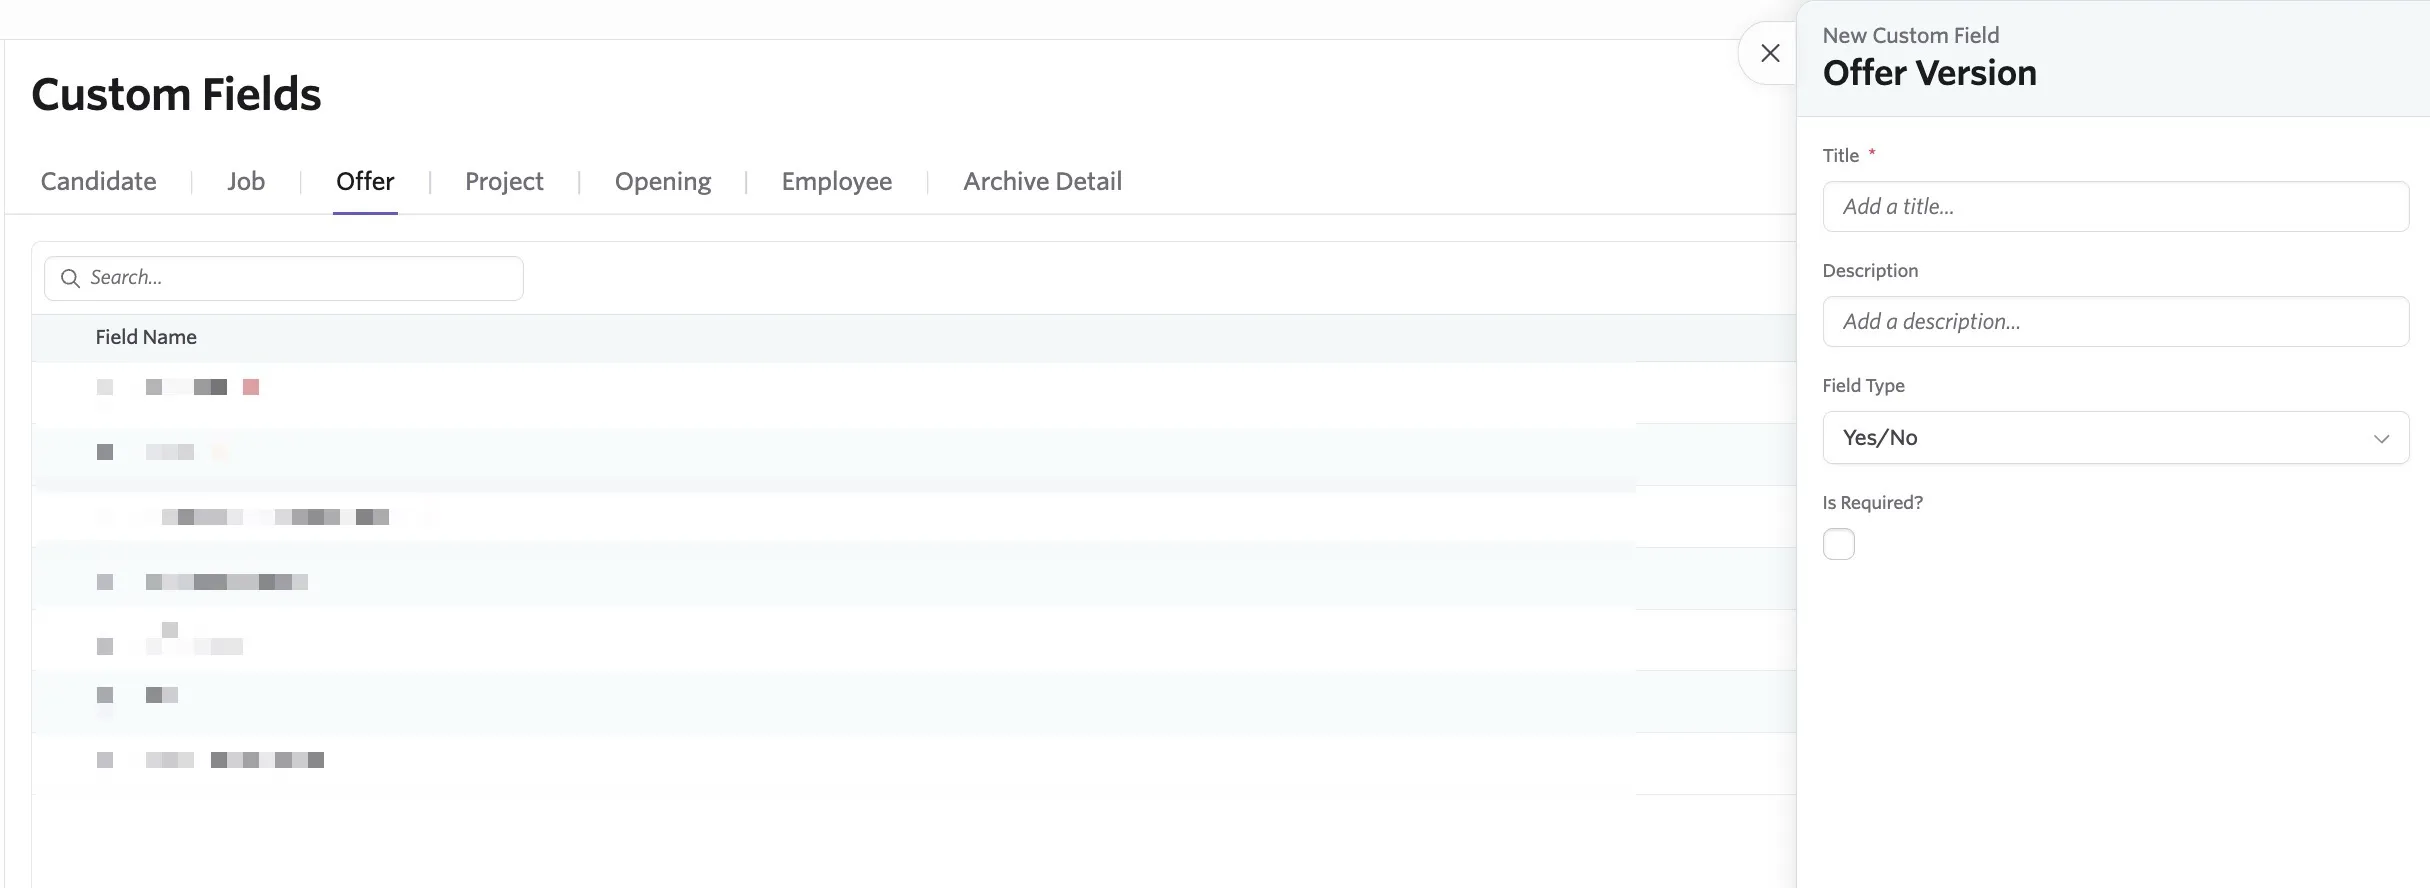
You can add offer custom fields to an offer to collect additional information from a candidate. Optionally, set these fields up as tokens to automatically populate information in the candidate's offer letter. For more information on creating offer letters, visit Offers and Offer LettersOffers and Offer Letters.
Field types
Field Type | Description |
|---|---|
Yes/No | Toggle yes or no |
Short Answer | Input a single line of text |
Date | Select a single date |
Multiple Choice | Select a radio button |
Checkboxes | Select one or more checkboxes |
Number | Input a single numeric value |
Currency | Determine a currency or select a default currency |
Long Unformatted Answer | Input multiple lines of text |
URL | Add a URL into this field |
Employee | A single-select dropdown showing all employees in your Ashby instance |
Create an offer custom field
- Title: Name your field.
- Description: Optionally, add a description that appears below the title.
- Field Type (see options above)
- Depending on type selected, an options panel may appear.
- Is Required?: Determine if the field must be filled out.
Once you create the custom field, you have additional options when editing it too:
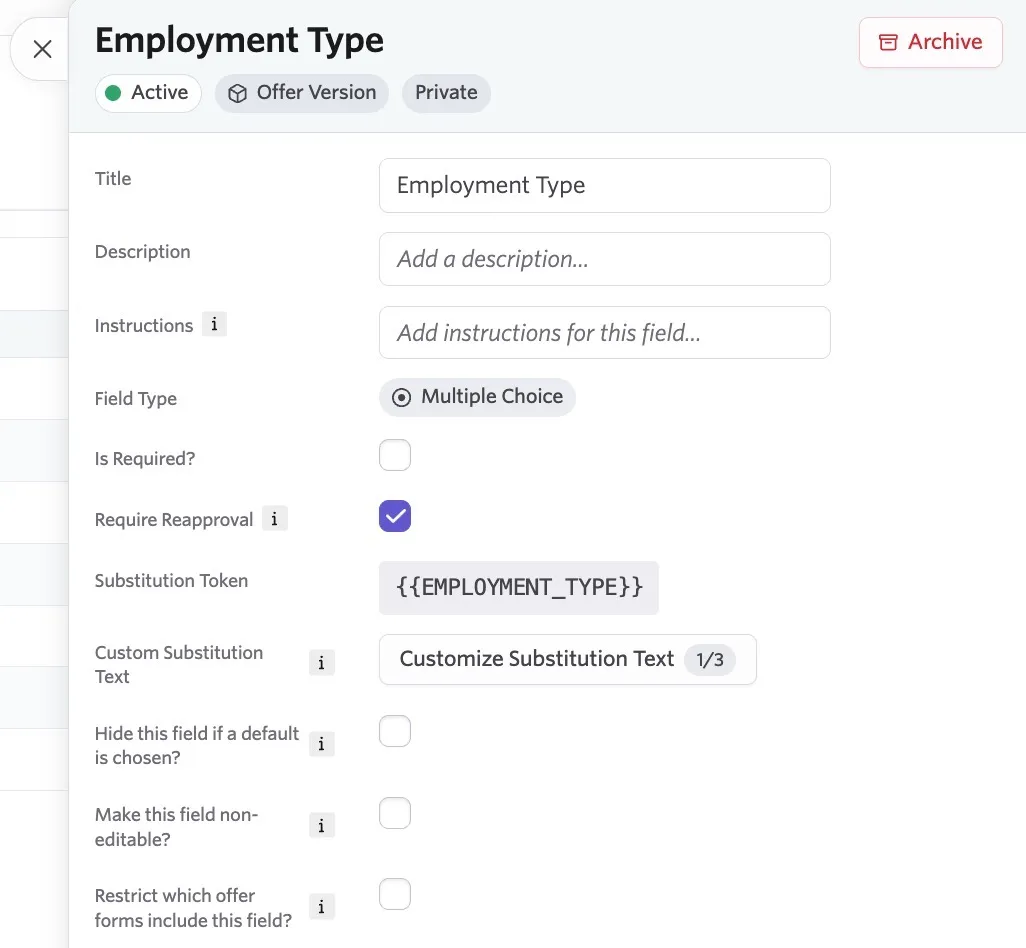
- Instructions: If instructions are provided on the offer custom field, this shows to team members when they fill out a candidate's offer (instead of showing the custom field's description). These instructions can also be set with rich text formatting, which also shows when filling out the candidate's offer.
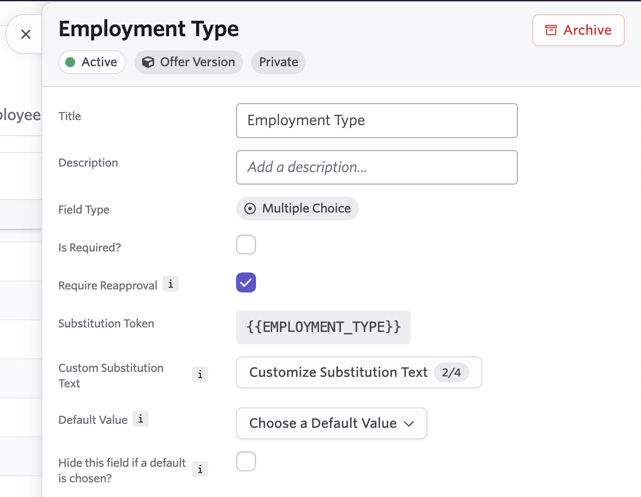
- Require Reapproval: If the field's data is changed, the offer must be re-approved.
- Substitution token: Create a token to pull data from this field into an offer letter or e-signature document. If you opt to generate a token for a multiple choice custom field, you get a follow-up option, Customize Substitution Text. More on this in Multiple choice custom fields: Customize substitution text below.
- Default Value: Determines the default value to use when this field is used in a fillable form. The default value can only be pulled from a custom field with the same field type (for example, Multiple Choice in this case), or it can be set to a static value instead.
- Hide this field if a default is chosen? If a default value is found using the Default Value option above, hide this field in the offer form.
- Make this field non-editable? If a default value is selected, then the field cannot be overridden manually within the offer details.
- Restrict which offer forms include this field?: Specify which jobs or departments should display this custom field on offers.
Find offer custom fields on the candidate profile
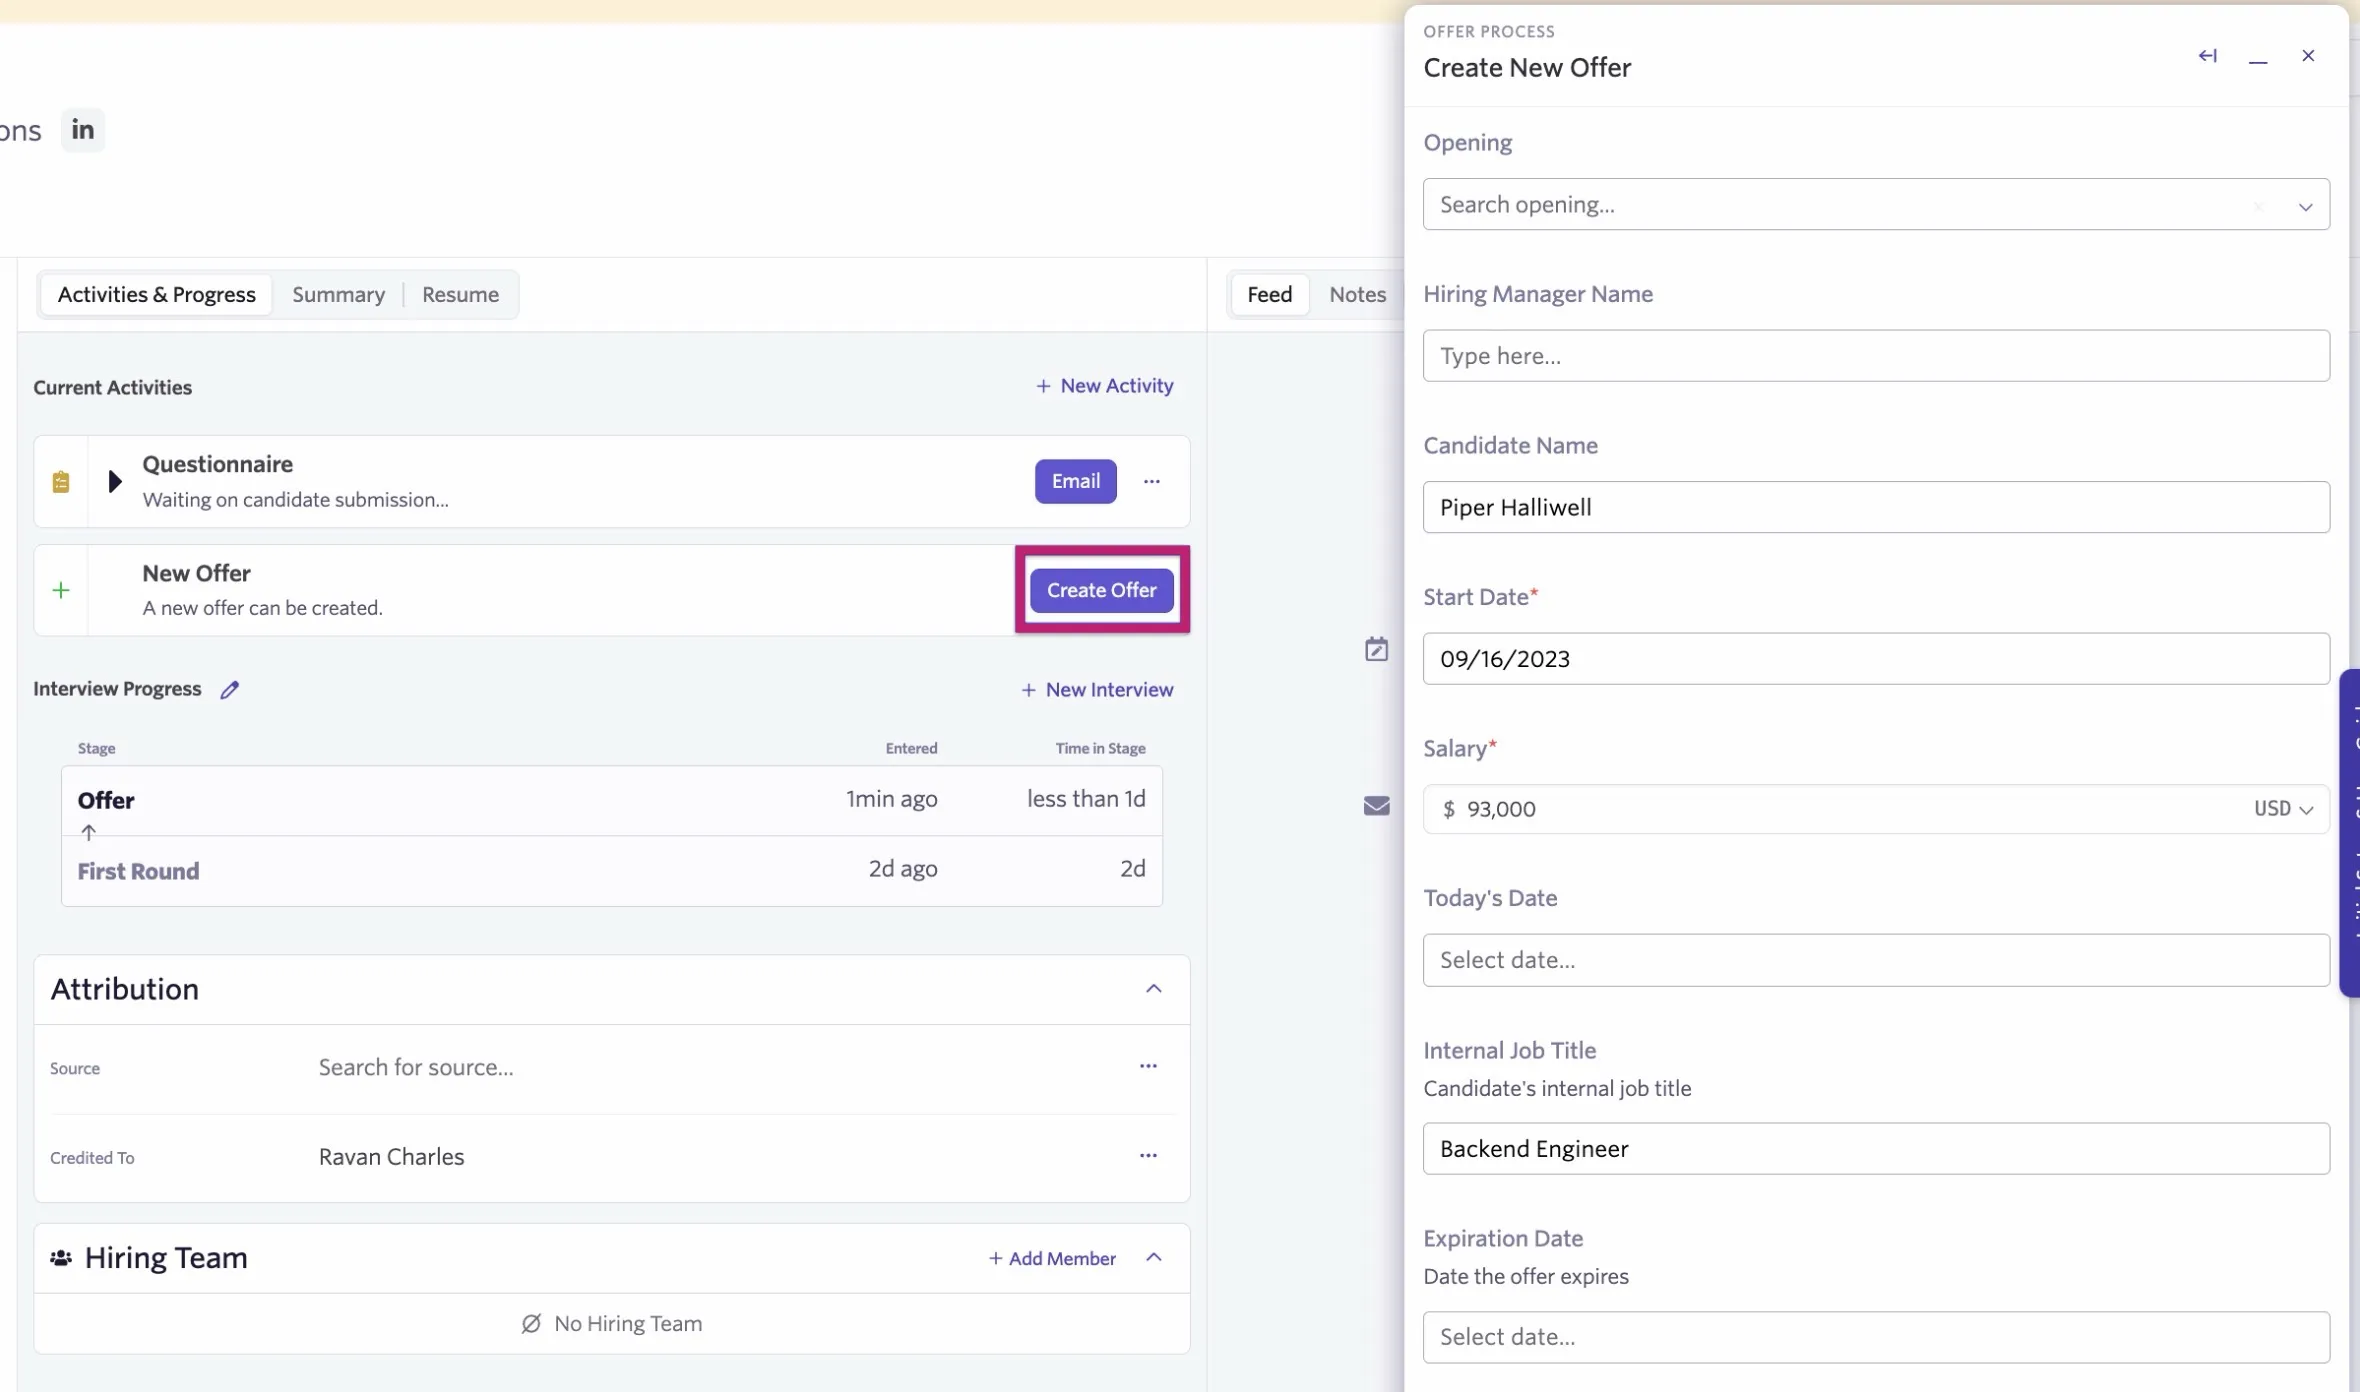
When you click Create Offer on the profile for a candidate in the Offer stage, the field shows on the Create New Offer pop-up. These fields can be used:
- To capture specific offer details or terms.
- To replace fields in .docx, .pdf, and Dropbox Sign e-signature requests
- To record special instructions or notes related to the offer.
Multiple choice custom fields: Customize substitution text
If you opt to generate a token for a multiple choice custom field, you have the option to customize the text added by the token to your offer letter or e-signature document, depending on the choice selected for your custom field.
- Once you generate the token within the Substitution Token section of the custom field, click Customize Substitution Text to open the Customize Substitution Text window.
- The window shows each option that can be selected for your multiple-choice custom field.
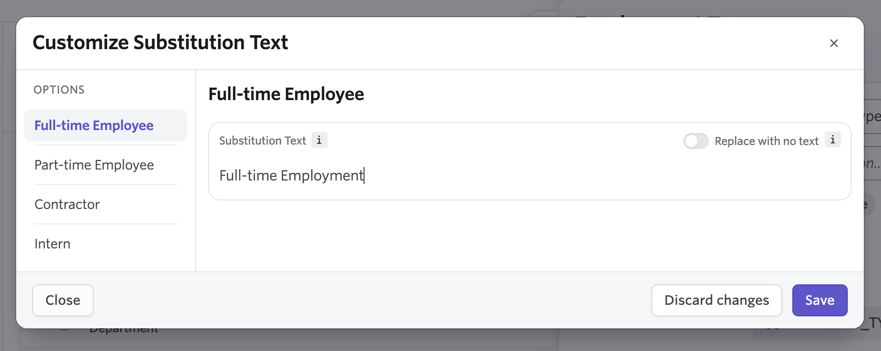
- Select an option from the Options list, then add in the text that should replace the substitution token within the offer letter or e-signature document when that option is selected within the offer details.
- For example, if you select Full-Time for the offer, the token becomes "full-time employment" when added to the offer letter template.
- If you don't want the token to be replaced by text for specific options, toggle on the Replace with no text option. This option removes the token from the document and doesn't add substitute text in its place.
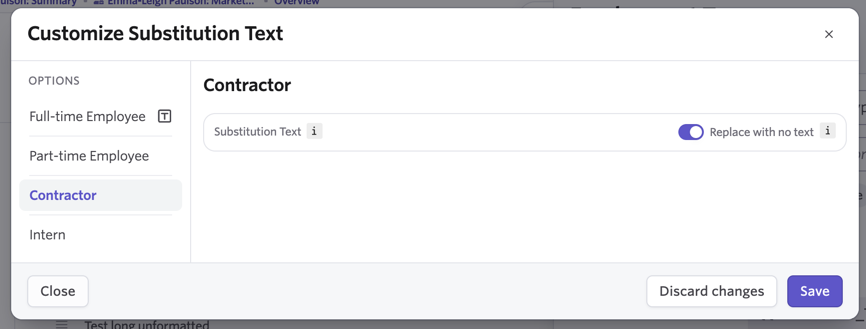
- Click Save to save any amendments made to the option substitution text. Make sure to save amendments to each option as you go to avoid losing your changes.
- The number of custom text options set for each option appears within the Customize Substitution Text button for your reference. So here, text options have been set for two out of the four options available.
Creating custom fields: Project custom fields
You can add custom fields specifically for your projects. Use these to specify and house information in your project's Settings page. You can show these custom fields as additional columns when viewing projects, or filter by custom fields as needed.
Field types
Field Type | Description |
|---|---|
Yes/No | Toggle yes or no |
Short Answer | Input a single line of text |
Date | Select a single date |
Multiple Choice | Select a radio button |
Checkboxes | Select one or more checkboxes |
Number | Input a single numeric value |
Long Unformatted Answer | Input multiple lines of text |
URL | Add a URL into this field |
Employee | A single-select dropdown showing all employees in your Ashby instance |
Creating a project custom field
To create a custom field for your projects, navigate to Custom Fields within Admin, then click the Projects tab. Click New to create a new custom field.
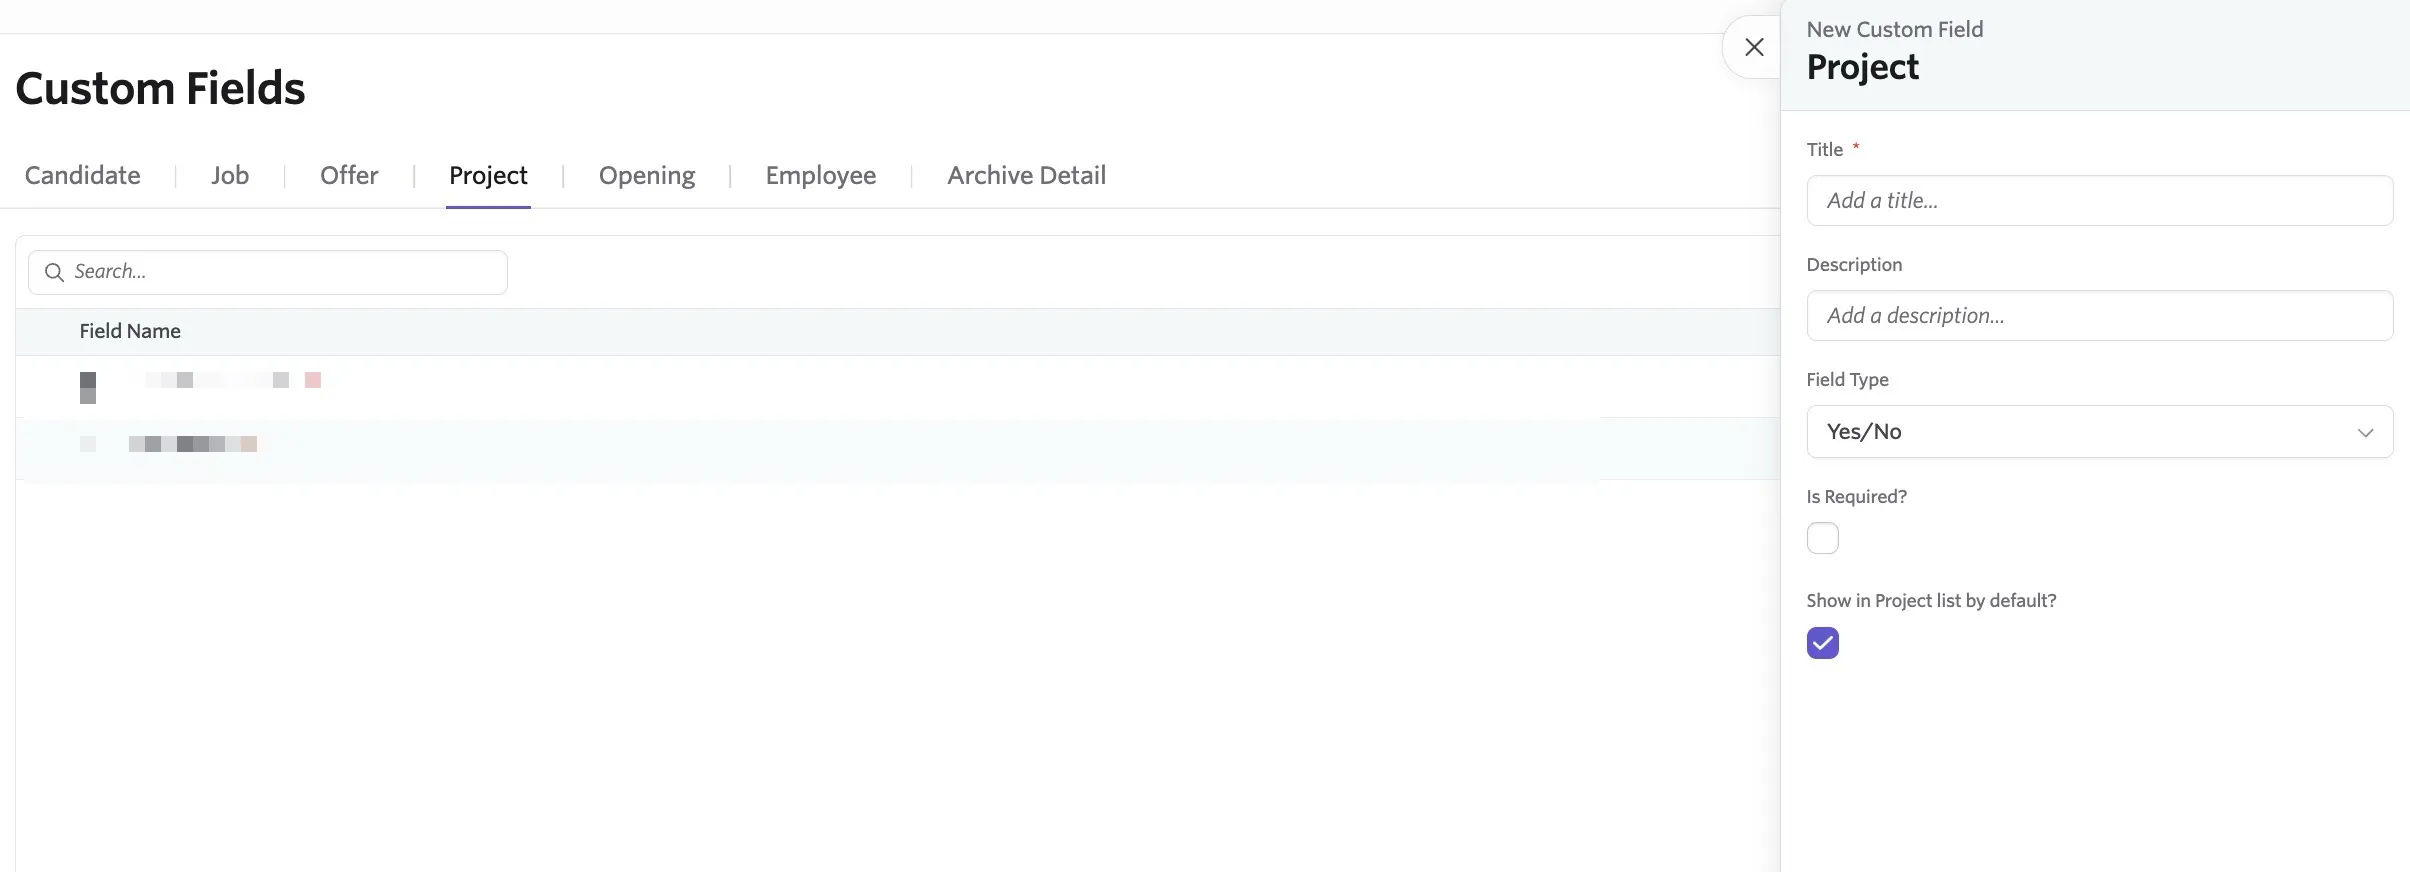
When creating a new custom field, you add the following:
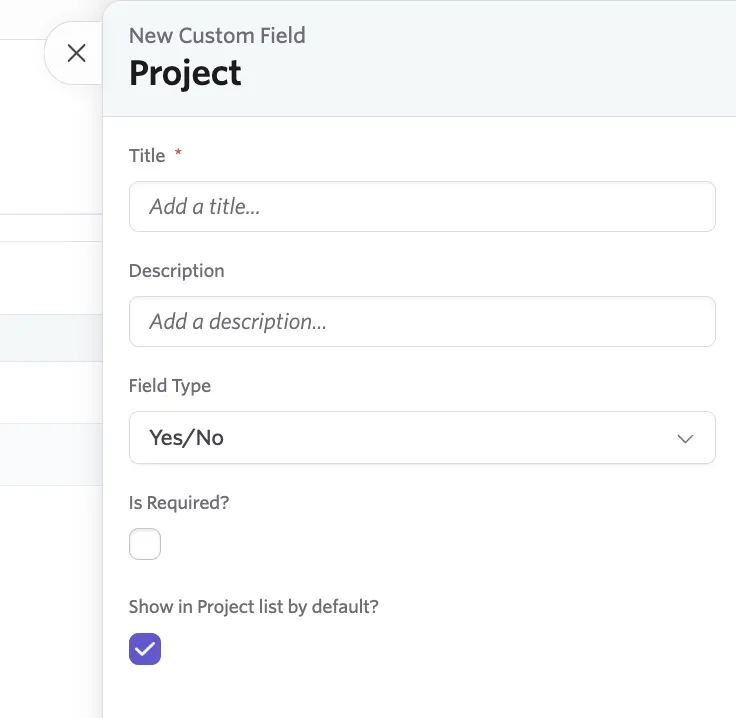
- Title: The name of your field, used for filtering and the header if you add a column for this custom field to your project.
- Description: A description that shows internally to clarify the information to be added to this custom field.
- Field Type: Specify the format of the information added to this field.
- Is Required?: Does this information need to be included?
- Show in Project List by Default? Check this if the custom field should be shown as a column when viewing your project list.
Completing project custom fields
To add information to the custom fields on a project, navigate to Sourcing > Projects. Click the project in question, then click Settings. Your custom fields appear under the Basic Info section.
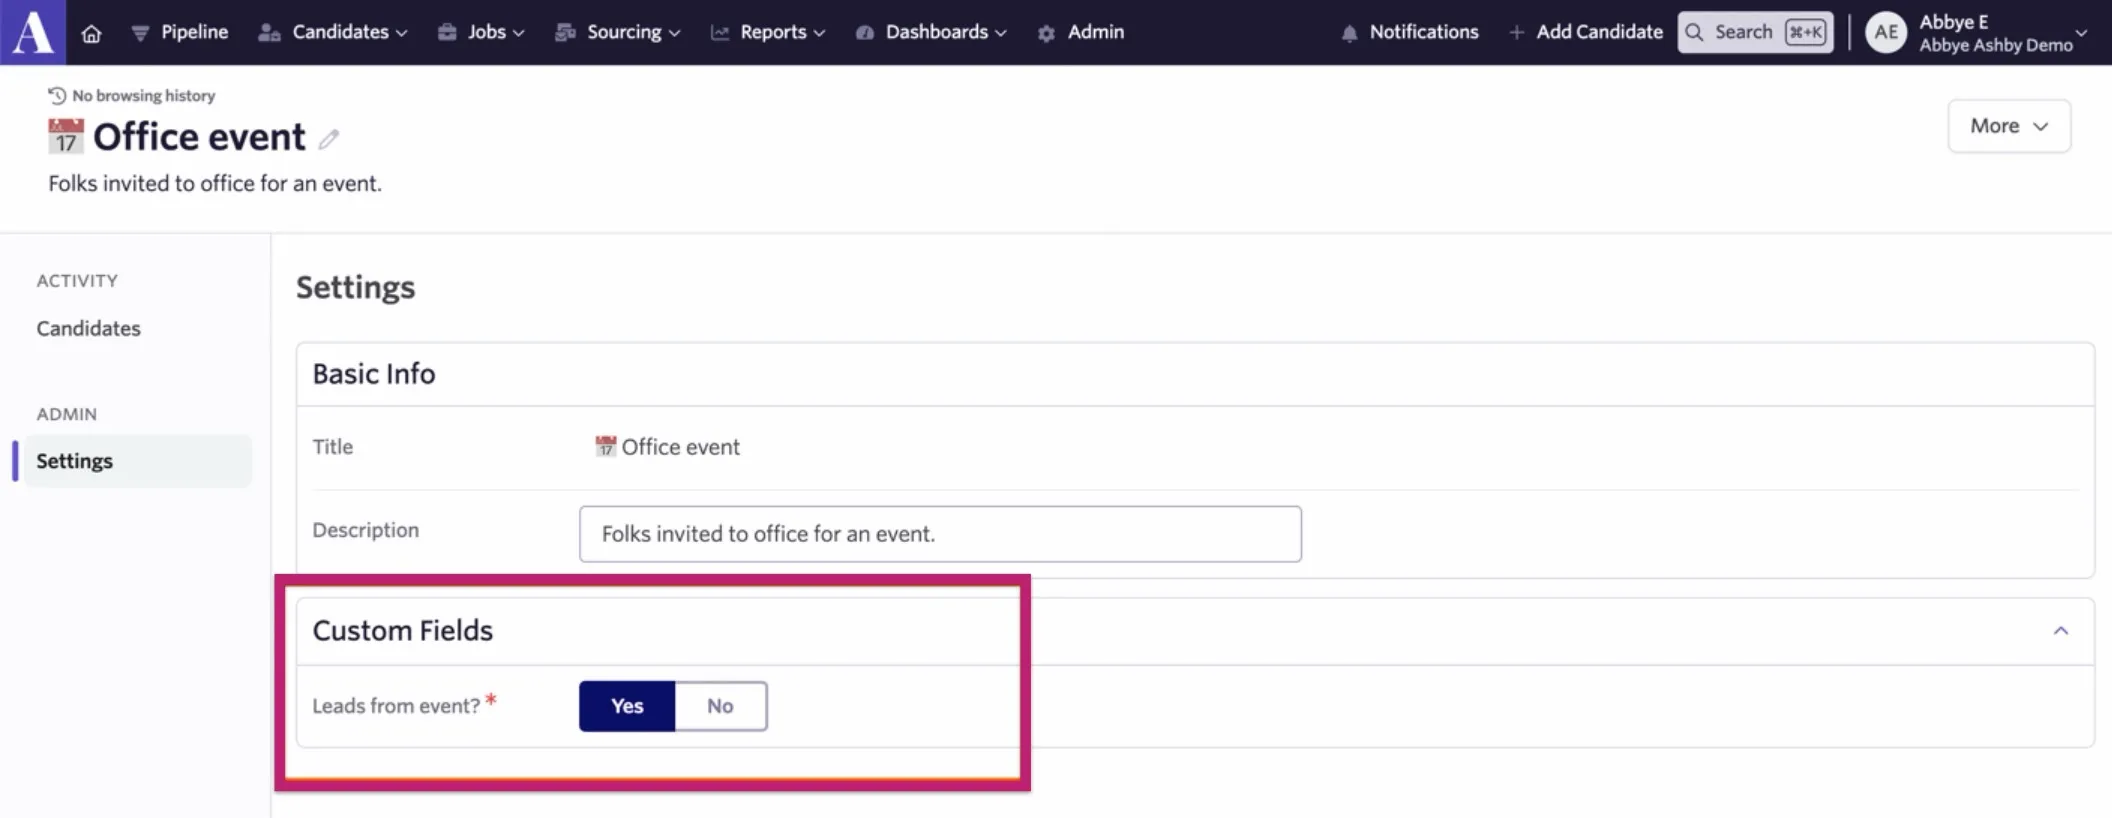
If a custom field is set as Required, you see a warning message below an empty field requesting that you select an option or complete the field.
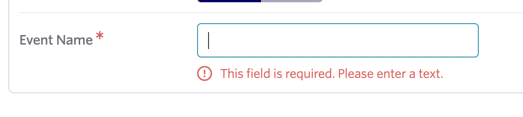
If a required field was previously filled and the information is removed, when navigating to another field, you see a message prompting you to complete the field. If you navigate away from the page leaving the field empty, the field reverts to containing the previously entered information.
Filtering by a project custom field
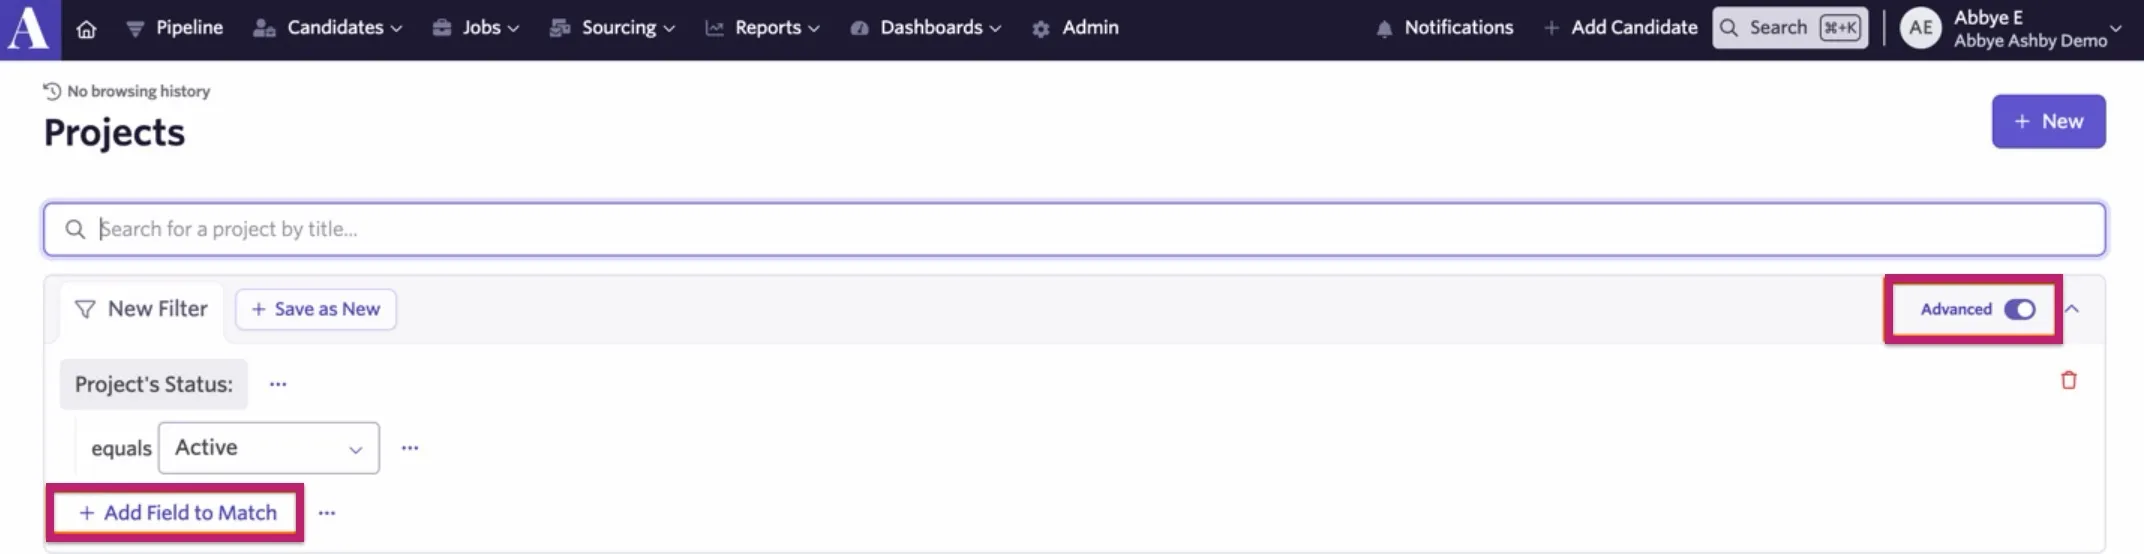
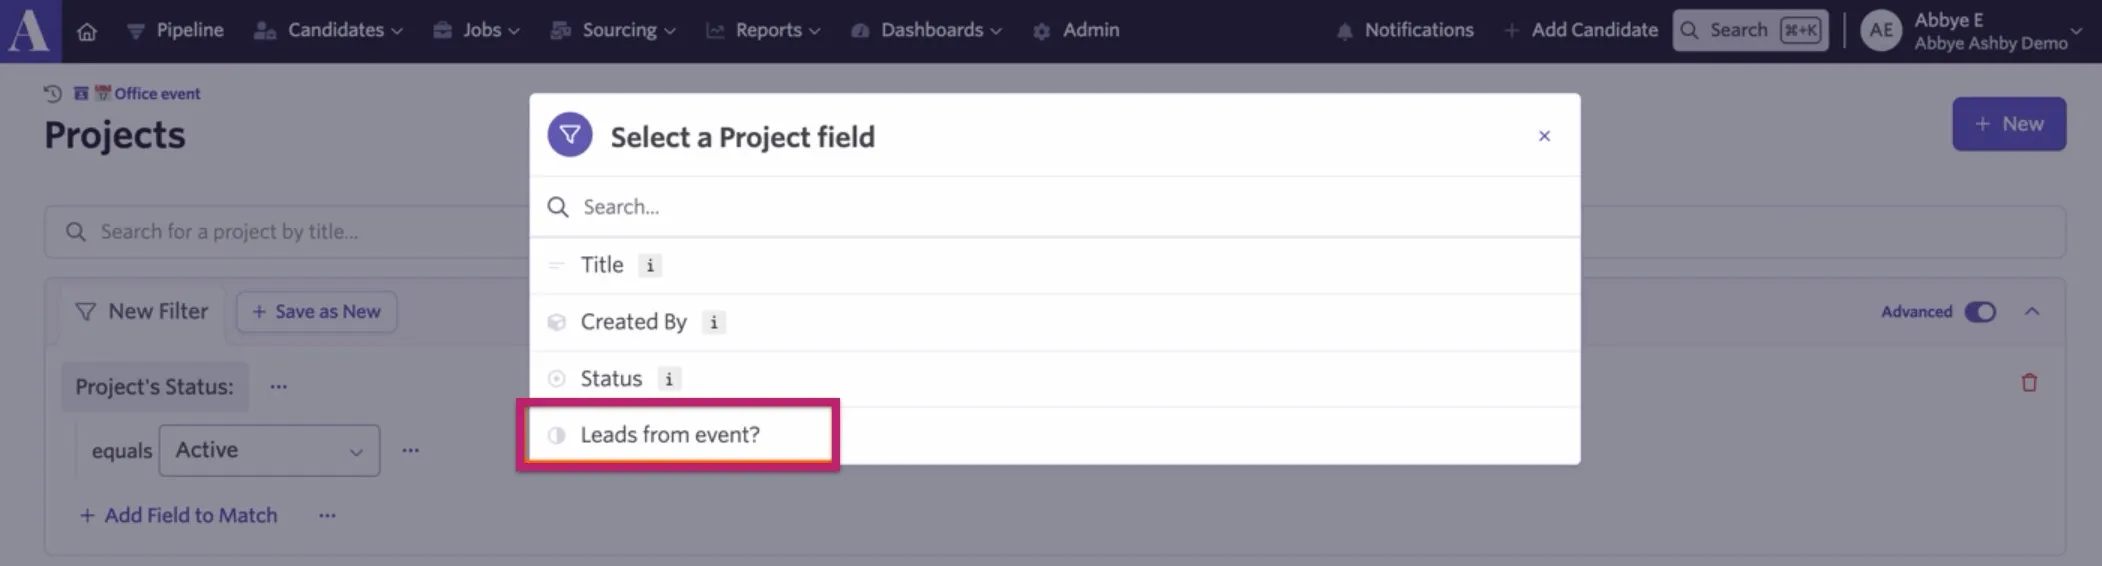
To filter by a project's custom field, ensure that the Advanced toggle is on for filtering. From there, click Add Field to Match to select the custom field you'd like to filter by.
Once you select the filter, specify the field information you want to use to find specific projects.
Creating custom fields: Opening custom fields
You can create openings custom fields to add additional internal information about an opening. Just as with a job, you can fill in the field title, add a description, and pick a field type for data input. With an opening custom field, you have the additional field type option of a compensation range. Learn more about openings in Openings ManagementOpenings Management.
Field types
Field Type | Description |
|---|---|
Yes/No | Toggle yes or no |
Short Answer | Input a single line of text |
Date | Select a single date |
Multiple Choice | Select a radio button |
Checkboxes | Select one or more checkboxes |
Number | Input a single numeric value |
Compensation Range | A compensation range and interval |
Number Range | A range of numbers with a lower and upper bound |
Long Unformatted Answer | Input multiple lines of text |
URL | Add a URL into this field |
Employee | A single-select dropdown showing all employees in your Ashby instance |
Create an opening custom field
Navigate to the opening custom field view, then click + New in the top right corner of the page.
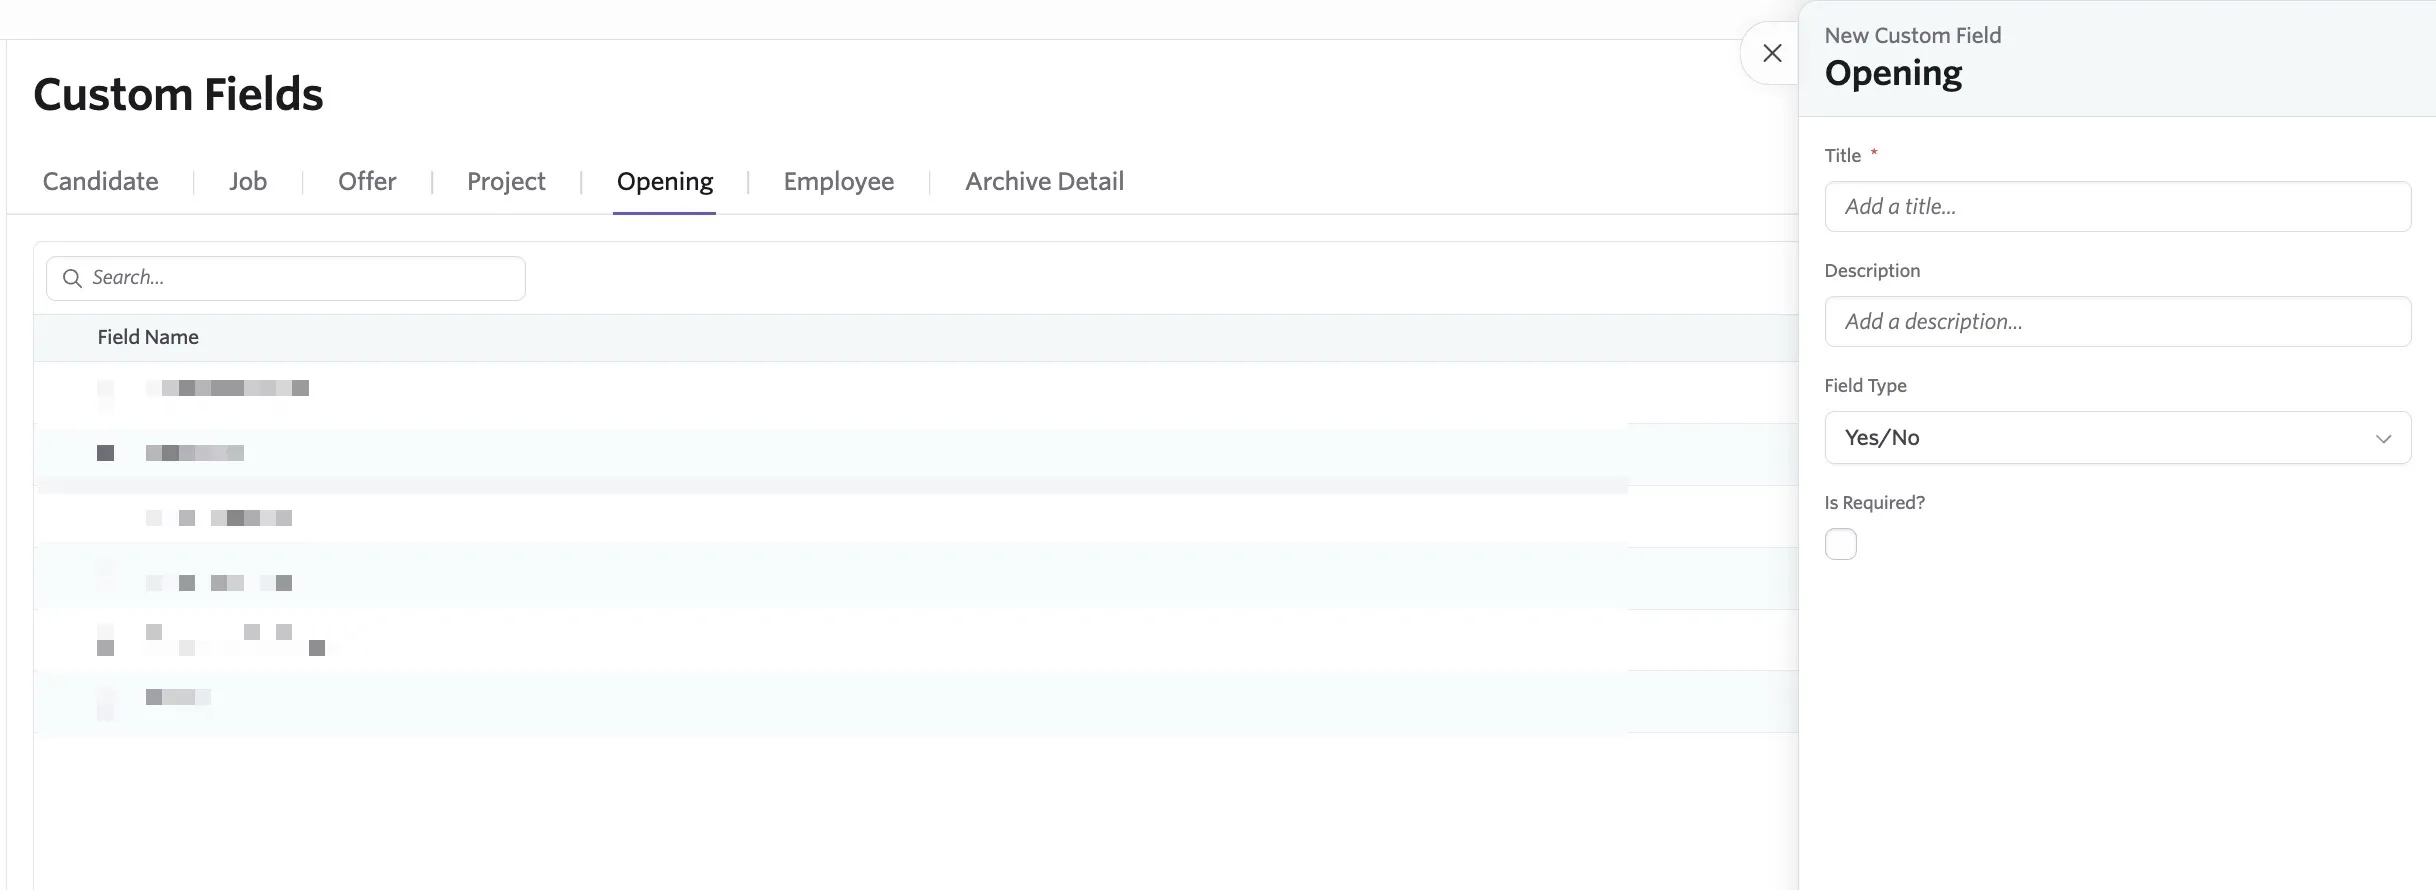
A configuration form appears with the following options:
- Title: Name your field.
- Description: Optionally, add a description that appears below the title.
- Field Type: Determine the type of custom field you'd like to configure.
- Is Required?: If checked, an opening cannot be moved from its draft state unless the required field is completed.
When editing the custom field, you see additional options:
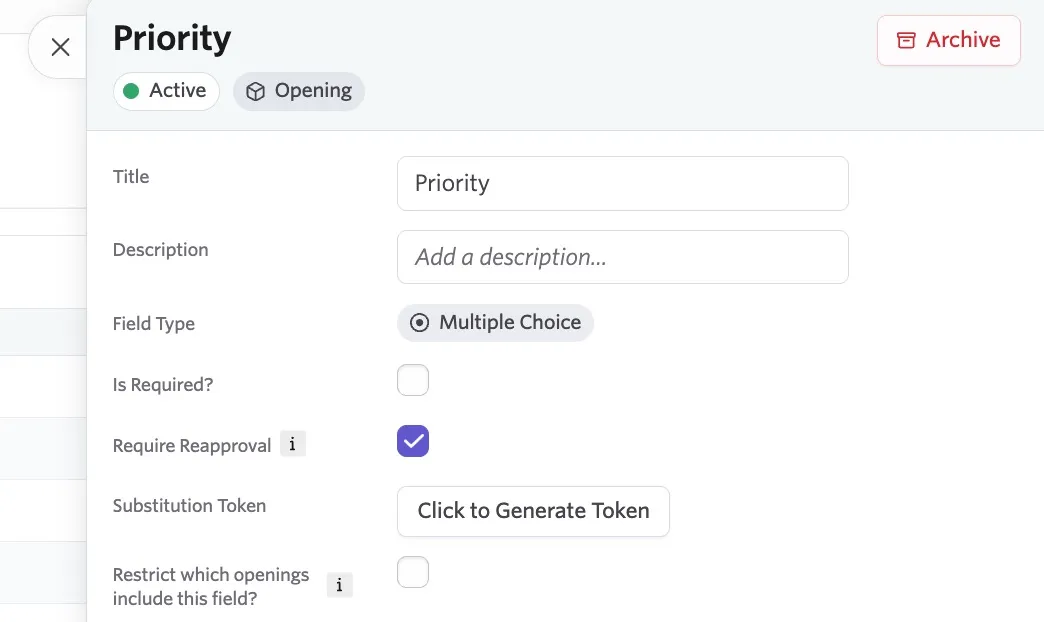
- Substitution Token: Click the Click to Generate Token button to create a substitution token for this custom field.
- Restrict which openings include this field? Set criteria here to determine the openings that should include this field.
You can edit default opening custom fields to set them as required. You can't set criteria to limit the jobs that include default fields.
Find opening custom fields on openings
Once created, the custom fields appear at the bottom of the opening form.
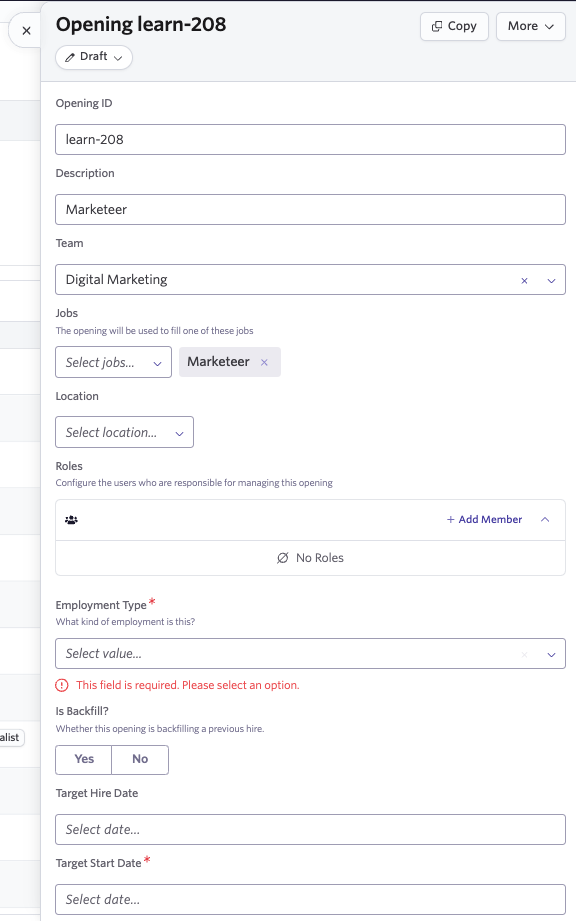
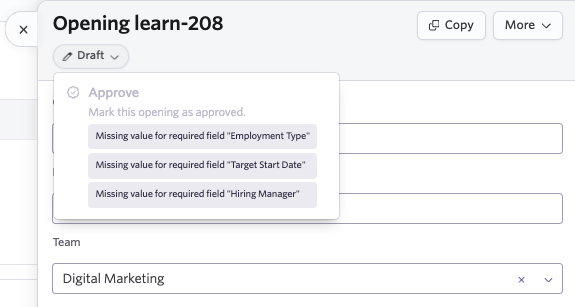
When clicking the Draft tab below the opening ID to adjust the opening status, if any required fields aren't completed, you see a Missing Value message. You can create and amend a draft opening without completing the required fields. The Missing Value message appears only when you change the opening status.
Creating custom fields: Employee custom fields
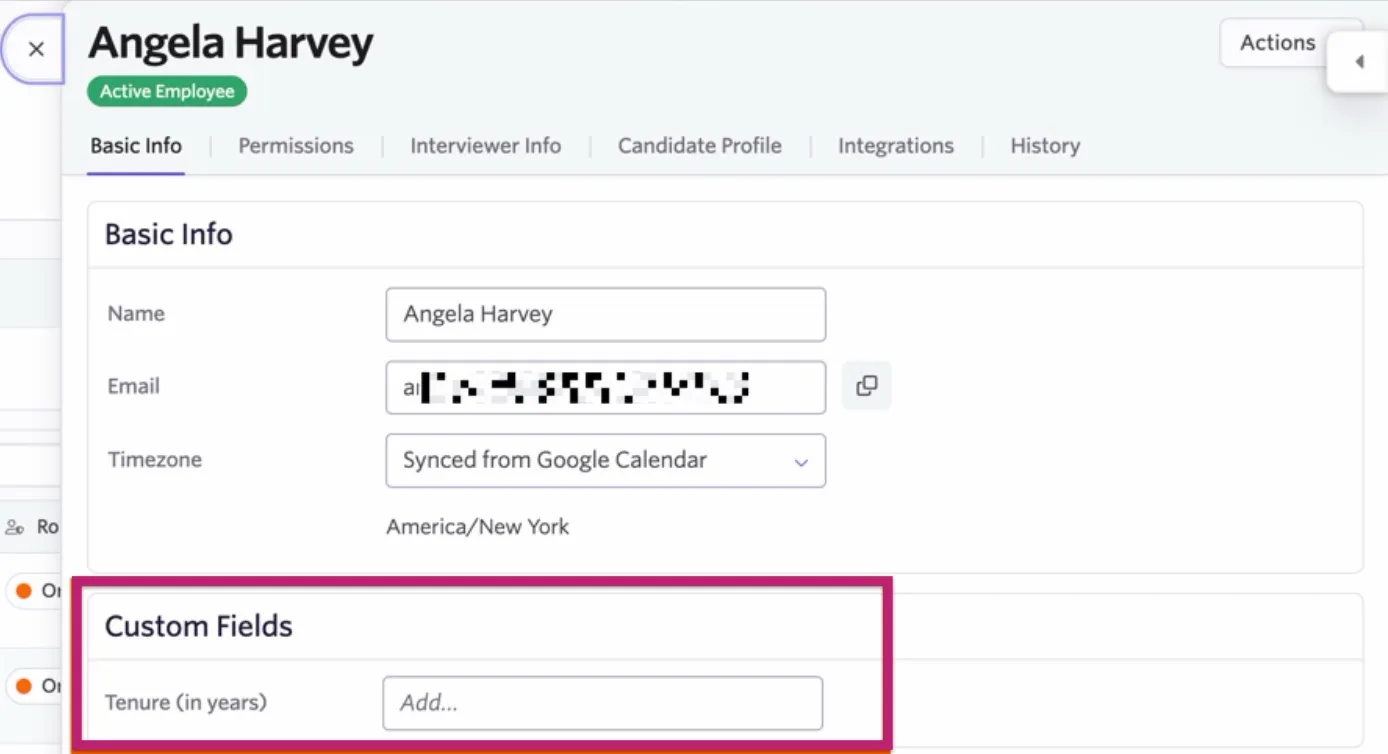
When adding custom fields for employees, these show on the Basic Info tab of each user's profile on the Employees page.
Field types
Field Type | Description |
|---|---|
Yes/No | Toggle yes or no |
Short Answer | Input a single line of text |
Date | Select a single date |
Multiple Choice | Select a radio button |
Checkboxes | Select one or more checkboxes |
Number | Input a single numeric value |
Long Unformatted Answer | Input multiple lines of text |
URL | Add a URL into this field |
Employee | A single-select dropdown showing all employees in your Ashby instance |
Create an employee custom field
To create an employee custom field, navigate to Admin > Organization Setup > Custom Fields and select the Employees tab. Click + New in the top right corner of the page.
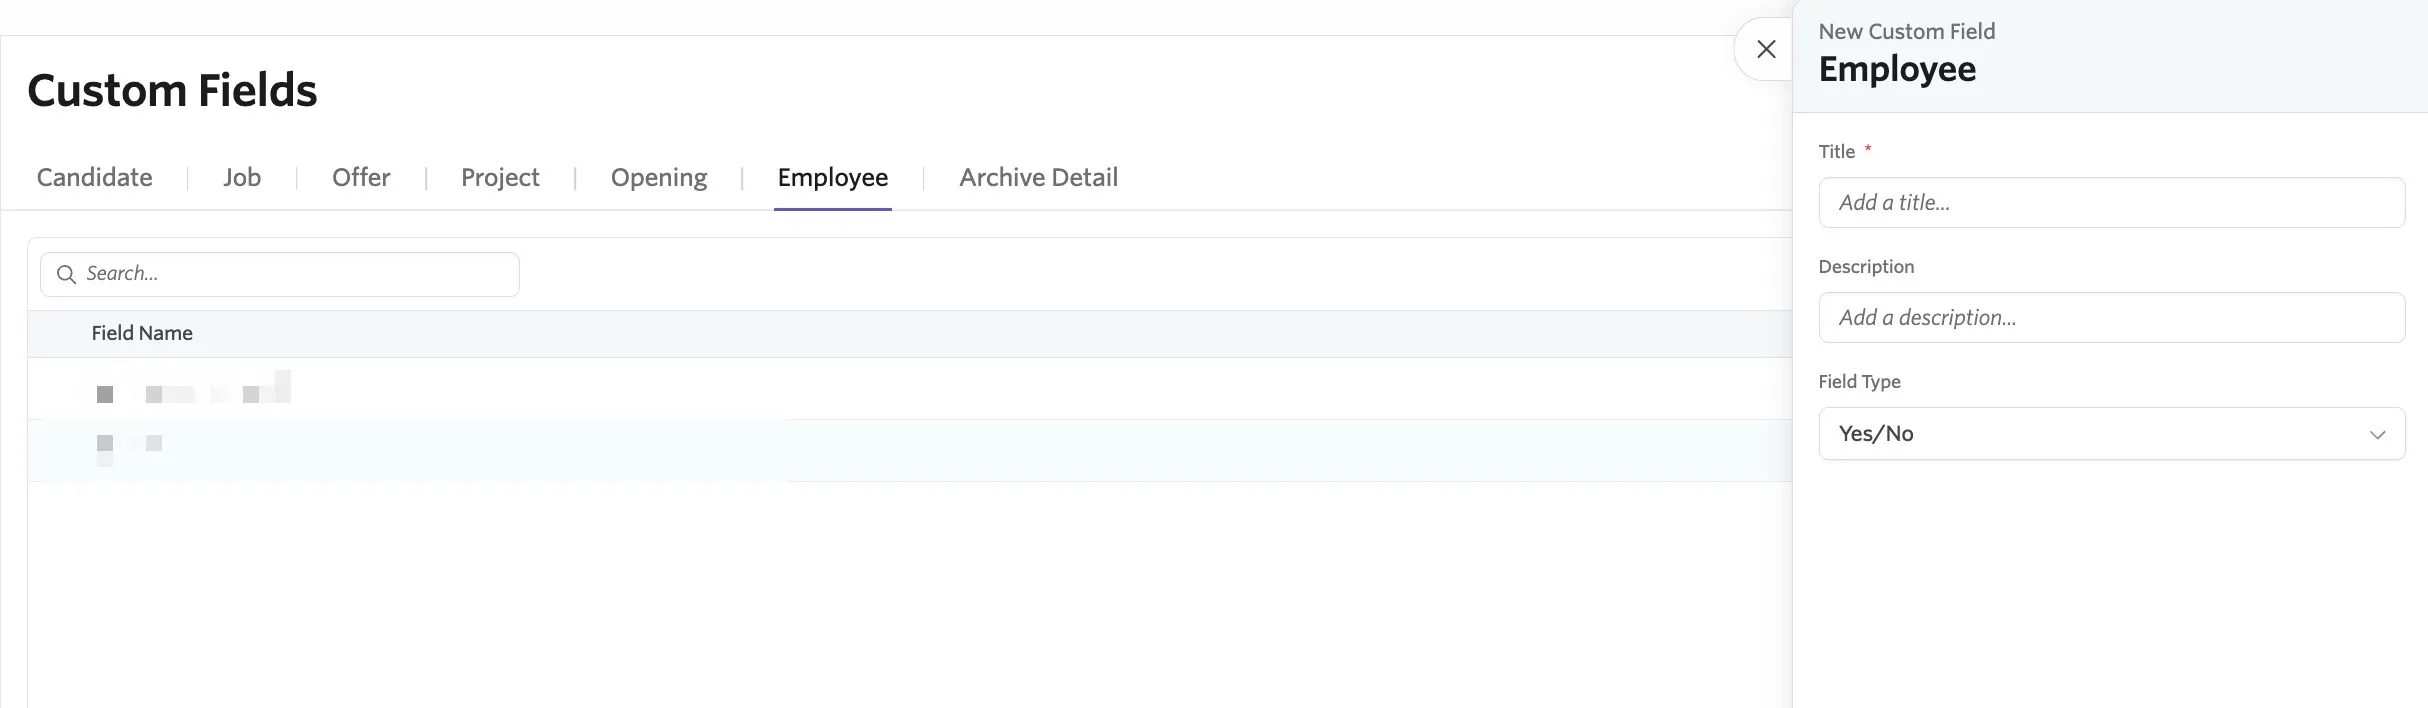
A configuration form appears with the following options:
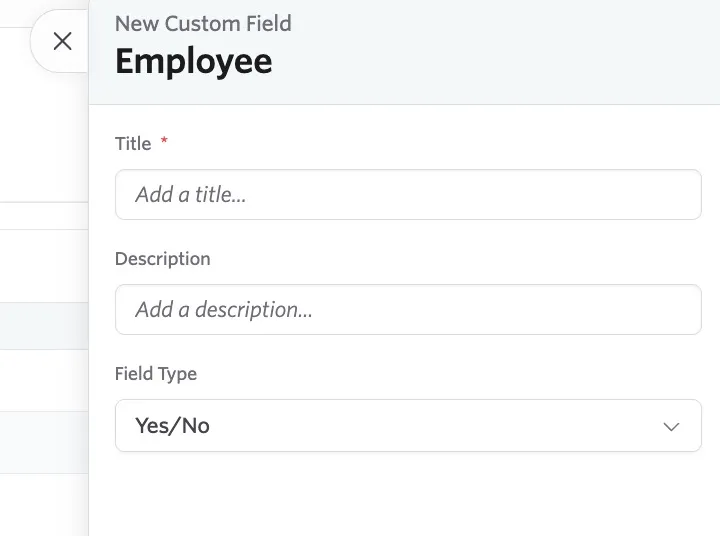
- Object Type: Specified as Employee.
- Title: Name your field.
- Description: Optionally, add a description that appears below the title.
- Field Type: Select the field type from the drop-down to determine the information that should be added to this field.
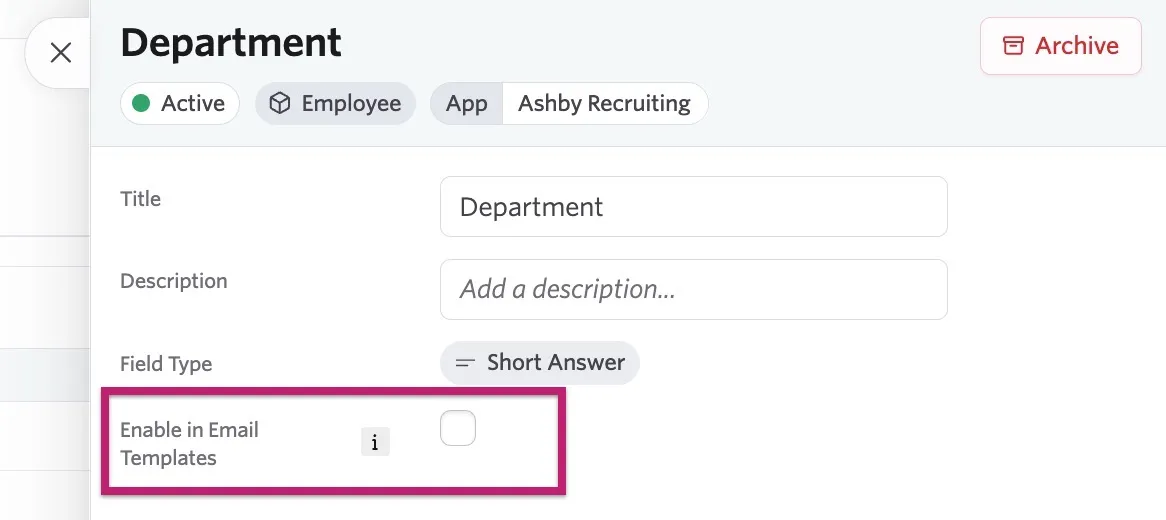
When editing an employee custom field after creating it, you see an additional option:
- Enable in Email Templates?: If checked, the data can be included in emails. Ashby creates a token that you can add to email templates to pull this information over. This option is not supported for checkbox and long unformatted answer custom field types. More on this at Substitution TokensSubstitution Tokens.
Substitution tokens are not supported for checkbox and long unformatted answer custom field types.
Completing the field on a user profile
To access the employee custom field, navigate to the Employees page, then click a user's profile. You can find custom fields on the Basic Info tab of their profile.
Creating custom fields: Archive detail custom fields
You can create custom fields to capture additional data when archiving or rejecting a candidate in Ashby. This option is only available on the Plus and Enterprise plans.
Field types
Field Type | Description |
|---|---|
Yes/No | Toggle yes or no |
Short Answer | Input a single line of text |
Date | Select a single date |
Multiple Choice | Select a radio button |
Checkboxes | Select one or more checkboxes |
Number | Input a single numeric value |
Currency | Determine a currency or select a default currency |
Long Unformatted Answer | Input multiple lines of text |
URL | Add a URL into this field |
Employee | A single-select dropdown showing all employees in your Ashby instance |
Create an archive detail custom field
Navigate to the Archive Detail custom field view, then click + New in the top right corner of the page.
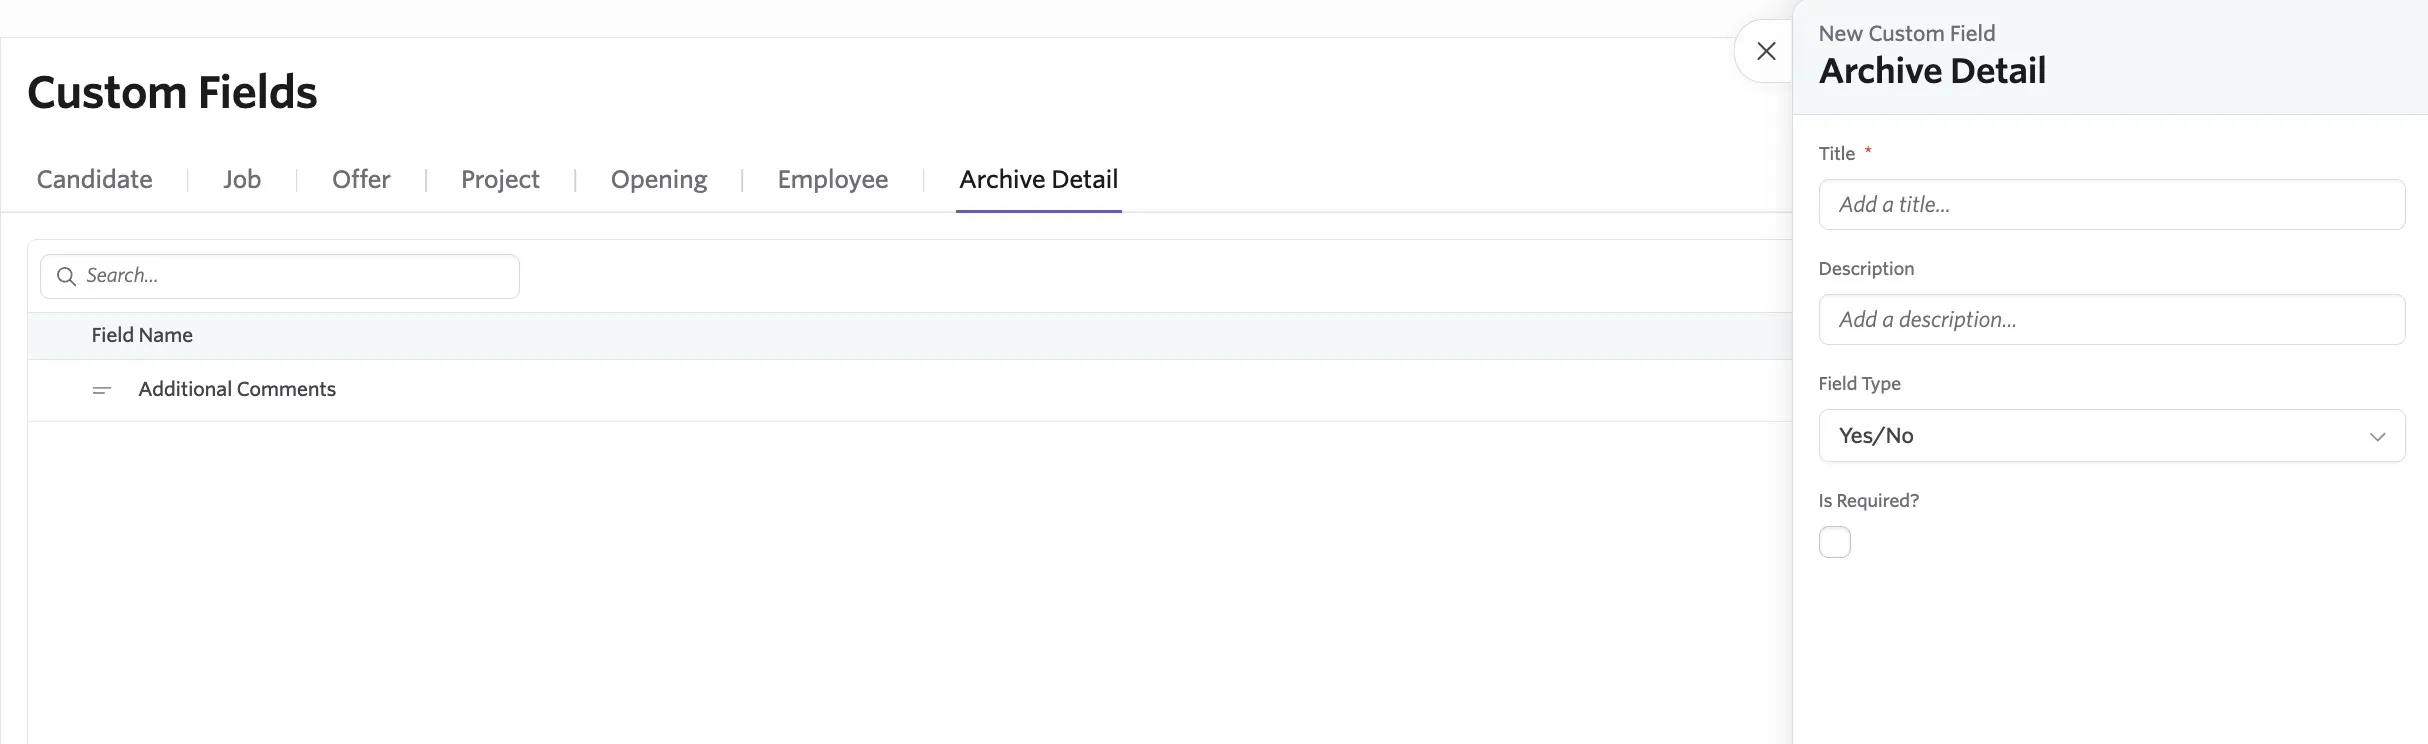
A configuration form appears with the following options:
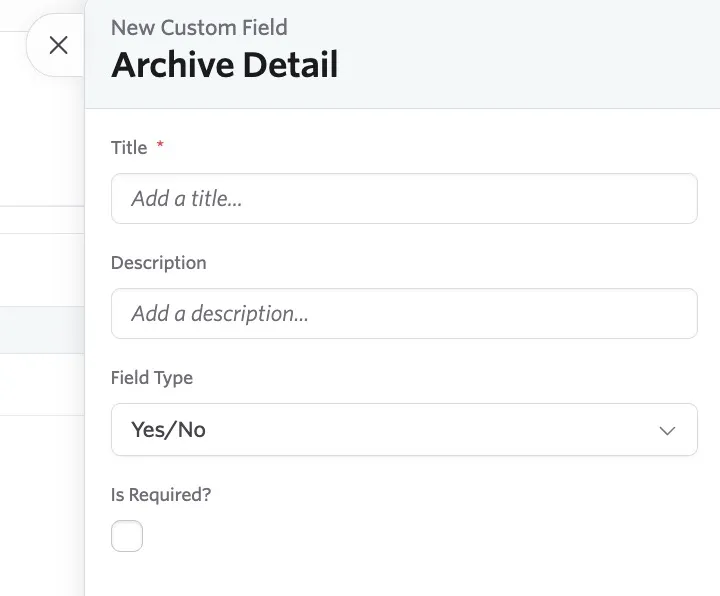
- Title: Name your field.
- Description: Optionally, add a description that appears below the title.
- Field Type (see options above)
- Depending on type selected, an options panel may appear.
- Is Required? Determine whether a value must be added to this field.
When editing an existing archive detail custom field, you see some additional options.
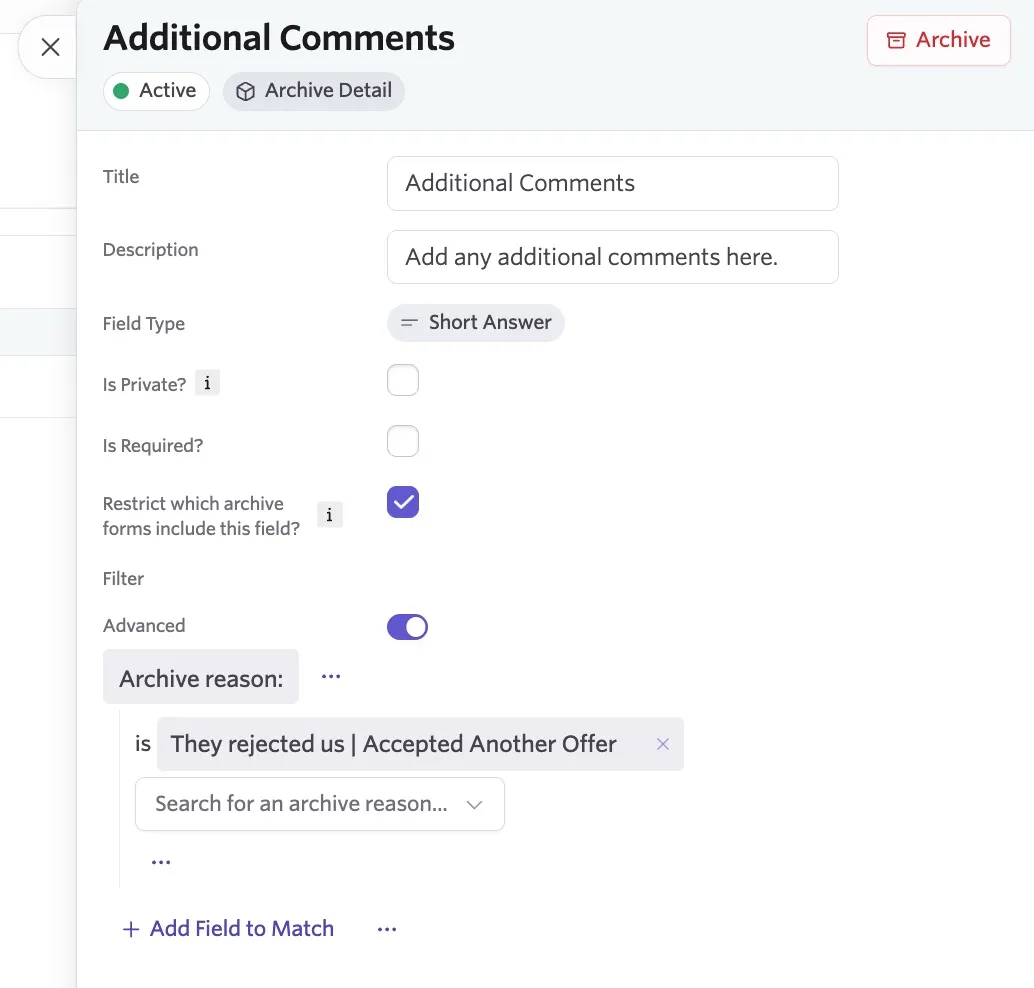
- Is Private?: Determine whether or not all users can see this field, or if only those with Organization Admin or Elevated Access - Admin Private access can see this field.
- Restrict which archive forms include this field? If you check this box, you can set criteria for when this field should appear when archiving a candidate. For example, you could opt to add a filter based on archive reason, so if a candidate gets a competing offer, you can add further details for your reference.
Click + Add Field to Match to select the field to filter by, then specify the value or values for your criteria.
Find archive detail fields when archiving a candidate
If you click Archive on a candidate's job consideration to reject them, your archive details custom fields show on the archive form.
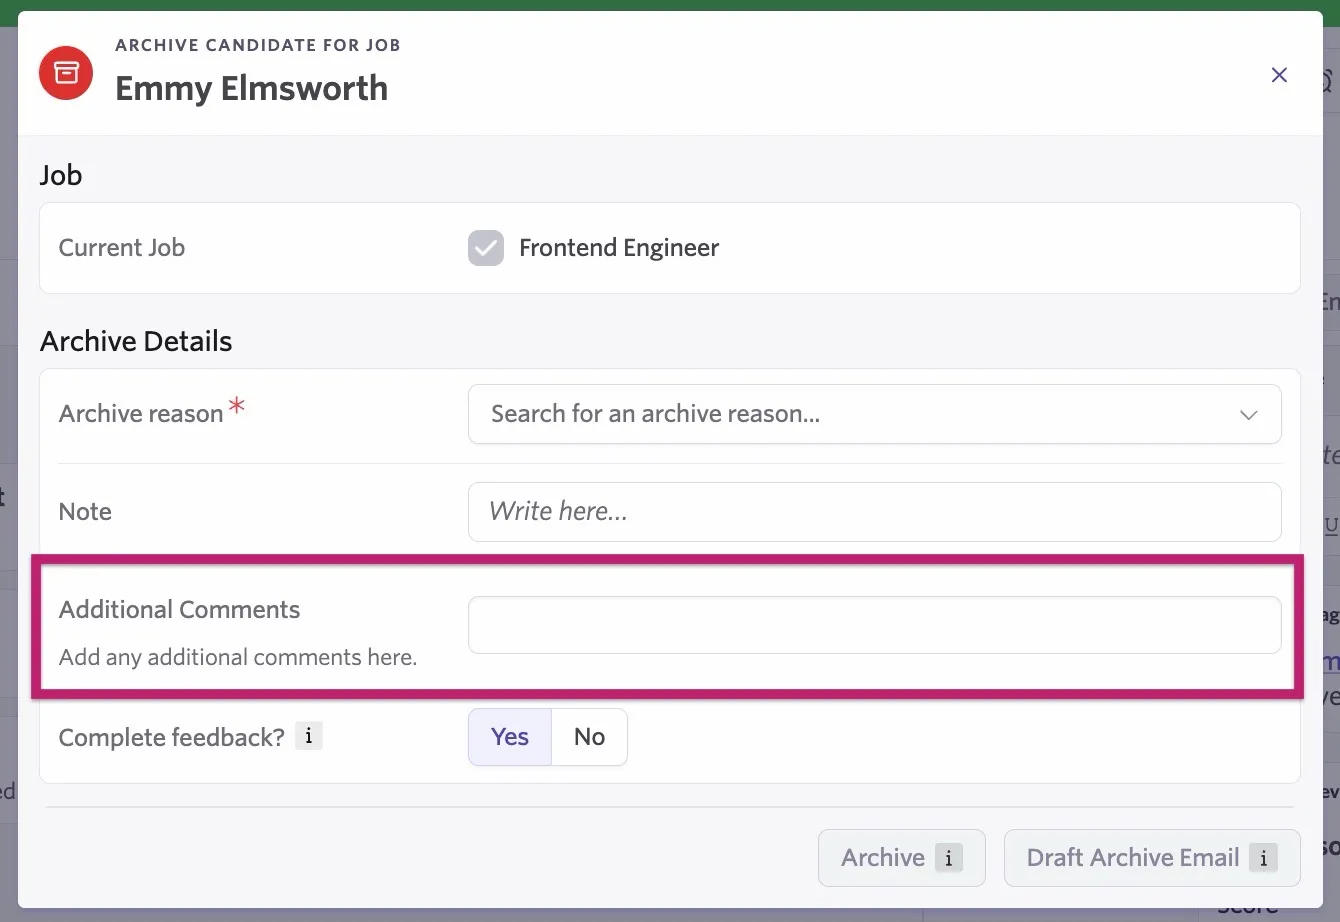
If you have restricted the archive forms that include your custom fields, only those that meet your criteria display your created fields.
Listing archive form details in custom list reports
Once you complete the archive form, you can run reports using your archive detail custom fields to view this information. You can either display your archive detail custom fields on a report (as fields to show) or use them as filters on a report.
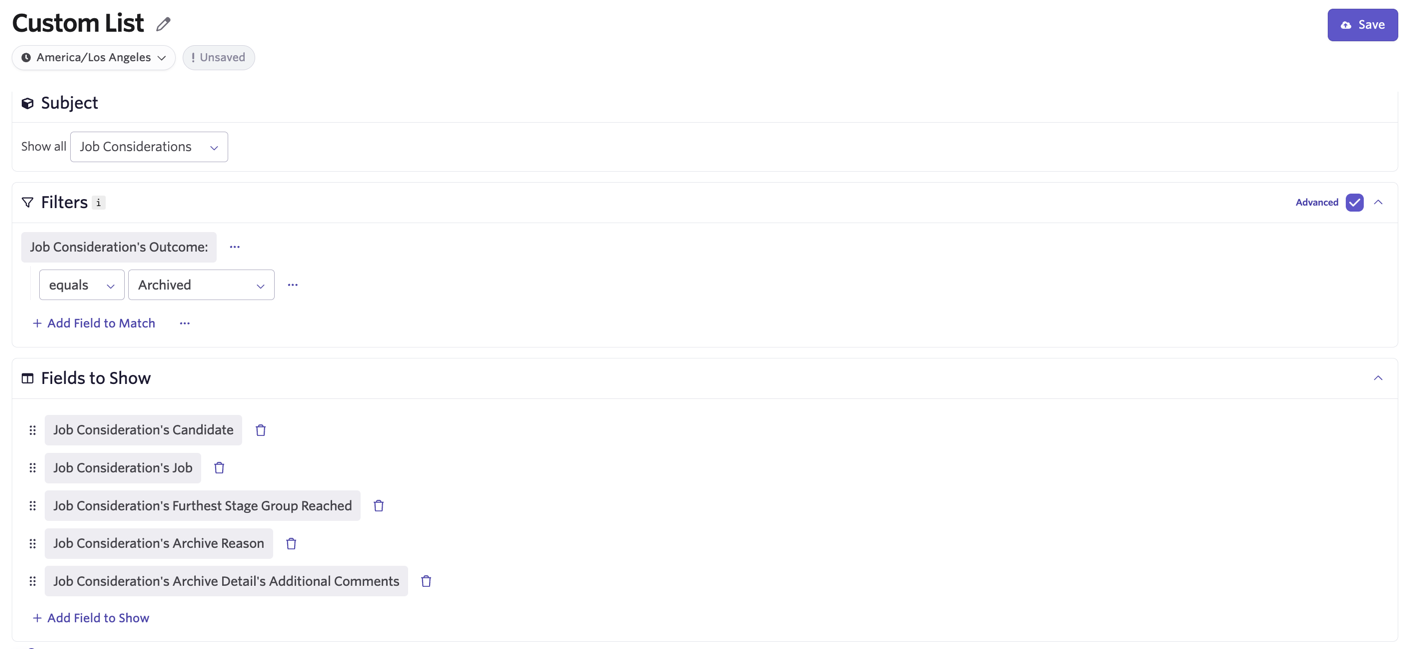
For example, you could build a custom list report, filtering for archived candidates, then opt to add your archive detail custom fields as fields to show so this information is easily accessible.
Navigate to Reports > Build Reports > Custom List.
Subject: Job Considerations
Time Field and Interview: Job Consideration's Started at to show [insert your chosen time range here] per [set your interval here].
Filter: Job Consideration's Outcome is Archived.
Fields to Show: Job Consideration's Candidate, Job Consideration's Job, and any archive reason custom fields you'd like to include. You can also opt to include information like the furthest stage group reached and the job consideration's archive reason.
FAQs
I can't view a custom field I should see. What do I do?
Check with an Organization Admin to see if the Is Private option is enabled for that field. They can either disable it or adjust your permissions.
How do I archive or restore a custom field?
You can archive or restore a custom field when editing it. Click the Archive/Restore button in the top right corner of the field to take the appropriate action.
Why can't I archive certain custom fields?
Default custom fields (e.g., Reason for Outreach) cannot be archived. Check for the Default tag when editing them to identify default fields.
How do I sort my fields?
Fields appear in the same order they appear on the Custom Fields page in Admin.
If you use a multiple choice or checkbox field, you can sort the options alphabetically or in reverse alphabetical order.
Can I show information added to a candidate custom field to an interviewer on their interview briefing?
Yes. Navigate to Admin > Interviewer Briefing Info. From there, you can select the fields you'd like to show to your interviewing panel when they look at the interview briefing.
Want to get this information from the candidate's application form? Check out our guide on Form Field ConnectorsForm Field Connectors to find out how to link application form fields to candidate custom fields.
Can I import data into custom fields when importing via the bulk CSV importer?
Yes. You can select custom fields at the mapping stage. Find more information on custom fields in our Custom FieldsCustom Fields guide.
I have a lot of custom fields — what filtering options are available?
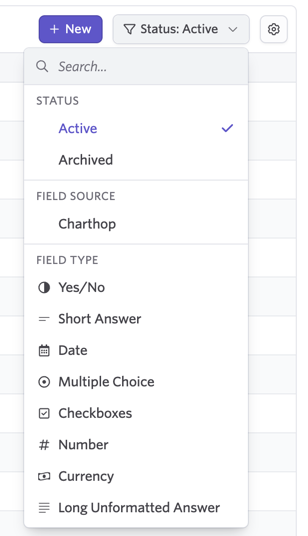
When filtering custom fields, you can filter by status (Active or Archived), by field type (e.g., Yes/No, Short Answer), or by field source (e.g., a custom offer field syncing over from an integration Human Resources Information System (HRIS)).
Can I use archive detail custom fields to migrate and map Greenhouse rejection questions?
Yes, Ashby maps Greenhouse rejection questions as archive detail custom fields during migration. If you need to have these remapped, reach out to your Customer Success Manager (CSM) or [email protected].