---
title: Workday
slug: workday
docTags: rl7p3XLQknqPB1UQ70cu_,pnTugMDqVVXgkHZy0AYvk
createdAt: 2025-07-10T11:42:31.263Z
---
The Workday integration can only be set up on the Enterprise plan:
| Foundations | Legacy Plus | Plus | Enterprise |
| ----------- | ----------- | ---- | ---------- |
| ❌ | ❌ | ❌ | ✅ |
## Integration Overview
:::hint{type="info"}
The Workday integration requires a conversation between your Ashby Customer Success team, your Workday administrator, and your talent team. In order to start the process of integrating, please reach out to your Ashby CSM to get a Workday kickoff call scheduled.
The process of setting up the full integration can take a variable amount of time and is highly dependent on how you use Workday today and what your strategy will be moving forward. We've seen this take anywhere between a couple of days to up to 4 weeks. The stages include a conversation about strategy, then setting the integration up in a sandbox, and then moving that to production.
:::
| Sync custom fields | Sync offer letters | Sync file uploads | One or two-way sync |
| ---------------------------------------- | ------------------ | ----------------- | -------------------------------------------------------------------------------------------------------------------------- |
| See further information within the guide | ✔ | ❌ | Two-way sync
From Workday:
Positions > Openings Job Reqs > Jobs
To Workday:
Offers > Workers & CWs |
Ashby allows setting up an integration with Workday. The integration has the following available features:
- Sync Workday Positions into Ashby Openings: Whenever a position becomes available for recruiting, the integration creates an Opening in Ashby.
- Sync Job Requisitions into Ashby Jobs
- Send Hired candidates to Workday
- Create ad-hoc Positions for hired candidates in Workday
The Workday sync runs once every 20 minutes. The sync will update all fields on all Open Job Requisitions and/or Positions in Workday. There is also a `Sync Now` button that Organization Administrators can click to immediately initiate a sync.
## Enabling the integration
:::hint{type="warning"}
While it is possible to use it without headcount planning, it’s strongly recommended to enable manual headcount planning if you’re looking to use the Workday integration.
:::
1. Head over to the Ashby Integration Marketplace at [https://app.ashbyhq.com/admin/integrations/marketplace/workday](https://app.ashbyhq.com/admin/integrations/marketplace/workday) and click on the `+Enable Workday` button.
2. Configure your Workday integration System User (ISU) and enter information in the Access Settings of Ashby. Follow the steps in [Workday HRIS Integration Setup](docId:2uDZn4hF4rJR6bsy9jJPu) for detailed configuration instructions.
### General Configuration
- Create Openings from Workday Positions: If enabled, syncs positions from Workday and creates Ashby openings
- Create Workday Position from Openings on Hire: If enabled, when hiring a candidate into an Opening that was not imported from Workday as part of the Positions sync, Ashby attempts to create a Position in Workday from the Opening the candidate was hired for.
- Attach Offer Letter to Hire Employee: If enabled, sends the signed Offer Letter document from Ashby to Workday as a Worker Document with type Offer when the Hire event is initiated.
### Sync Configuration
Settings for data synced from Workday in each delta sync are configured in the Sync Configuration. Similar to how Auto-Reject configurations work, there’s always at most one active configuration and at most one draft configuration. To change the configuration, first create a new draft configuration, do all the necessary setup, and then activate the configuration.
A Sync Configuration consists of these five things:
::Image[]{src="https://cdn.zappy.app/00c54112f490f12d896fdef9257b5dc7.png" size="70" width="487" height="445" darkWidth="487" darkHeight="445" position="center" showCaption="false"}
- Job Fields:
- Sync direction: Workday → Ashby
- These are the job fields that can be synced from Workday into Ashby. For each of the enabled fields, the sync generates a corresponding job custom field.
- Opening Fields:
- Sync direction: Workday → Ashby
- If `Sync Positions` is enabled, these fields will be synced into Openings created from Workday positions. For each of the enabled fields, the sync generates a corresponding opening custom field.
- Offer Version Fields:
- Sync direction: Ashby → Workday
- Every field enabled here will create an offer custom field that can be used as part of the offer form. For many of the fields, we also sync in the selectable values.
- Employee Fields
- Sync direction: Workday → Ashby
- Employee lists come from your SSO provider (e.g Okta). However, for customers with an Ashby \<> Workday integration, some data can be synced from Workday to enhance the Employee records in Ashby. For each of the enabled fields, the sync generates a corresponding Employee custom field.
- Job Mapping:
- In order to create Ashby jobs from Workday Job Requisitions, this allows setting up mapping logic for which job should be created from which Ashby job template.
::Image[]{src="https://cdn.zappy.app/95d6504ad2d03a59aa962cccb1880a37.png" size="64" width="499" height="438" darkWidth="499" darkHeight="438" position="center" showCaption="false"}
## Video Overview
Here’s a walkthrough of the Ashby \<> Workday integration.
::loom{url="https://www.loom.com/embed/6064a1e2bf30410c8b482a792475f065"}
## Sync positions into Ashby
To sync positions from Workday into Ashby Openings, you need to enable the Create Openings from Workday Positions toggle in the Workday integration settings. Once enabled, Ashby will sync Workday Positions that are marked as Available for Recruiting into Ashby:
Positions in Workday can be seen as a seat that can be filled and unfilled multiple times. Ashby Openings, in contrast, represent hiring requests. We support re-filling Positions if they are later re-opened and unfilled, or are made available for overlap. A new Opening gets created in Ashby every time the Position is re-opened. The Opening ID for the new Opening would be the Workday Position ID with a -1 appended on the end. The appended number increases by 1 for each subsequent re-opening of the existing Position.
Position data we sync into Openings:
- Position ID → Opening ID
- Position’s Job Posting Title → Opening Description
- Opening State: Approved
- Job → Associated Job created from Workday Job Requistition (if Job Mapping is configured and the Position is associated with a Job Requisition in Workday)
- Custom fields according to the selection in Opening Fields
Data we don’t sync into Openings:
- Team: The Ashby Team field is used for user permissions and Job Board visibility in Ashby. It is not the same as the Supervisory Organization, and there is no way to map a field from the Position in Workday to the Ashby team hierarchy. You can sync data fields from the Position in Workday, such as Supervisory Organization, Cost Center, and custom organizations, as Custom Fields on the Opening in Ashby, so they can be synced for reporting and operational purposes; they just would not be synced into the Ashby Team field.
- Roles
- Location: Similar situation as for teams
- Target Start Date: The workday data model doesn’t maintain this information
All those fields can be maintained manually in Ashby once the opening gets imported.
### Opening Updates After Initial Sync
- Only positions identified in Workday as "Available For Recruiting" get imported into Ashby. A position is considered Available for Recruiting in Workday when any of the following criteria are met:
- It is marked as Available for Overlap (even if there is an incumbent)
- The incumbent vacates the position and it is now Unfilled (even if you change the Availability Date and/or Earliest Hire Date on the position Restrictions to a future date)
- A new Unfilled position is created with a current or past Availability Date
- It has an Open job requisition against it.
- A position is NOT Available for Recruiting and will NOT be imported to Ashby when:
- It is Frozen
- It is Closed
- There is an incumbent in the position AND it is NOT marked as Available for Overlap AND there is no Open job requisition tied to it
- A new Unfilled position is created with a future Availability Date.
- The initial opening state when an Opening gets imported is "Approved"
- An opening can (and must) be manually moved to "Open" to hire into that opening
- The opening state is only updated for openings that are not filled. Once an opening got filled, the integration stops managing the state. This accounts for the fact that an opening gets filled before the hire information gets sent to Workday. Even after sending the data to Workday, the Workday Position only gets filled once the "Hire Employee" business process is completed in Workday, which might take additional time.
- Positions closed in Workday get closed in Ashby (if they got imported previously due to being “Available For Recruiting” and only if they're not filled).
- Positions not available for recruiting don’t get imported. If they got imported previously due to being "Available For Recruiting" and then become unavailable:
- If they were "Open" before, they get closed
- If they were "Approved" or “Draft” before, they'd get archived. Those draft openings can be manually deleted if desired.
- Once they become available for recruiting again, a new Opening will be created with the Opening ID \[Position ID] -1 in status "Approved"
- If a Position is associated with a Job Requisition in Workday and the Job Requisition is closed:
- The Opening in Ashby will be Closed (if it was previously Open) or Archived (if it was previously Draft or Approved).
- If the Position remains Open in Workday after the Job Requisition is Closed, a new Opening will be created with the Opening ID \[Position ID]-1 in status “Approved”.
- Positions deleted in Workday automatically get archived in Ashby.
## Sync Job Requisitions into Ashby
The integration can automatically create Ashby jobs from Workday Job Requisitions. By default, since no job mappings have been set up, Job Requisitions don’t get imported into Ashby. In order to set job sync up, these steps must be performed:
1. Create job templates in Ashby that should be used as a basis for creating an Ashby job from a Job Requisition
2. Configure Job Mappings: For each job template, set a filter to tell the integration which job requisitions should be imported using which job template
1. It’s possible to set up multiple job mappings. The order of mappings is important. For each job requisition, the first matching mapping from top to bottom will be used.
2. To import all job requisitions, you can set up a mapping without a filter as the last mapping. This allows for catching all remaining job requisitions.
3. A job mapping allows setting an override team and location. This is useful in two scenarios:
1. The job template didn’t define a team or location: In this case, setting those overrides is required
2. Use a single job template for multiple teams/locations: In this case, you can specify multiple mappings that use the same job template but a different team/location. E.g., the mapping filter could include a filter based on the job requisition’s location and map it to an Ashby location.
When a new job requisition or a job requisition that hasn’t been imported already gets synced, the mapping list gets evaluated from top to bottom. The first mapping that matches a job requisition will be used. If no matching mapping can be found, the job requisition doesn’t get imported but will be re-considered during the next sync.
When a matching mapping could be found, a new job gets created from the specified job template:
1. It uses the job template as a basis for creating the job.
2. It uses the job requisition’s Job Posting Title as the job’s title.
3. If an override team and/or location is set on the mapping, it will be used for the new job.
4. New jobs get created as "Draft" and need to be opened manually.
Additionally, the following data is kept in sync with the job:
- The job requisition’s Job Posting Title gets synced into the job’s title
- The job requisition’s Employment Type gets synced into the job’s Employment Type
- Custom fields that have been enabled in the integration configuration’s Job Fields
- The Job Requisition ID gets synced into the Job’s Custom Requisition Id field
- Workday Position ↔ Job Requisition links get synced into Opening ↔ Job links
## Send Hired Candidates to Workday
Once a candidate gets hired in Ashby, it is possible to send the candidate to Workday. Internally the integration triggers the `Hire Employee` business process in Workday but doesn’t complete the process automatically. Completing the business process requires data not available in Ashby and what data is required also differentiates from one customer to another, depending on how they set up their Workday instance.
When hiring a candidate, there are two scenarios:
### Hiring into an Opening imported by the Workday Integration
In this scenario, theoretically, no additional offer fields are required to send hires successfully to Workday. By default, we take over the following data from the position the candidate has been hired into:
- Supervisory Organization (optional): We set the position’s organization as the supervisory organization for the new hire
- Country (optional): We use the country of the position’s job requisition’s primary location as the country for the new hire
Workday validates data according to the information provided here, so make sure the other candidate’s data (such as the phone number) matches the country. E.g., Workday rejects a US phone number when hiring for a German position. In case you need more flexibility around those two fields, they can be enabled as an offer custom field which would allow overriding the values if necessary. Depending on the hiring restrictions of the position, it’s possible that more data is required, but this depends on how the position/job requisition is configured.
### Hiring into an Opening NOT imported by the Workday Integration
For this scenario to make sense, make sure to enable the “Create Position From Opening” flag in the integration settings. With the flag enabled, the integration generates an ad-hoc Workday position from the Ashby Opening at the time a candidate gets pushed to Workday.
Here’s a set of minimal offer form fields that need to be enabled (and filled out in the offer form) to successfully create a position and send a hired candidate to Workday in this scenario:
- For creating the position:
- Supervisory Organization: The organization selected here will be used as both the organization to create the position and the organization the candidate is hired into
- Company Assignment: Depends on company settings
- Cost Center
- For initiating the `Hire Employee` business process:
- Location
- Job Profile
- Time Type
- Employee Type
It’s recommended to make all the above fields required through Custom Field settings.
For customers that are already in the process of implementing the integration, FAQs can be found below. Please make sure to reach out to your implementation partner with any questions.
### Post-hire changes
Sometimes, changes need to be made to an event that has already been sent to Workday. There are a few ways to process these changes:
- If the Staffing event (Hire, Change Job, or Contract Contingent Worker) is still in progress, you can Deny or Cancel the event.
- If the Staffing event is completed and the change is small (e.g. start date change), you can Update the Offer in Ashby and then correct the event in Workday separately.
- If the Staffing event is completed and then change is big enough to warrant a full rescind, you can Update the Offer in Ashby, rescind the event in Workday, then push the event again from Ashby.
- To send the event again from Ashby, click the More menu in the top right of the Job Consideration, then open the task **Add Candidate to HRIS**. This will allow you to select Workday and send the Staffing event again.
- When re-sending the event to Workday, Ashby will only send the Hire, Change Job, or Contract Contingent Worker event. If the hiring scenario was for a conversion where another event was sent from Ashby (e.g. a Termination or an End Contingent Worker Contract event), Ashby will NOT attempt to send the Termination or End CW Contract event again. The best practice is to Correct the Termination or End CW Contract event in Workday (not rescind it), then push the Hire, Change Job, or Contract Contingent Worker event again from Ashby. If you rescind the End CW Contract or Termination event in Workday, you will need to manually replace it before attempting to add the candidate again from Ashby, or you will get an error that the applicant is already hired.
## FAQ
::::::ExpandableHeading
### Can I set an approval chain via the API?
:::hint{type="info"}
For more on manually creating approval processes, please check out [Creating and Editing Approval Processes](docId\:e-YBlrBjIGpkXpXJELyJo)
:::
:::::VerticalSplit{layout="middle"}
::::VerticalSplitItem
When creating an approval, you have the option to set it to be managed via the API if you are on the Enterprise plan.
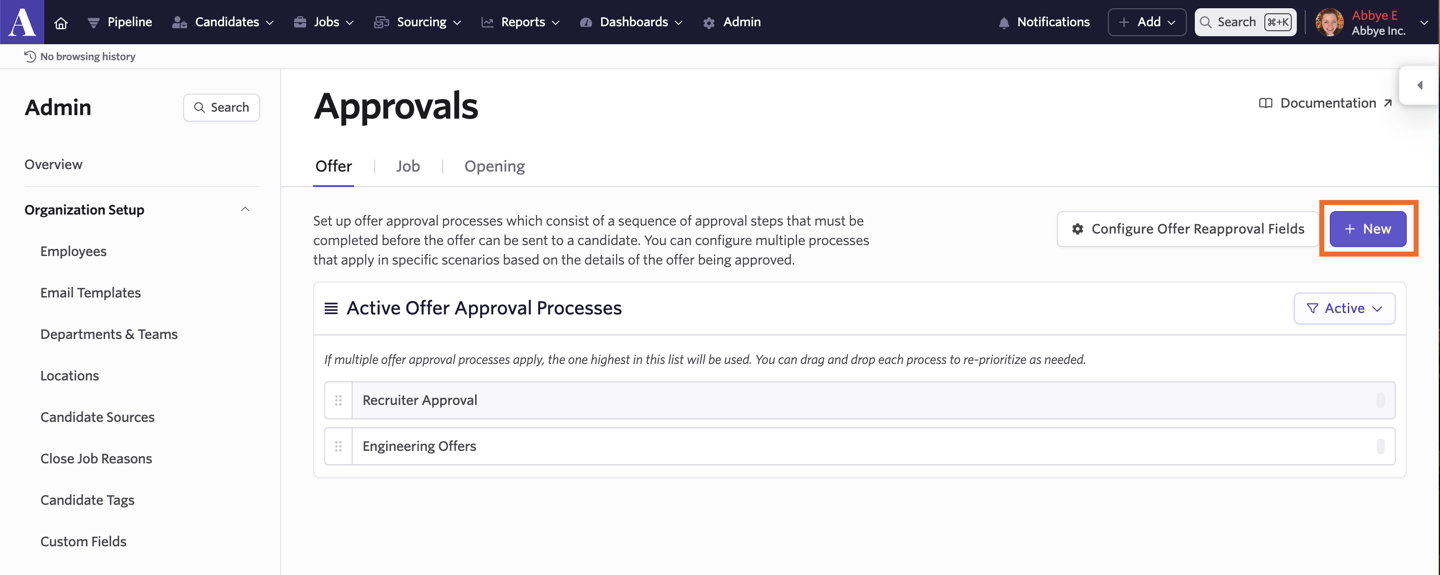
To create an approval within Ashby, head to [Admin>Organization Setup>Approvals](https://app.ashbyhq.com/admin/organizational-settings/approvals/offer) and click `+ New`.
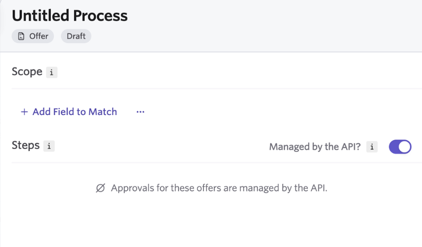
Toggle on the Managed by the API? option in the Steps section. You can opt to set up criteria within the scope section if only offers who meet a certain criteria should be managed via the API.
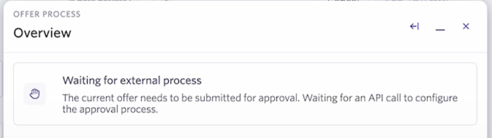
From now on, when an offer is created and submitted, a Waiting for external process message will show in the offer overview. This means that Ashby is waiting for an approval chain to be submitted via an API call.
:::hint{type="info"}
To pull data via the API to update the approval chain, you can use the approvalDefinition.update request. More on this [here](https://developers.ashbyhq.com/reference/approvaldefinitionupdate).
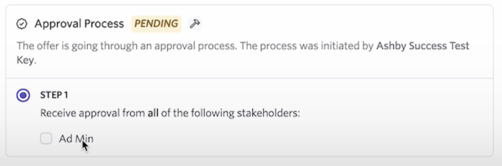
Once the approval chain has been received from Workday, the approval steps will be added to the offer
:::
::::
:::VerticalSplitItem
:::
:::::
::::::
:::ExpandableHeading
### My Open in Workday links aren’t working for the objects (jobs, openings, locations, etc) I’m syncing with Workday - is there a way to update the tenant URL?
Yes. Within your Workday integration settings in Ashby, click the pencil icon beside `Access Settings`. Add your URL to the Workday Tenant URL field to override the URL currently being used.
:::
:::ExpandableHeading
### The sync status is showing a Last Completed Sync from over an hour ago. What could be the problem?
If your Workday HRIS sync is in an error state, Ashby Support will reach out to you within 4 hours with specific troubleshooting steps for your Ashby instance. Common issues include:
1. Access Settings > Webservice Endpoint URL: this URL should end with /ccx/service and have no additional text after that.
1. To resolve: Remove any additional text.
2. Access Settings > REST API Base URL: this URL should end with .com and have no additional text after that.
1. To resolve: Remove any additional text.
3. Access Settings > Tenant Name: this field is case sensitive.
1. To resolve: from your Workday homepage, confirm that the Tenant Name in Ashby exactly matches what is between .com/ and /d/ including the case.
4. Confirm that the REST API Client ID, REST API Client Secret, and REST API Refresh Token are correctly entered.
1. To resolve: in Workday, open the View API Clients task, then under API Clients for Integrations, locate the Ashby ISU. You will find the Client ID and Refresh Token in the grid. You won't be able to view the Client Secret from the grid, but can generate a new one using the related actions. Reenter all 3 of these pieces of information into Ashby and click Update to ensure all three are saved together.
5. Confirm that the ISU password and authentication method are allowed for your tenant. To resolve: In Workday, run the task Signons and Attempted Signons for the Ashby ISU.
1. If there is an error for "Invalid for Authentication policy", update the Authentication Policy to allow the ISU to sign in using a Username and Password. Open the task Manage Authentication Policies and click Edit. Add a row for the Ashby ISU for Authentication Conditions = Any and Allowed Authenticaiton Types = User Name Password. Click OK to save the changes, then open the task Activate All Pending Authentication Policy Changes and submit to activate the changes.
2. If there is an error for "Invalid Username or Password", update the ISU password. In Workday, open the task Edit Workday Account for the Ashby ISU, create a new password and ensure the Require New Password at Next Sign In is de-selected. Then click Submit, and in the Ashby access settings, update the ISU Password to the new one. If the password has expired, you can use the task Maintain Password Rules to exempt the Ashby ISU from password expiration to prevent the issue from re-surfacing.
3. If there is an error that the "Account is Locked Out", you need to unlock the account. In Workday, open the task Manage Workday Accounts. Select Unlock Workday Accounts, and select the Ashby ISU. Click OK to complete the unlock.
:::
:::ExpandableHeading
### Help! I received an error when attempting to add the candidate to Workday. How can I resolve the issue?
Ashby will surface the exact error message from Workday in the UI under the button you clicked to `Add Candidate Data`. It also logs that there was an attempt to push the event to Workday, that it failed, and the date/time stamp of the push attempt.
You can set up a [Alerts](docId\:fCkR-kKHNMJZ6vuU3kRvW) to notify a person or channel in email or Slack - use the fields `Workday Latest Hire Push Status` and `Workday Latest Hire Push Attempted At` to configure the alert.
You can also enable the Opt-In Feature for the `AI-Assisted HRIS Error Explainer` which will give you further information about the error. Once this feature is enabled, from the `More` menu of the Job Consideration, locate the task `View External Pushes` and you will see the Explain Error button.
[Here is a Loom demo](https://www.loom.com/share/bae44fbab935430b9e876e349bc56ab9) of the error explainer in action! If you and your HRIS team are unable to troubleshoot the issue, please contact [support@ashbyhq.com](mailto\:support@ashbyhq.com) and our Support team would be happy to assist you with resolution.
:::