---
title: Openings Management
slug: openings-management
docTags: Vf2qheORpv3iluTbL7oWa,O4aR5L8r-VGakk42TosRy,0rmTVv3T3PSJ5bMimkXK_,g9-Hbw2PSmdObfPvr23WA,33FVdn-4NB6Kw3LIHvIon
createdAt: 2025-07-10T11:57:32.687Z
---
Openings in Ashby let you set up and track individual positions linked to your jobs, so you can manage multiple hires under a single job without creating duplicate jobs. They're especially useful for evergreen roles, where you can track the opening and closing date of each position independently while keeping the same job open.
Headcount planning is essential to achieving operational excellence in hiring. Openings help your team understand whether you have the knowledge and skills needed to achieve your goals, reduce costs on hiring workflows that don't yield results, and accurately track open headcount and hiring metrics at the individual position level.
This article covers how to enable and configure openings, create and manage them, link them to jobs and offers, and report on hiring progress.
:::hint{type="info"}
Learn the full openings workflow in our [Managing Openings in Ashby](https://academy.ashbyhq.com/course/manage-openings) course. It walks through jobs vs. openings, openings setup, approvals, linking openings to jobs and hires, and reporting on headcount and time to fill.
:::
# Permissions & access
Openings Management is available on the Legacy Plus, Plus, and Enterprise plans:
| Foundations | Legacy Plus | Plus | Enterprise |
| ----------- | ----------- | ---- | ---------- |
| ❌ | ✅ | ✅ | ✅ |
The table below outlines the roles that have access to configure openings settings and set up openings.
| Access Role | Has access to enable/configure opening settings? | Can see openings (for departments and jobs they have access to)? | Can create an opening? | Can link an opening to a job? |
| -------------------------------------------------------------- | ------------------------------------------------ | ---------------------------------------------------------------- | ---------------------- | ----------------------------- |
| Limited Access | ❌ | ❌ | ❌ | ❌ |
| Agency Users | ❌ | ❌ | ❌ | ❌ |
| Elevated Access - External Recruiter (not linked to an agency) | ❌ | ✅ \* | ✅ \* | ❌ |
| Elevated Access - Analyst | ❌ | ✅ \* | ✅ \* | ❌ |
| Elevated Access - Hiring Team Member | ❌ | ✅ \* | ✅ \* | ❌ |
| Elevated Access - Hiring Manager | ❌ | ✅ \* | ✅ \* | ❌ |
| Elevated Access - Admin | ❌ | ✅ \* | ✅ | ✅ |
| Elevated Access - Admin Private | ❌ | ✅ \* | ✅ | ✅ |
| Organization Admin | ✅ | ✅ \* | ✅ | ✅ |
:::hint{type="info"}
\*If you provide a user with *Manage Openings* access as part of their permissions, they can see all openings for the jobs and departments they have access to, along with any openings that aren't linked to a job. Users with Manage Openings permissions can also create openings. For more, see [Additional User Permissions](docId\:MHy0TXb4sxnqYe9XKvN8e).
If the user does not have *Manage Openings* set as part of their permissions, they can see openings linked to the jobs they've been given access to. Team or department assignment alone does not grant visibility to standalone openings. If *Manage Openings* is not enabled within their permissions, the user cannot see openings that aren't linked to any jobs.
Only Organization Admins can configure openings settings, but Elevated Access users with the *Manage Openings* permissions can create an opening and link it to a department. Only those with Elevated Access - Admin Access or higher can link an opening to a role that they have access to.
:::
# Overview
Watch the video below for an overview of openings in Ashby, or follow the steps in this article.
::loom{url="https://www.loom.com/embed/2a3557fcda8a492091379b3725bd1729"}
# Openings: best practices
Openings allow you to ensure that hiring only happens against approved headcount.
To that end, follow these best practices:
- When you are actively hiring for a job, link it to at least one approved opening.
- Whenever you make a hire, create the offer in Ashby and link it to an approved opening (if you enable Strict Mode, Ashby requires this).
:::hint{type="info" indent="1"}
For more on creating offers and sending them out to candidates, see [Offers and Offer Letters](docId\:KLIMfx9N1tAhEBVkMGPOh).
:::
- We recommend inputting your forward-looking hiring plan into Ashby (for example, for the next quarter or next half year). You can input openings as `Approved` but not `Open` just yet. You can input openings ahead of opening the corresponding jobs (often, you know you want to hire for a certain role, but it's far enough out that you don't have a job description yet and haven't completed an intake meeting).
- Mark an opening as `Open` as soon as you actively start hiring for it. This allows you to track time-to-fill accurately (the time from when a specific opening was opened to when it was filled with a hire) on the opening level, allowing for accurate reporting.
# Enabling openings in Admin
To enable the openings feature:
1. Navigate to **Admin > Jobs & Applications > Openings**.
2. Toggle on the `Enable Manual Opening Management` option.
3. Configure the additional options to suit your organization. Settings are described in the bullet points below.
::Image[]{src="https://api.archbee.com/api/optimize/0p8tQ--ZZOxRtkVp6Qr-e/9BLIFId8Icz9Xz-aazIUb_openings-ashby-2026-08-18-at-30154-pm.png" size="100" isUploading="false" width="1298" height="1566" darkWidth="1298" darkHeight="1566" alt="screenshot of some of the settings under the Openings admin area" showCaption="false" indent="1"}
:::Paragraph{listStyleType="disc" indent="2"}
**Enable Manual Opening Management** - use this to enable/disable the openings feature for your organization.
:::
:::Paragraph{listStyleType="disc" indent="2"}
**Opening Identifier Prefix** - you can append an opening identifier to the beginning of the automatically generated numeric value.
:::
:::Paragraph{listStyleType="disc" indent="2"}
**Next Opening Identifier Number** - add the next opening identifier here (if you want it to start on a specific number).
:::
:::Paragraph{listStyleType="disc" indent="2"}
**Require Openings for Jobs** - when toggled on, your team is required to link openings when opening new jobs. We recommend leaving strict mode off while setting up openings so your team isn't blocked.
:::
:::Paragraph{listStyleType="disc" indent="2"}
**Require Openings for Hires** - when toggled on, offers can't be generated and candidates can't be moved to the Hired stage without having an opening attached to their offer.
:::
:::Paragraph{listStyleType="disc" indent="2"}
**Enable Requisition ID on Jobs**: When Openings Management is enabled, the Requisition ID field on a job's **Settings** tab is hidden by default (since Openings are the recommended way to track headcount). Toggle this on if you need to retain the Requisition ID field — for example, if you're mid-transition from using Req IDs or have a custom integration that relies on this field. This is uncommon.
The below fields appear when this setting is enabled:
:::
:::Paragraph{listStyleType="disc" indent="3"}
**Auto-Name Job Requisition Identifiers?** - If enabled, job custom requisition identifiers are automatically generated.
:::
:::Paragraph{listStyleType="disc" indent="3"}
**Job Requisition Identifier Prefix** - If enabled, confirms the prefix to be used for job requisition identifiers when creating a new job.
:::
:::Paragraph{listStyleType="disc" indent="3"}
**Next Requisition Identifier Number** - If enabled, confirms the next number to be used in job requisition identifiers when creating a new job.
:::
:::Paragraph{listStyleType="disc" indent="2"}
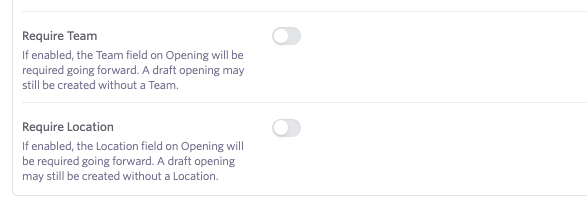
**Require Team** - If enabled, the Team field on Opening is required going forward. A draft opening may still be created without a Team.
:::
:::Paragraph{listStyleType="disc" indent="2"}
**Require Location** - If enabled, the Location field on Opening is required going forward. A draft opening may still be created without a Location.
:::
# Create openings
:::hint{type="info"}
If you set up an opening, it defaults to draft mode. This allows you to create future openings without linking them to a job and open them immediately.
:::
## Create a draft opening on the Openings page
To create an opening on the Openings page:
1. Navigate to **[Jobs > Openings](https://app.ashbyhq.com/openings)**.
2. Click `Create Opening` in the top right corner of the page.

3. Fill out the form and click `Create Draft`.
::Image[]{src="https://cdn.zappy.app/ca8c5839cf6b9b1359320e9b231d1c30.png" size="70" width="700" height="694" darkWidth="700" darkHeight="694" position="center" showCaption="false" alt="Shows the opening details form with the Create Draft button in the bottom right."}
## Create a draft opening on a specific job
To create an opening for a specific job:
1. Navigate to the **Openings** tab of the job.
2. Click `Create Job Opening` in the top right corner of the page.
3. Fill out the form and click `Create Draft`.

## Create a draft opening via the top navigation bar
1. Click the `+ Add` button on the top navigation bar and select `Opening`.
2. Fill out the form and click `Create Draft`.
Watch the video below for a walkthrough of this process, or refer to the steps above.
::loom{url="https://www.loom.com/embed/d45d440a35c946e68c1d0e17751925ca"}
:::hint{type="info"}
You can also import openings. For more, see [Bulk Import Options](docId\:SORNCJ66lgHRfLrAcXETJ).
:::
## Approving and setting openings as open
To approve or start the approval process for a draft opening, click the `Draft` status dropdown within the opening details.
If there's an approval process in place, you see a `Create Approval Request` option. Click it to review the approval process and create an approval request.
::Image[]{src="https://api.archbee.com/api/optimize/0p8tQ--ZZOxRtkVp6Qr-e/lqdvLK6f8IsxOhW9pPMtg_opening-acent-ashby-2026-02-02-at-101809-am.jpg" size="60" alt="Shows the create approval request option that appears when an opening approval process is in effect." isUploading="false" width="862" height="382" darkWidth="862" darkHeight="382" showCaption="false"}
:::hint{type="info"}
For more on configuring approvals, see [Creating and Editing Approval Processes](docId\:e-YBlrBjIGpkXpXJELyJo).
:::
If there is no approval process configured with criteria matching that of the opening, you see the option to approve the opening when you click the `Draft` status. This applies the Approved status to the opening.
::Image[]{src="https://api.archbee.com/api/optimize/0p8tQ--ZZOxRtkVp6Qr-e/DR_gECcl28rZ82ifks8kQ_opening-acent-ashby-2026-02-02-at-102159-am.jpg" size="70" alt="Shows the Approve option under the status dropdown." isUploading="false" width="692" height="332" darkWidth="692" darkHeight="332" showCaption="false"}
After the opening is listed as Approved, click the `Approved` status within the opening details, then `Open` to open the opening and start hiring for it.

# View openings
## View all openings
To review all openings in one place, navigate to **Jobs > Openings**.
Options on this page include:

1. **Create Opening** - create a new opening in the results section of the page.
2. **Filter** - you can filter openings using opening fields.
3. **Saved Filters** - you can save filters to access a subset of your openings quickly.
4. **Results** - the full list of openings.
5. **Opening** - each row represents an opening. Click on the ID of an opening to view the details or to make any amendments, add details, or update the opening status.

## On a specific job
To view an opening on a specific job, navigate to the job, then click **Openings** in the left menu.
Organization Admins can create new openings from this page. Elevated Access users can add an existing opening to a job.
Options on this page include:

1. **Filter** - you can filter openings using opening fields.
2. **Saved Filters** - you can save filters to access a subset of your openings quickly.
3. **Add Existing Opening to Job** - apply an opening you've already configured to this job.
4. **Create Job Opening** - create a new opening for this role.
5. **Search** - search for specific openings if you have a long list.
6. **Opening** - each row represents an opening. Click on the ID of an opening to view the details.
# Use openings
:::hint{type="info"}
Once openings are created, they can be linked to jobs and candidates.
:::
## Open jobs and link to openings
If your organization requires jobs to be linked to openings, attach the approved opening when opening the job.
The `Open Job` screen displayed when you opt to open the job asks you to select an opening from the `Opening` drop-down.
If you link a draft opening to a job and then open the job, the opening automatically opens as well.

## Detaching an opening from a job
To remove an opening from a job, click on the opening in question, either from **Jobs > Openings** in Ashby or within the **Openings** section of the job.
In the **Jobs** tab, click the `X` on the role you'd like to remove the opening from.
::Image[]{src="https://api.archbee.com/api/optimize/0p8tQ--ZZOxRtkVp6Qr-e/uc0CSwtGQPcUzZw1vy4Ej_openings-re-draft-archbee-document-2026-02-02-at-95652-am.jpg" size="80" alt="Highlights the small X icon to remove a job from an opening." isUploading="false" width="1946" height="1104" darkWidth="1946" darkHeight="1104" showCaption="false"}
Want to attach the opening to a new job? Click the `Select Jobs` dropdown to select another job.
## Extend offers
When extending an offer for a job, you can link it to an opening. Once that opening is filled, you need to create a new opening on the job before extending any new offers.
:::hint{type="info"}
If you have `Require Openings for Hires` enabled within your Openings settings, you need to specify an opening when creating an offer.
:::
When adding an opening to an offer, ensure the opening is set to Open.
If the opening isn't directly linked to the job, switch off the `Only show openings of job?` option to choose from all openings with the Open status.
::Image[]{src="https://api.archbee.com/api/optimize/0p8tQ--ZZOxRtkVp6Qr-e/vCPiy2-EVnGMzzTfJZHGo_openings-re-draft-archbee-document-2026-02-02-at-95750-am.jpg" size="70" alt="Highlights the Only show openings of Job? toggle button." isUploading="false" width="1396" height="908" darkWidth="1396" darkHeight="908" showCaption="false"}
# Reporting on openings versus jobs
If you have openings enabled in Ashby, you have the option to report on them separately from jobs.
If you select `Openings` as the subject when setting up a custom report, each individual opening is reflected in the results.
If you set `Jobs` as the subject, data relating to the job the openings are linked to is displayed in the results.
## Reporting time to fill for openings
If you generate a Time to Fill for Openings report and have multiple openings for a single job, each opening represents the active filling of a position for that job.
The average is calculated from when the opening was first opened to when it was filled.

The report uses the dates openings were created and filled.
On the **Jobs Dashboard** in **Core Dashboards**, the time to fill report shows how long jobs have been open and how many hires were made against these jobs, and calculates a ratio.
# FAQ
### What fields are supported on openings?
::::VerticalSplit{layout="middle"}
:::VerticalSplitItem
- Opening ID
- Description
- Team
- Jobs
- Location
- Roles
:::
:::VerticalSplitItem
- Add Member
- Employment Type
- Is Backfill?
- Target Hire Date
- Target Start Date
- Compensation Range
:::
::::
### Can I set the Team and Location fields on my openings to be required?
You can, yes! Navigate to **Admin > Jobs & Applications >** **[Openings](https://app.ashbyhq.com/admin/organizational-settings/headcount-planning)**, then enable the `Require Team` and `Require Location` options.
Going forward, draft openings can be created without the required information but can't be moved out of their draft state until the required fields are completed.
### Is the compensation range visible to everyone?
Currently, all users who can see openings can also see the compensation range. We are still refining permissions and plan to change this.
### What's the difference between jobs and openings?
The table below outlines what is included in each and what you'd use them to capture.
| | **Jobs** | **Openings** |
| ------------------ | ---------------------------------------------------------------------------------------------------------------------------------------------------------------------- | ------------------------------------------------------------------------------------------------------------------------------------------------------------------------------------------ |
| **Include** | - The public job description
- The interview plan and all of its activities
- All active candidates under consideration for that job | - Your hiring plan (where one opening represents one open headcount)
- Which candidate was hired against which open headcount
- How long it took to fill an individual headcount |
| **Use to capture** | - The types of hires you want to make
- How you want to assess candidates for these types of jobs
- How you want to advertise these jobs on your career page | - Headcount information to accurately report on hiring goals, progress, and timing
- Get approval where needed when additional headcount is added to a plan |
### What about the Requisition ID field on a job's settings page?
Ashby supports a Requisition ID field on jobs to be compatible with some uncommon use cases.
The main reasons to use this field instead of openings are:
- For every job, you ever only make one hire.
- For organizations with custom integrations: you are integrating with a third-party system that is syncing headcount plans into Ashby and you want each of these headcounts to create a unique job.
:::hint{type="info"}
We recommend syncing third-party headcount data into openings instead of jobs.
:::
### What statuses are applied to openings?
You can view the status of an opening within the Status column, either when viewing openings across the company or on the job it's linked to.
::Image[]{src="https://api.archbee.com/api/optimize/0p8tQ--ZZOxRtkVp6Qr-e/qszYxRyJx2M4NiQ1v7Iqn_openings-management-archbee-document-2026-02-02-at-100107-am.jpg" size="60" alt="Highlights the status column on the Openings list page." isUploading="false" width="814" height="694" darkWidth="814" darkHeight="694" showCaption="false"}
An opening can have one of the following statuses:
- **Draft:** This opening is still in draft and can be opened, marked as approved, or submitted for approval (if approvals are required).
- **Approved:** The opening has been approved and is ready to open.
- **Open:** This opening can now be filled by a hired candidate.
- **Filled:** A candidate has been hired and has filled this opening.
- **Closed:** The opening has been closed out without a candidate being hired into it. This can be moved back to a *Draft* state if needed by clicking `More` when in the closed opening's details.
::Image[]{src="https://api.archbee.com/api/optimize/0p8tQ--ZZOxRtkVp6Qr-e/iMQbZqbgCEkblNarkyvq6_openings-management-archbee-document-2026-02-02-at-100155-am.jpg" size="70" alt="Highlights the More button in the upper right corner and the Restore option." isUploading="false" width="922" height="412" darkWidth="922" darkHeight="412" showCaption="false"}
- **Archived:** This opening is hidden from the default openings view and would need to be restored before it could be moved back to a draft state. To restore an archived opening, open the archived opening's details, click `More`, then `Restore`. You also have the option to delete an archived opening completely. You can delete an archived opening, but not an archived job.
### How do openings work when assigned to confidential jobs?
If the opening is only assigned to a job set as confidential, only those with access to the confidential job can see the opening.
If the opening is also linked to other non-confidential jobs, others can access the opening but won't see the confidential job linked to it.
### How do I configure close reasons for openings?
When you close out an opening, you are asked to provide a reason. Use the `Reason for closing` dropdown to assign a reason.
::Image[]{src="https://api.archbee.com/api/optimize/0p8tQ--ZZOxRtkVp6Qr-e/BscaYtknSWNPCEHcwX8SZ_opening-acent-ashby-2026-03-16-at-35539-pm.jpg" size="70" alt="Shows the window to close an opening and select a reason." isUploading="false" width="874" height="314" darkWidth="874" darkHeight="314" showCaption="false"}
Close reasons for openings pull from close job reasons in **Admin > Organization Setup > Close Job Reasons**.
If you do not have any reasons listed, navigate to **[Close Job Reasons](https://app.ashbyhq.com/admin/organizational-settings/close-job-reasons)** to set up reasons before closing out the opening.
### Why do openings appear after I enable manual opening management?
When manual opening management is off, Ashby creates and maintains an opening for each job in the background. Ashby uses these openings to attach offers and hires and to support opening-level reporting. The setting controls whether you manually manage and see openings. When you enable manual opening management, the background openings become visible in Ashby.